I managed to finish my Appleville quilt this week… another Project Linus finish for October. I started this quilt a week or so ago and it was a real challenge for me.
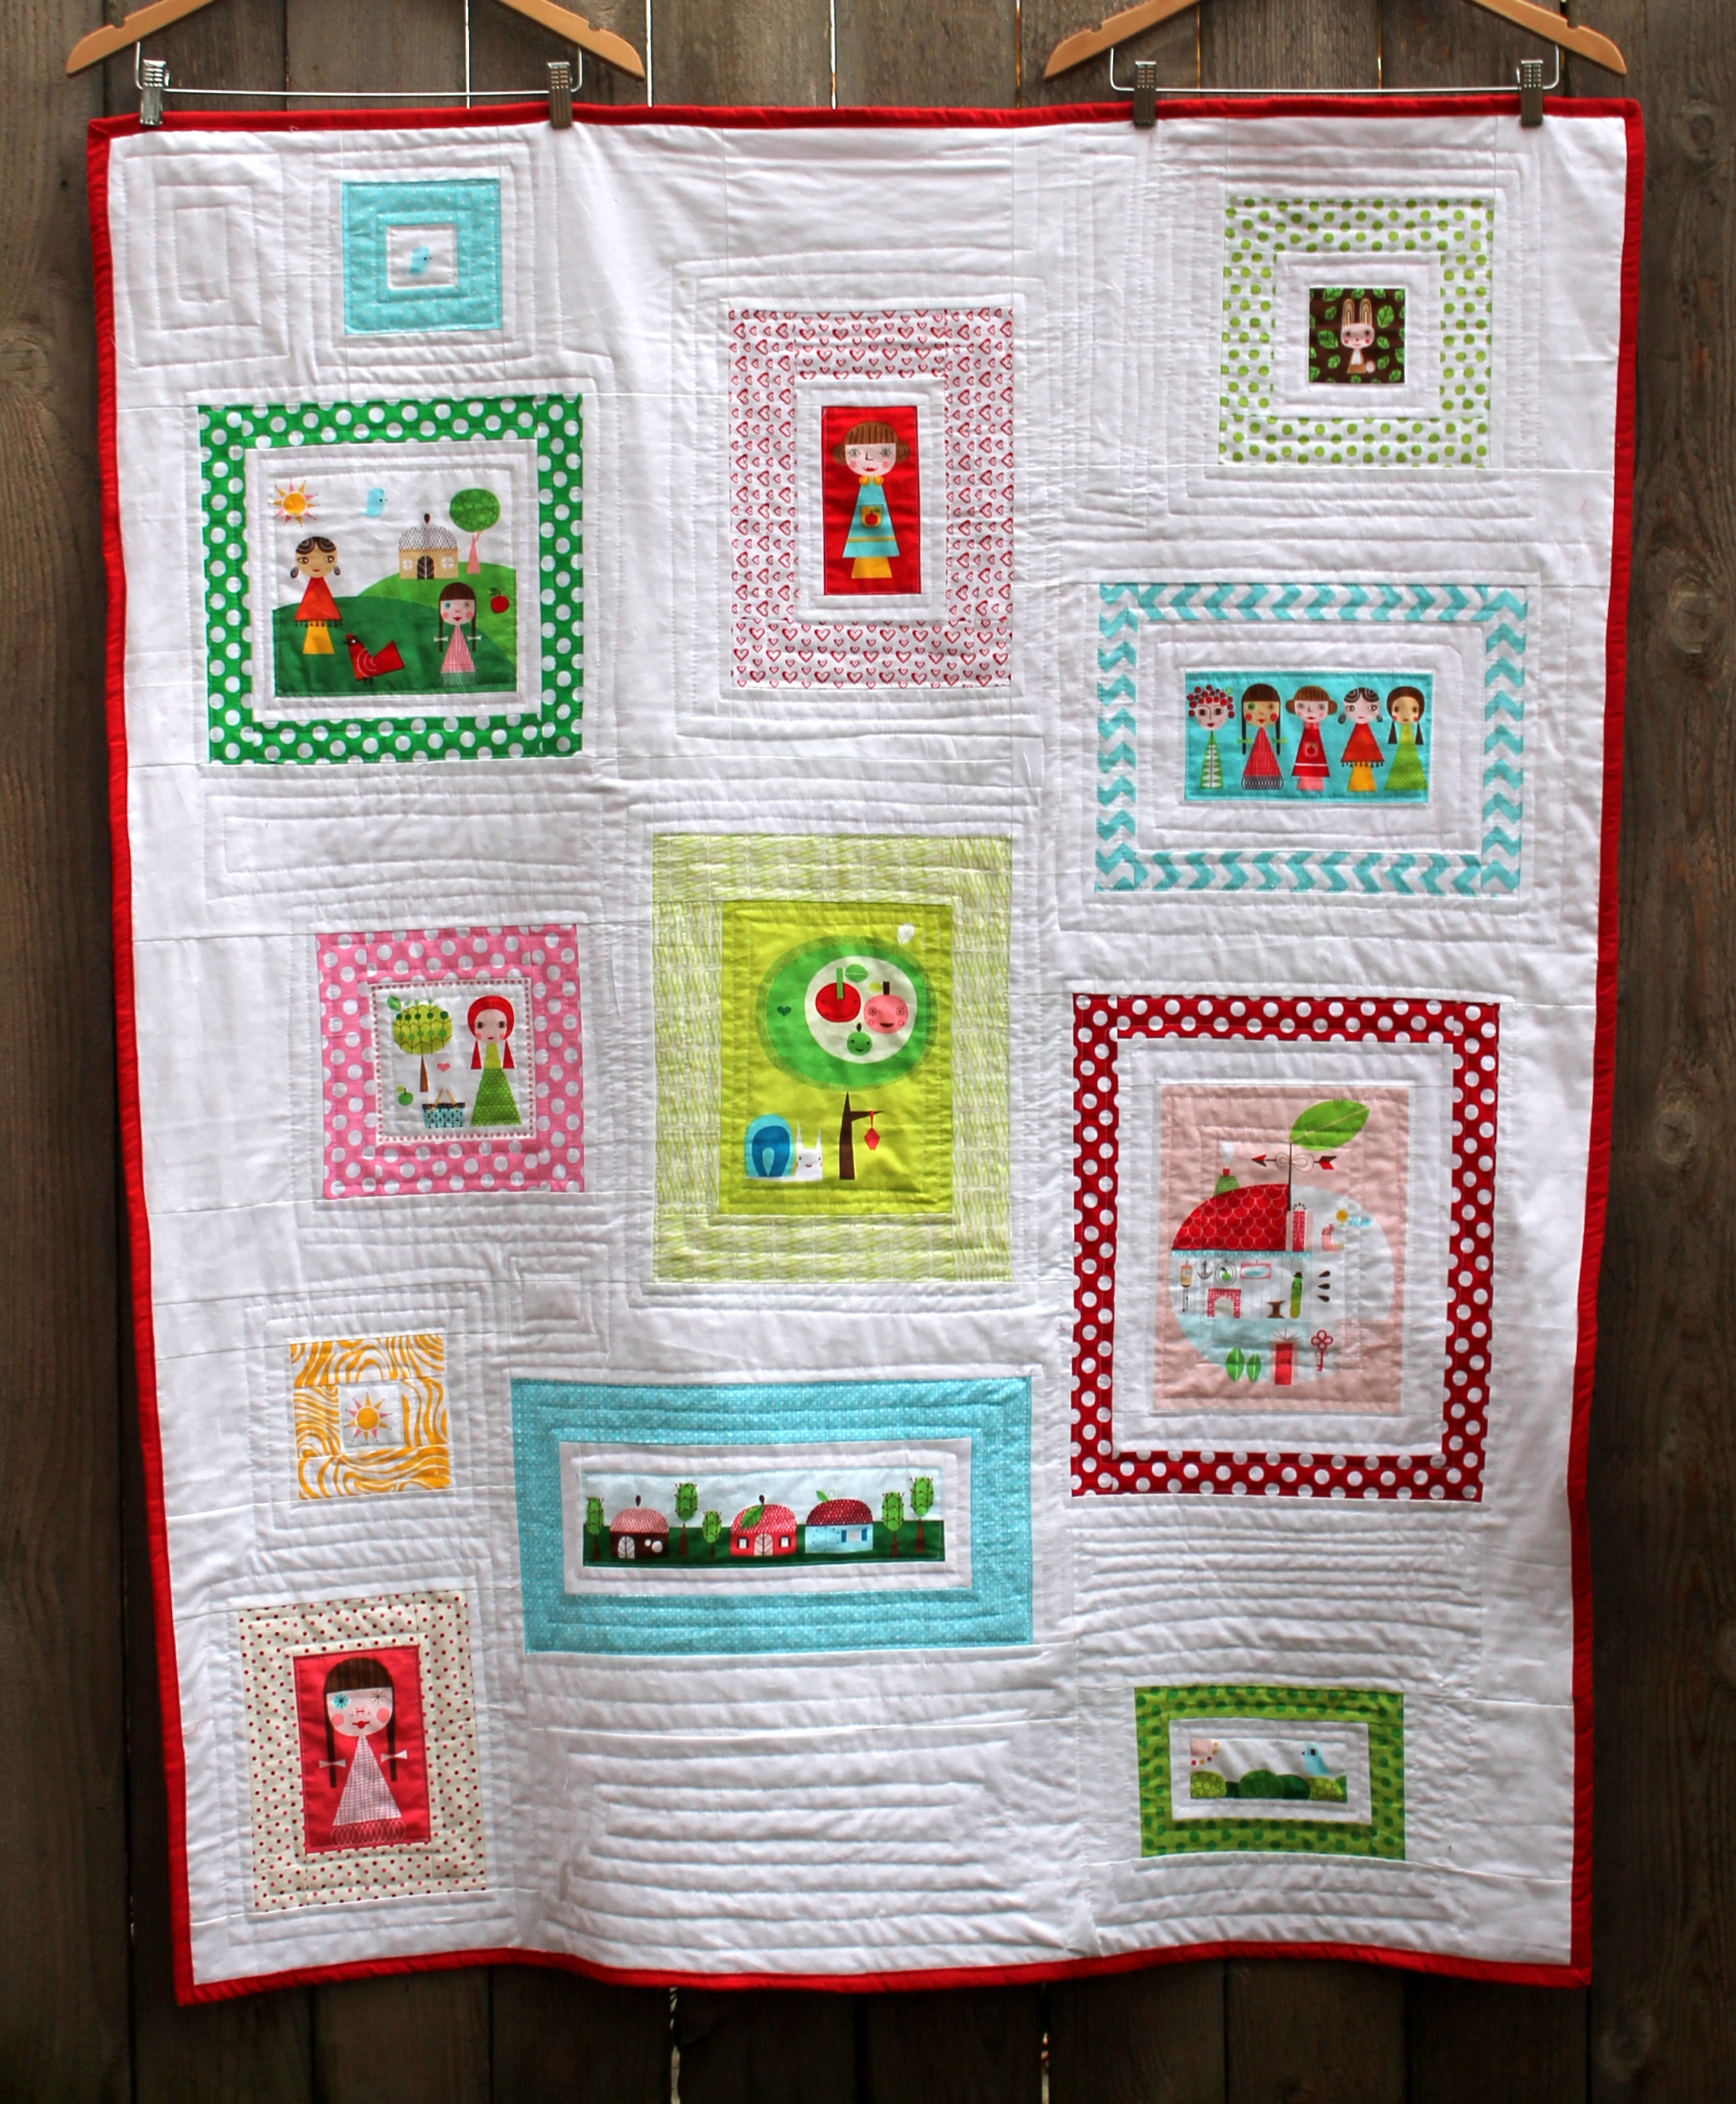
I was using a “cheater” panel for the first time and really wanted to highlight each of the individual illustrations somehow. Once I had worked out my colour scheme and pulled some appropriate supporting fabric from my stash, the individual blocks came together easily. My original post on the quilt was full of optimism. Then the struggle began for me with how to lay them out.
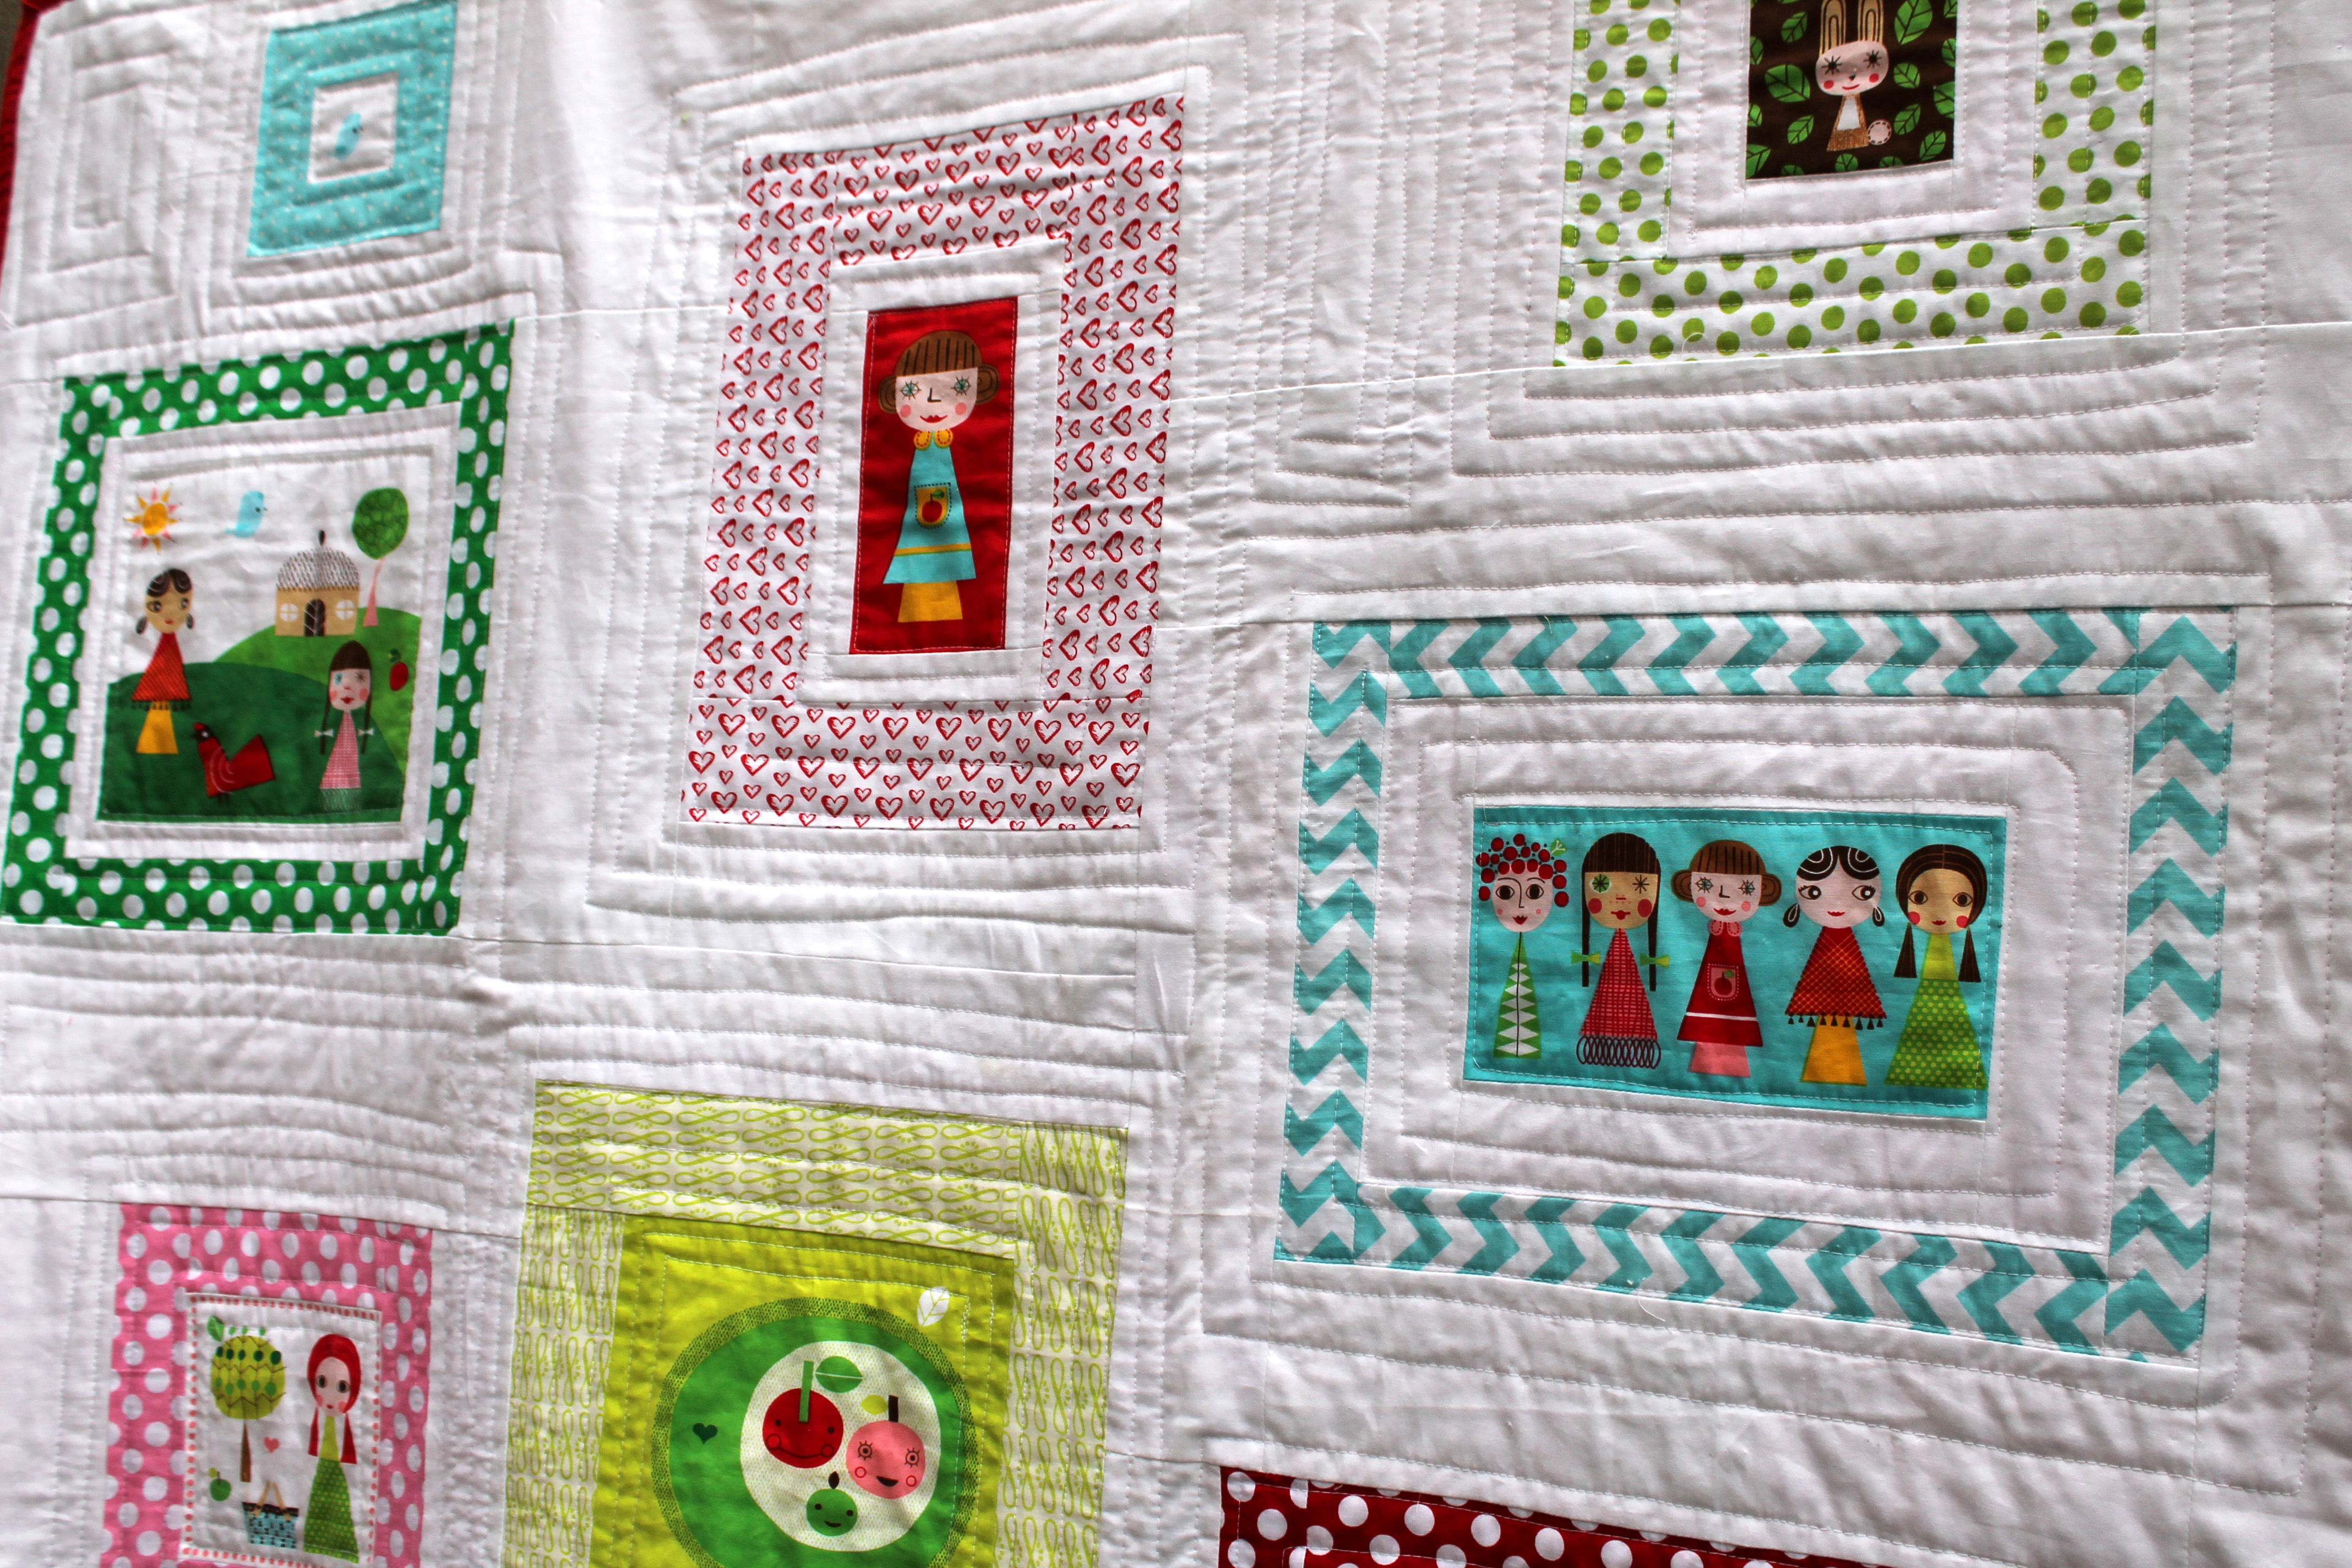
I had never worked with this much white/negative space before. My design wall was a blessing as I moved the blocks around trying to find a flow I liked. Once I had a layout I was happy with the real hard work began. It was like doing a jigsaw puzzle piecing in the white Kona cotton. The top part of the quilt took me ages to put together but by the bottom section I was an old pro. There are even some Y seams in this sucker (another first for me). I would love to hear from anyone who has advice, tricks or tips on doing this kind of piecing. I know I have a lot to learn.
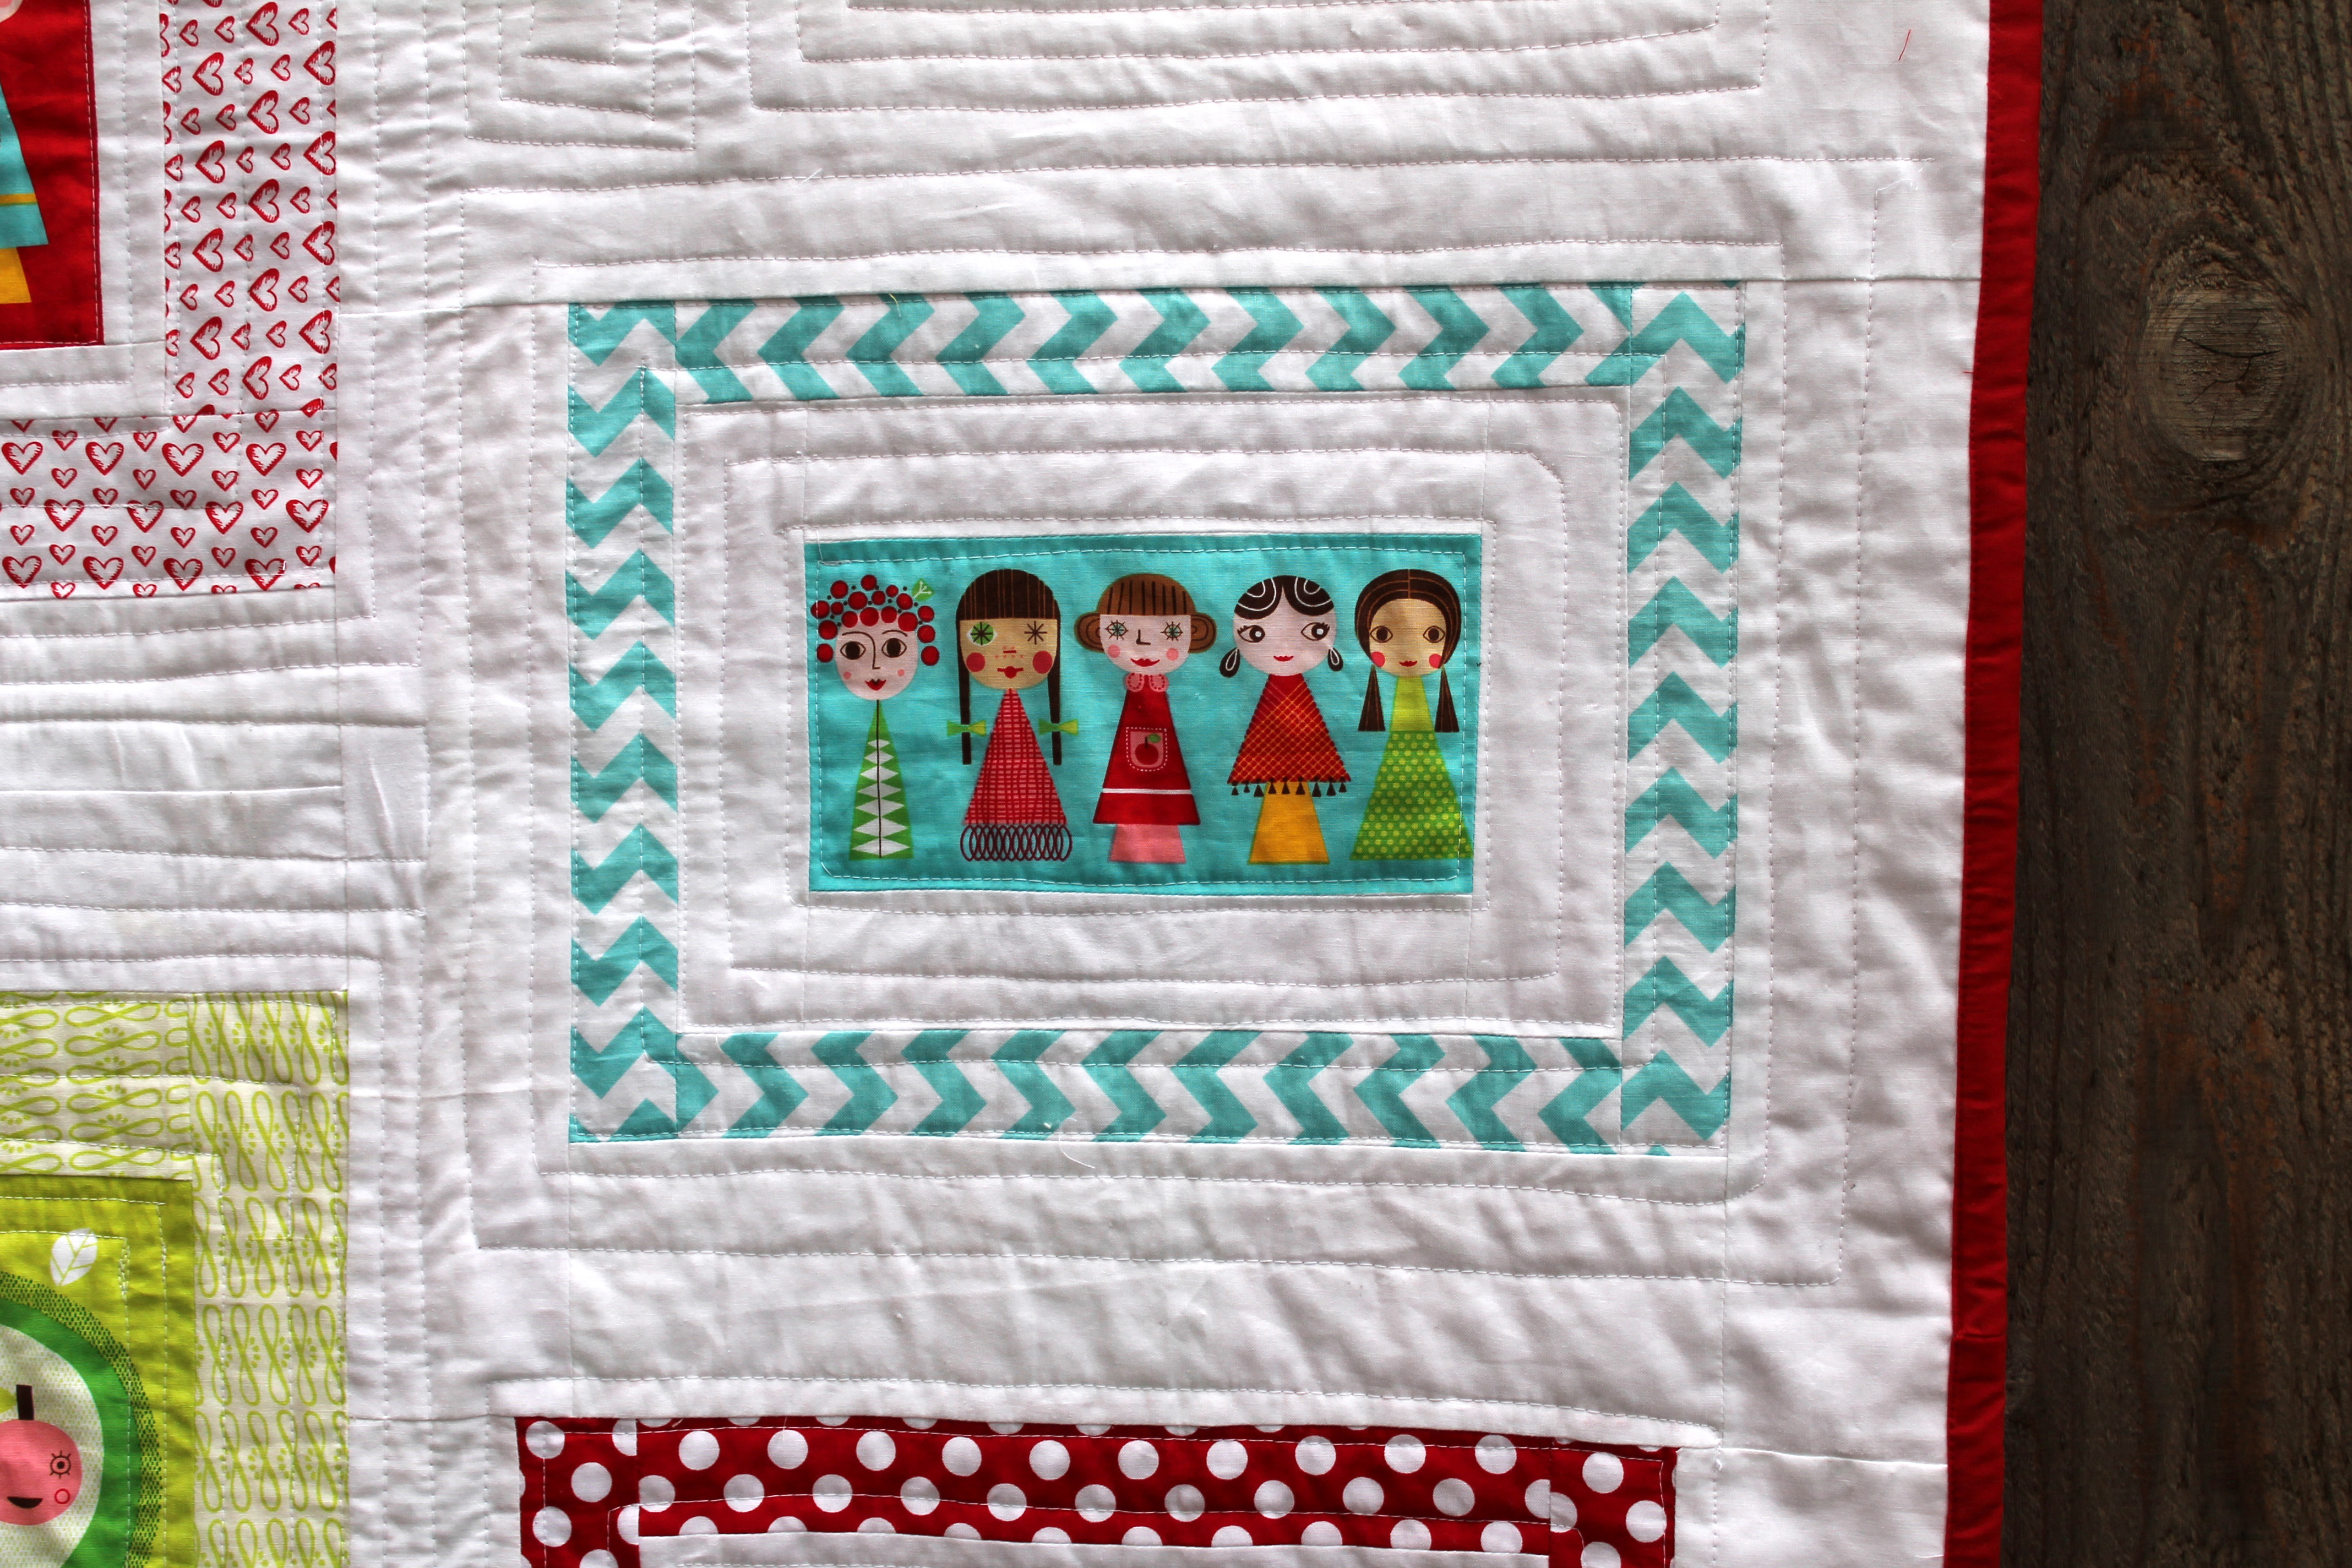
With the top all pieced I now had to fill all that negative space with quilting First off I tried some hand quilting in red thread – I liked it but my wrist is not healed enough to handle that much hand quilting at the moment…. so unpicking number one.
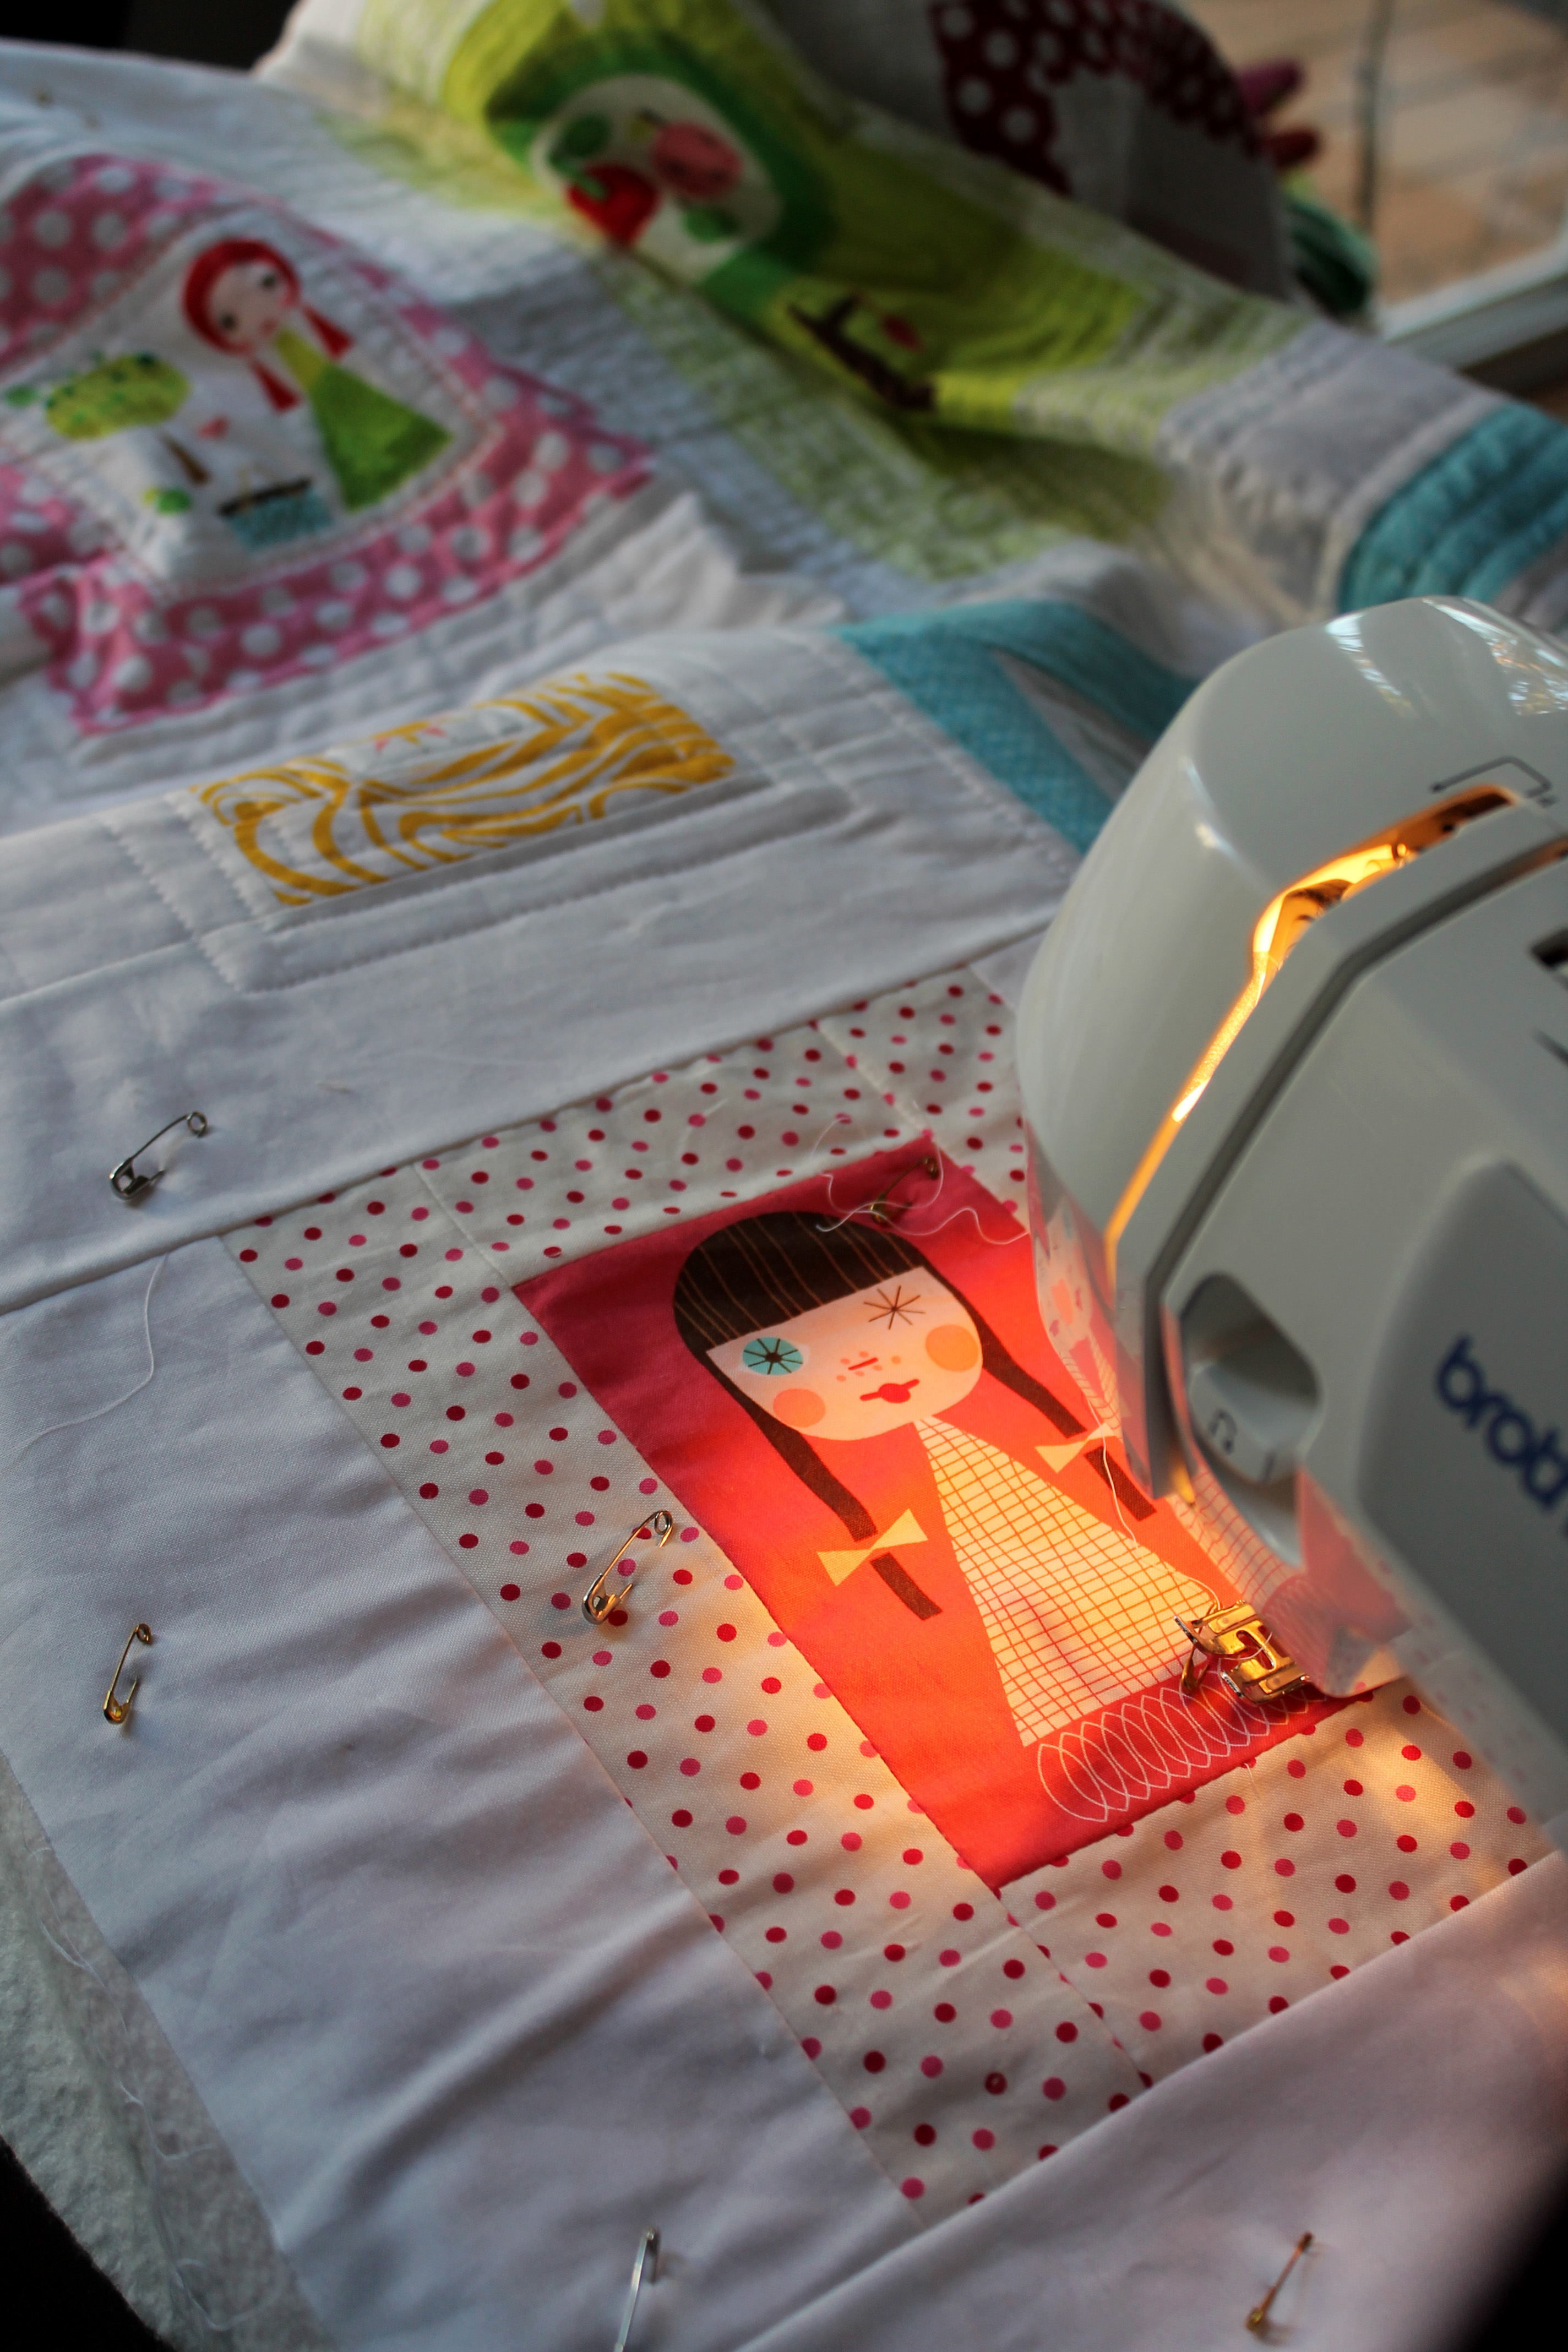 Then I quilted lines inside the blocks and tried a little free motion pebbles in the white space. I did not like it, and again my wrist was not up to that much pushing and pulling of fabric through the machine… unpicking number 2. In the end it was straight lines and boxes.
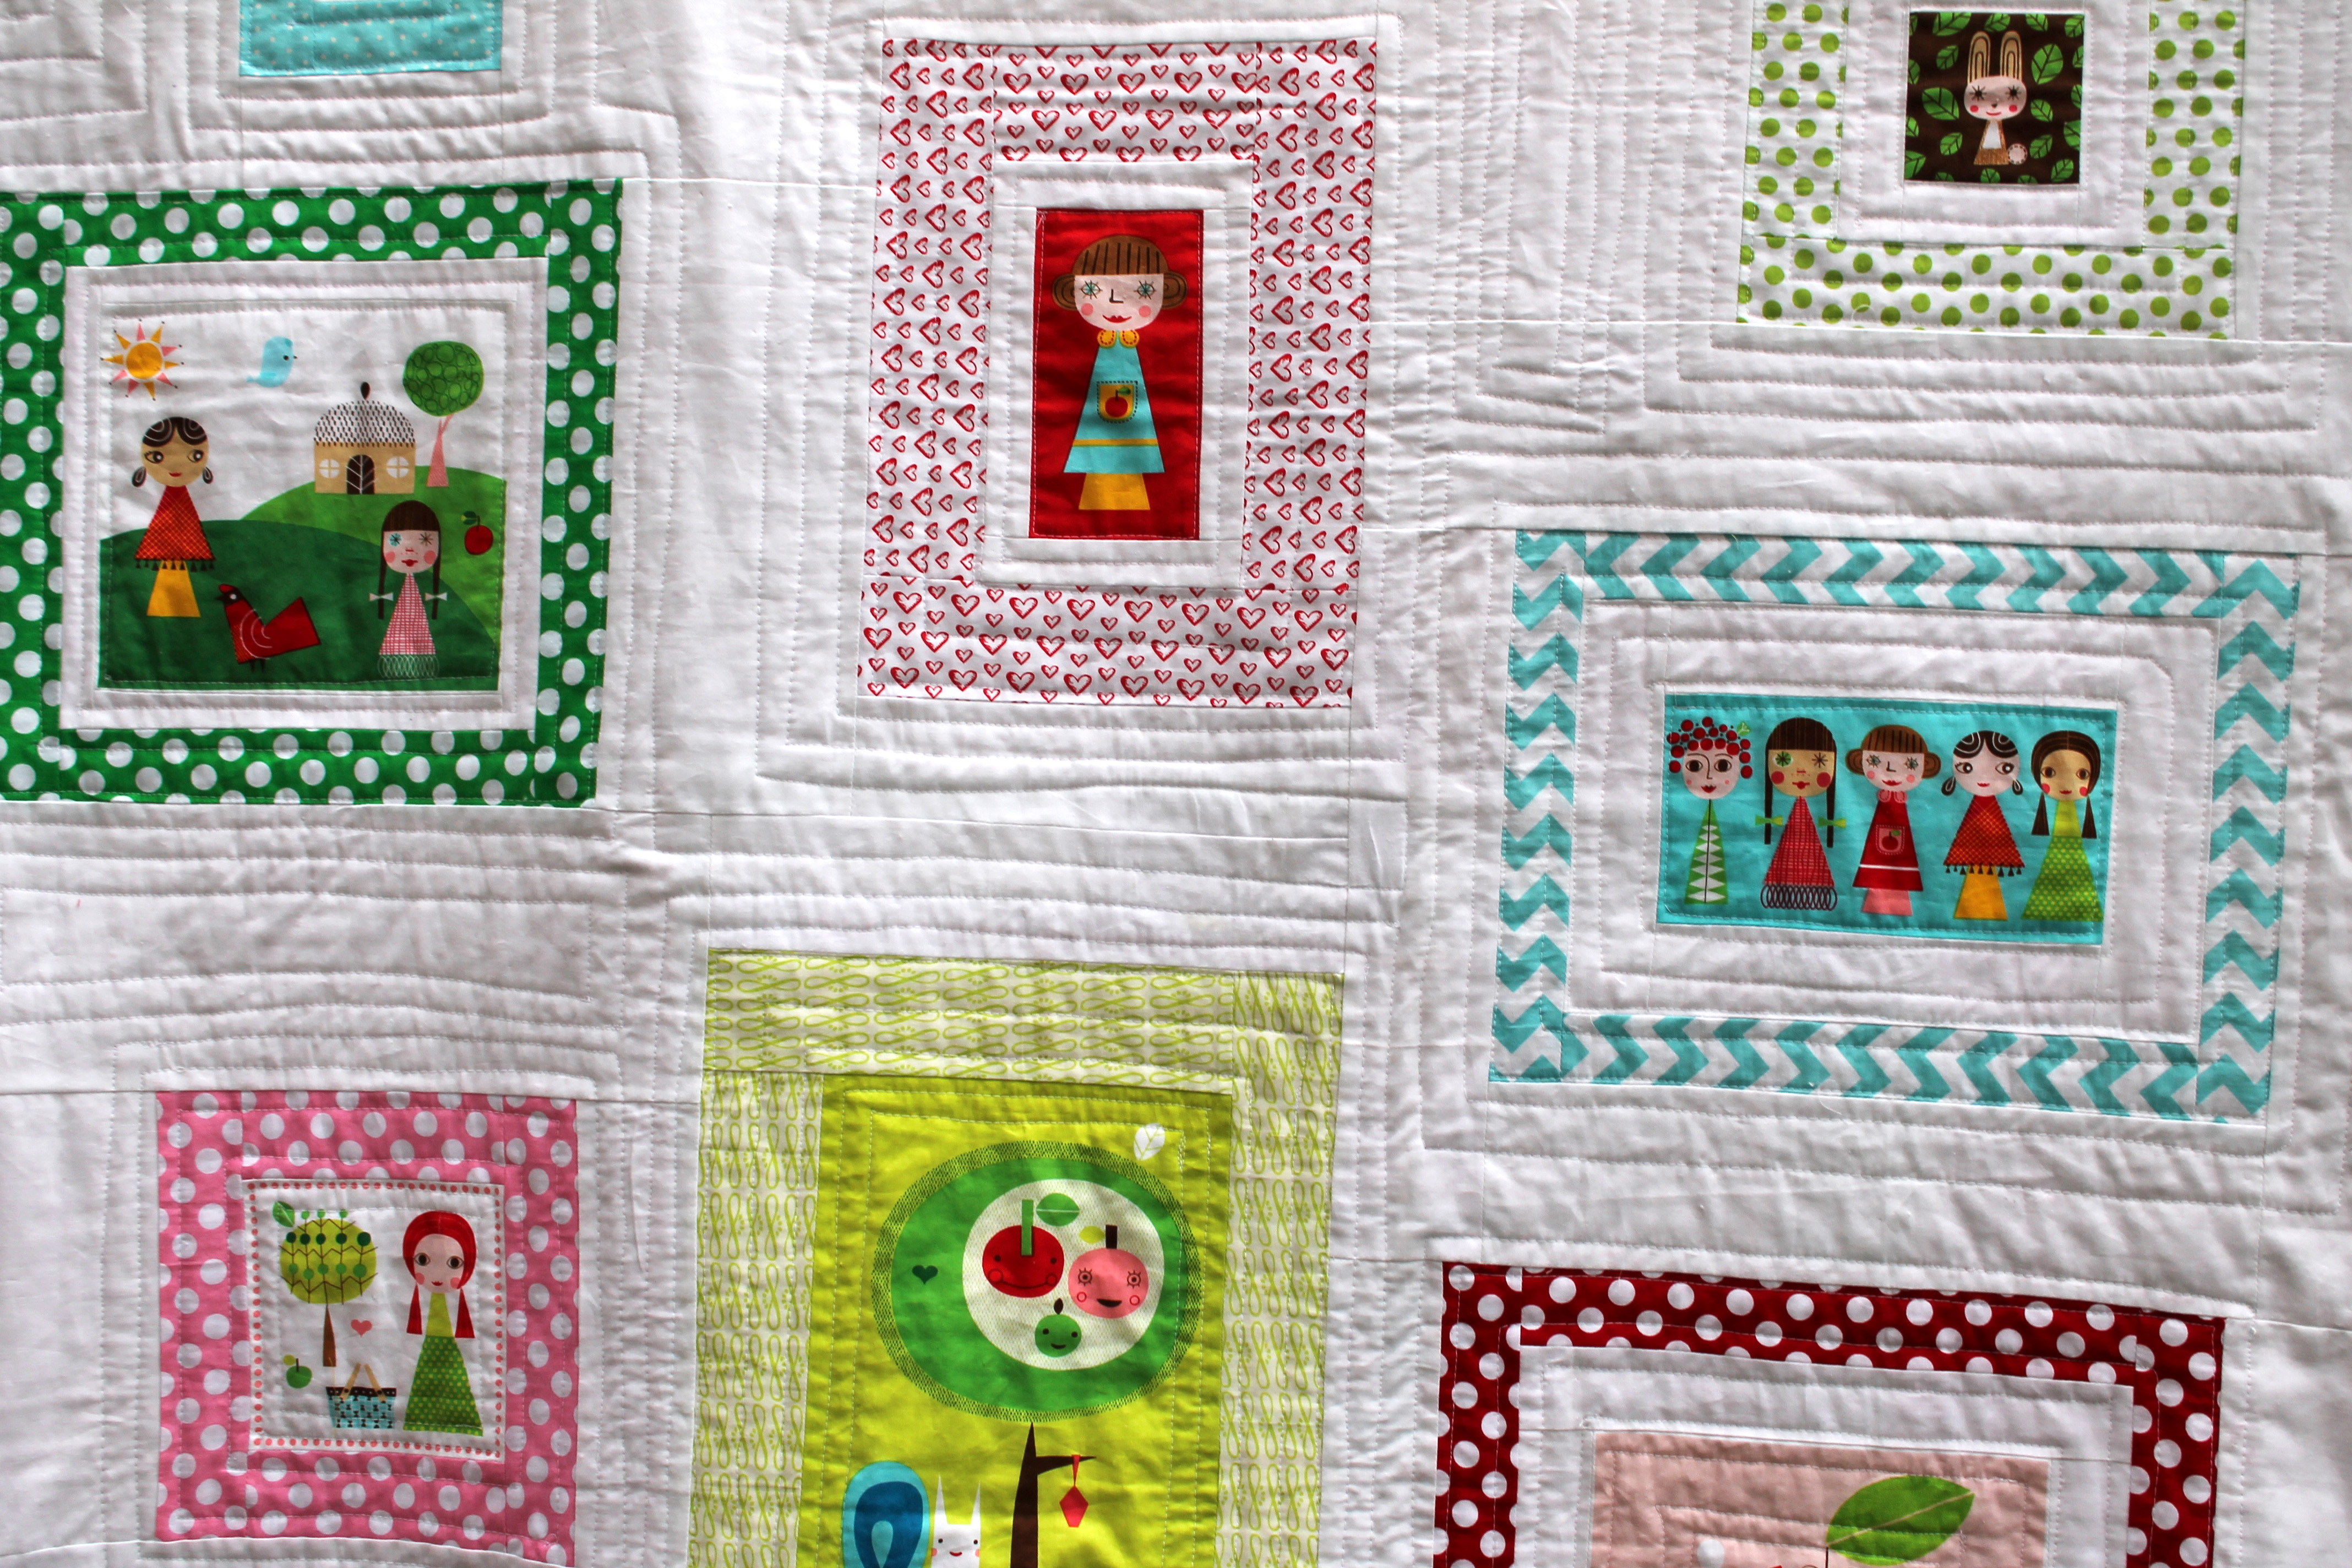
It does the job, but is not as beautiful as I would have liked. I am still coming to terms with my quilting shortfalls (which is my actual quilting) and my current physical limitations (my darn left wrist). I am chomping at the bit to do some proper free-motion quilting to build up my skills.
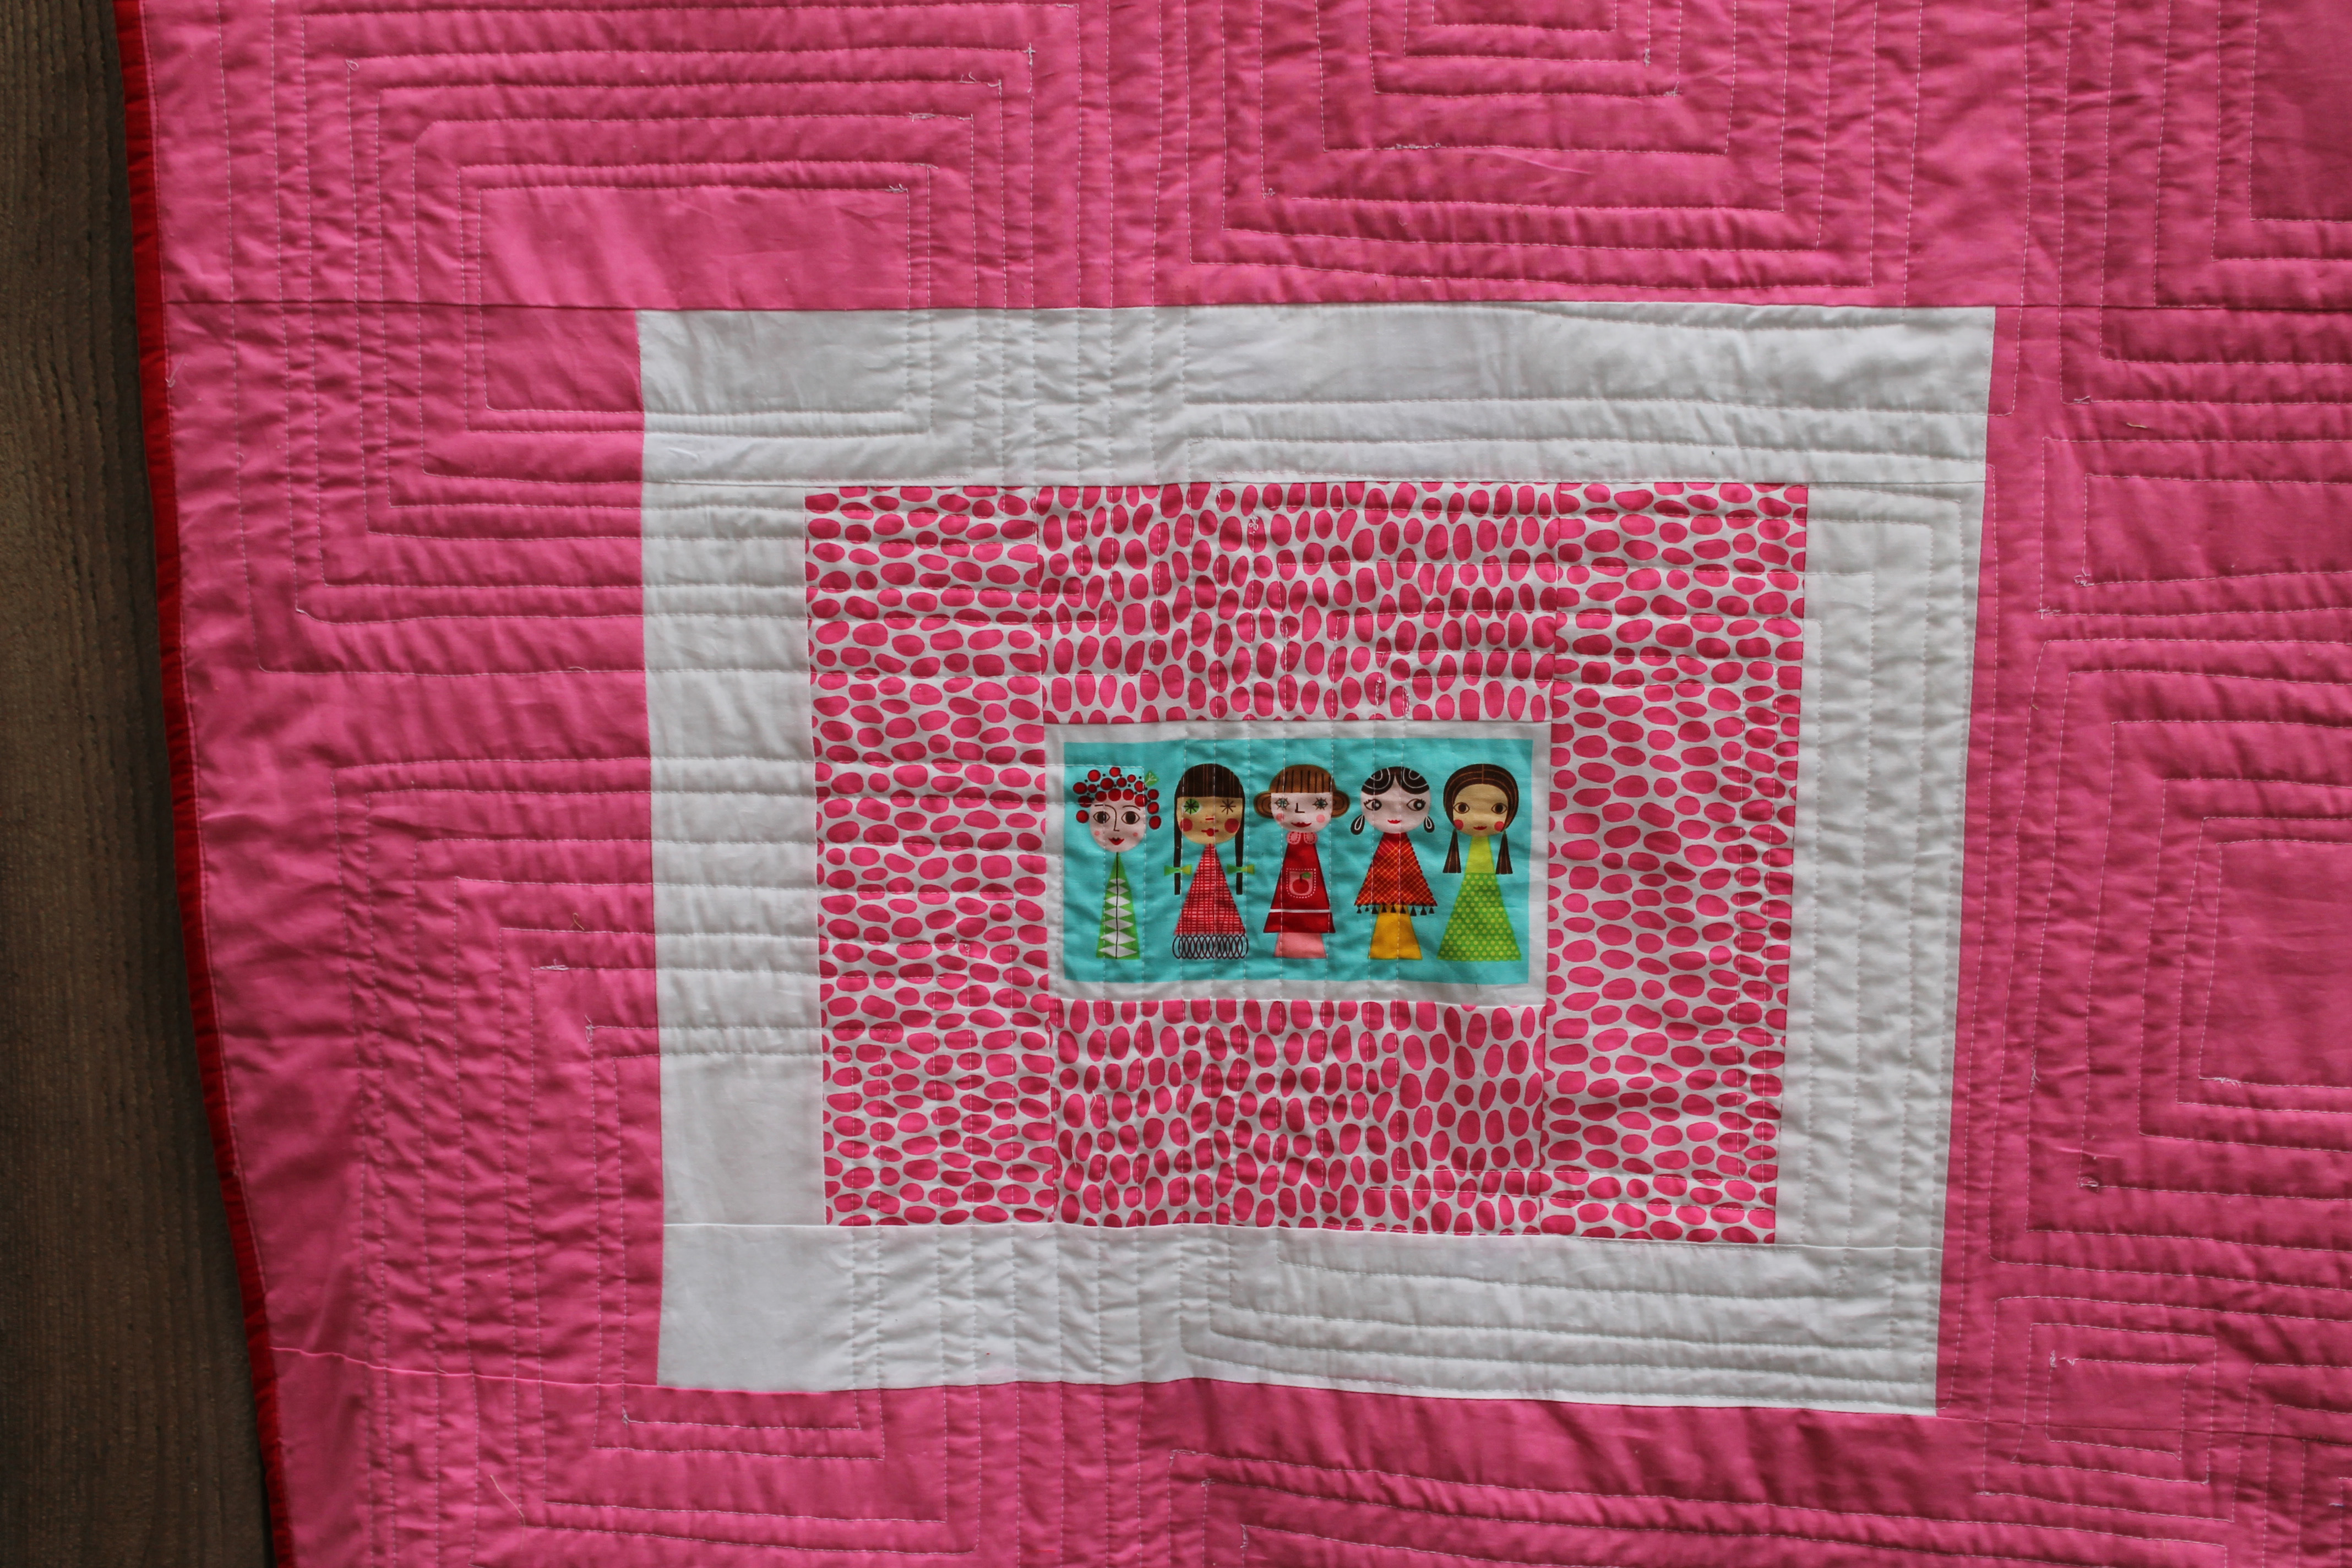
For the back of the quilt I used my favorite printed panel and made it the focal point.
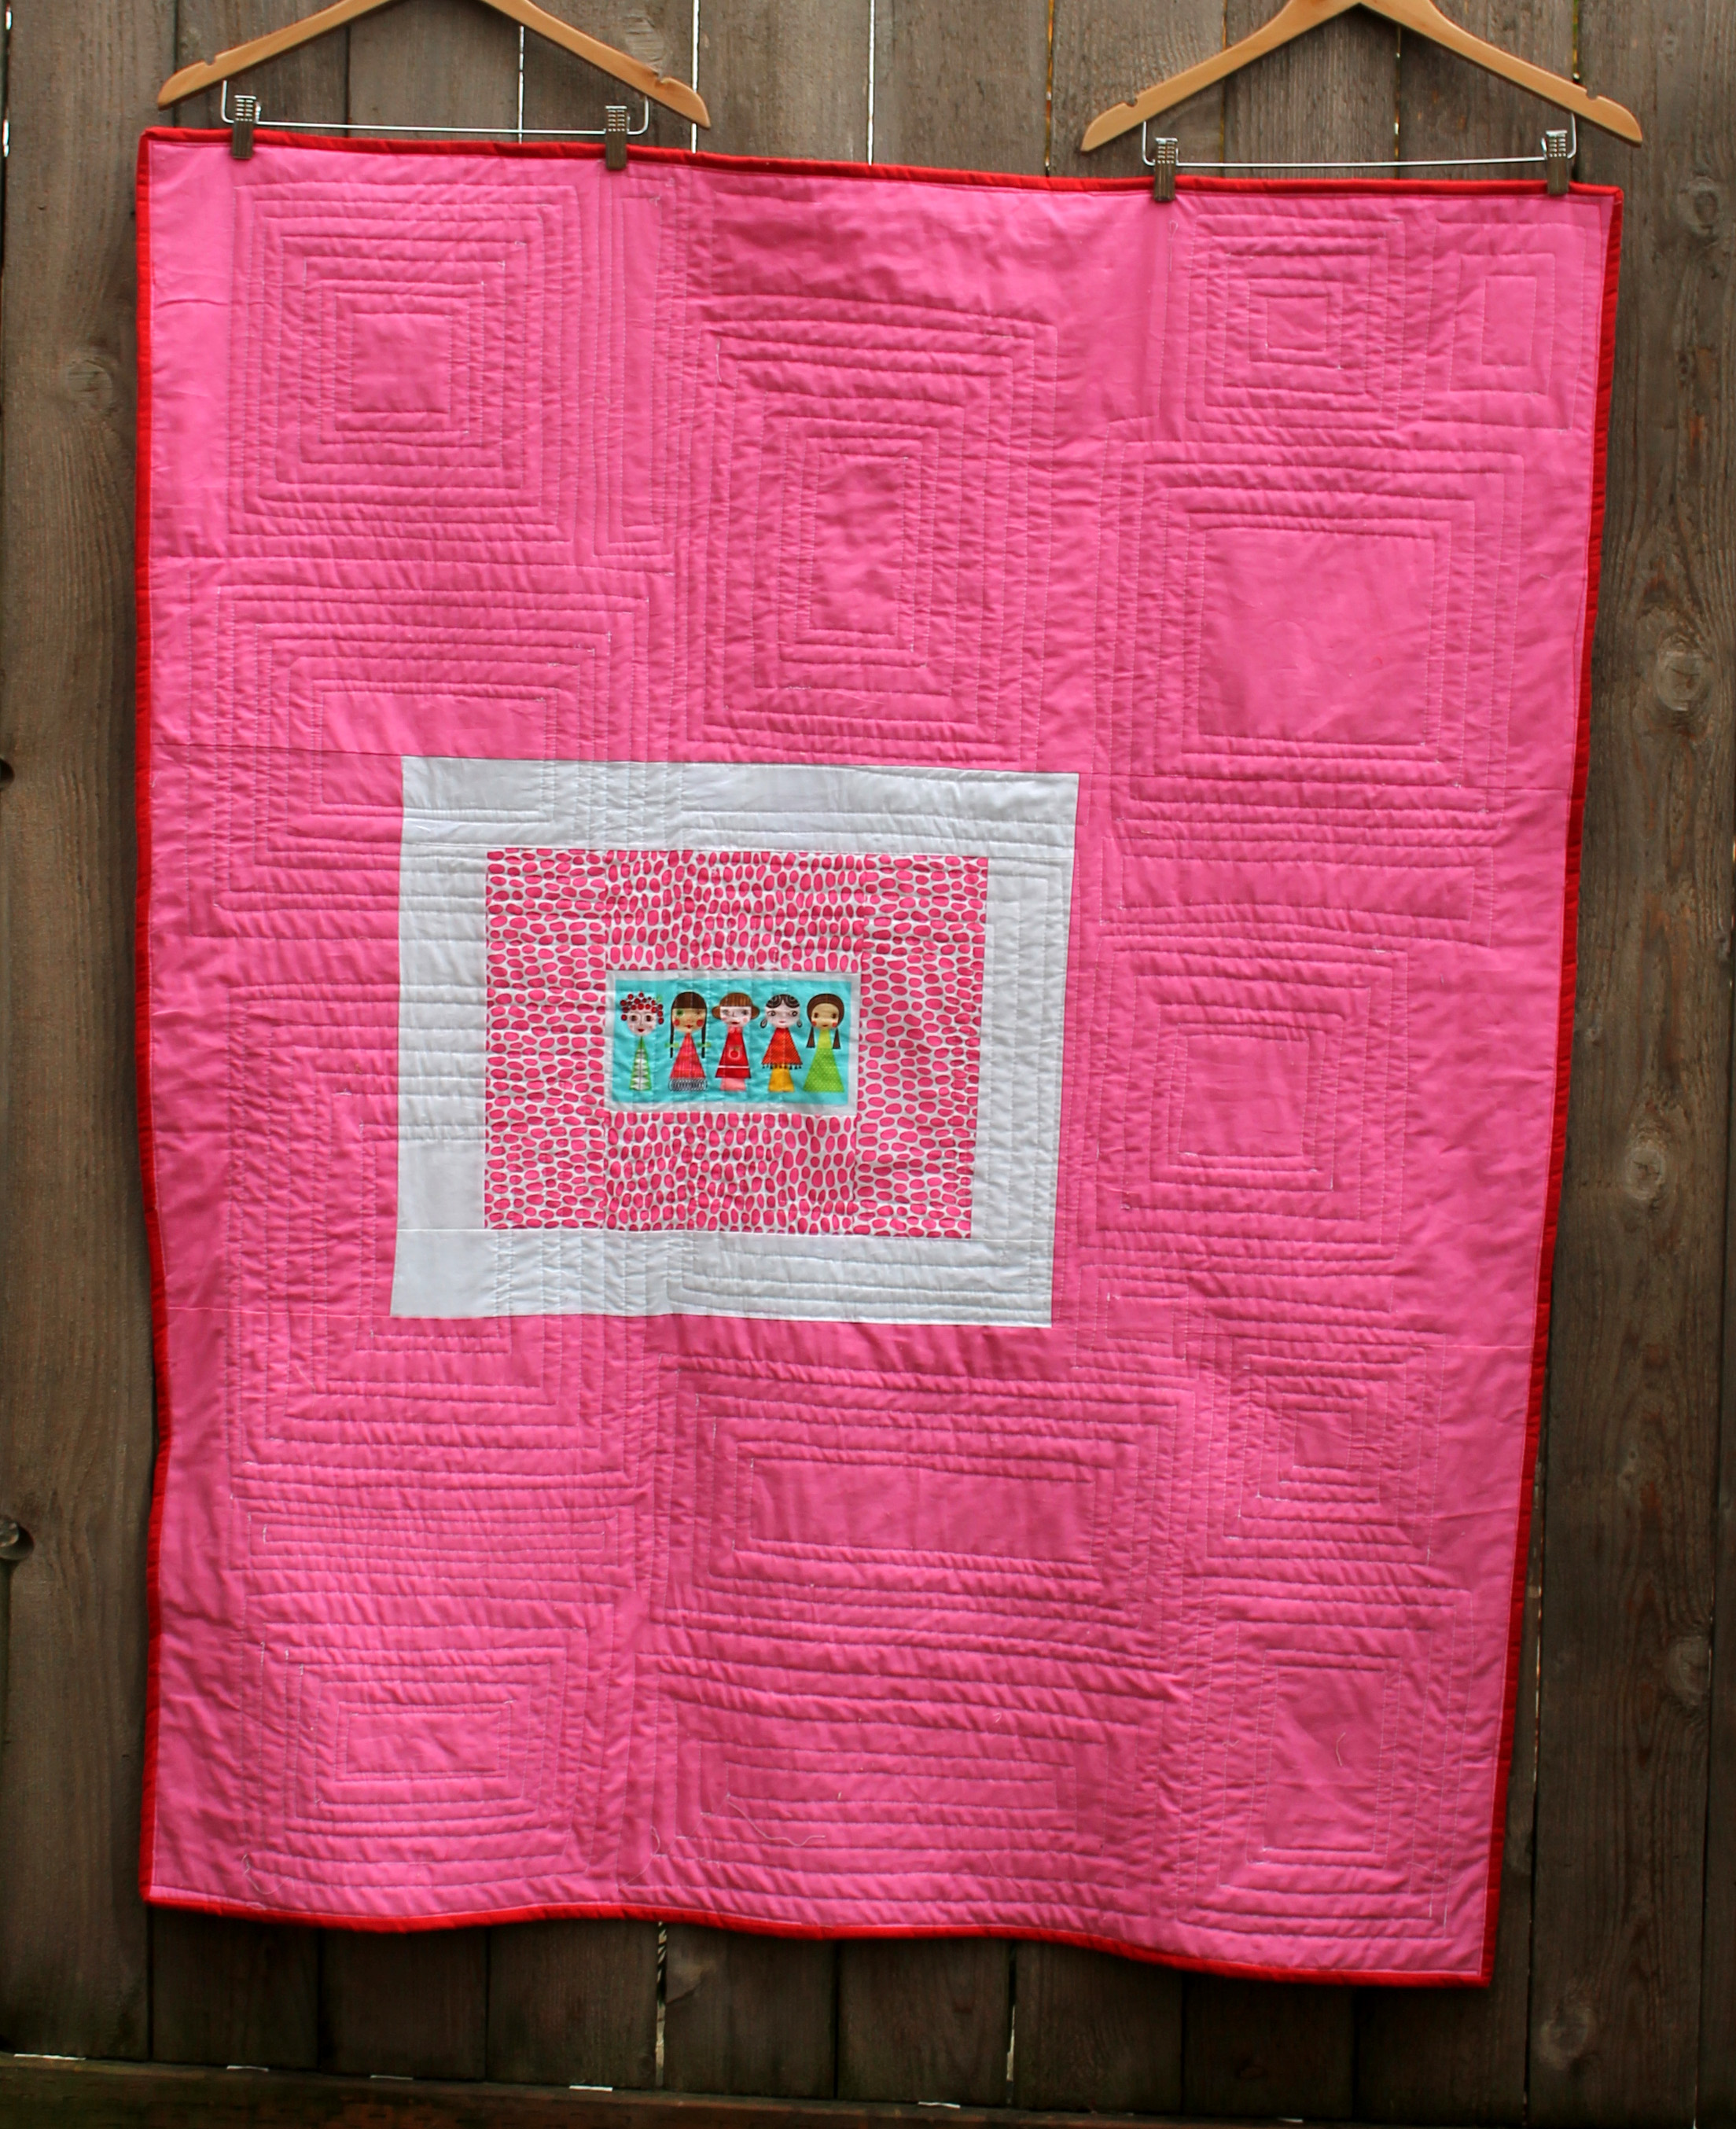
I think it is one of the cutest quilt backs I have done. And it is all because of this little print.
Appleville Quilt Details:
Style: Modern free form
Fabric: Appleville by Robert Kaufman & Kona White
Finished quilt size: 47″ x 57″

This quilt is bound to bring love and joy into some child’s life. It’s beautifully crafted, and whimsically designed. Well done!
Thanks Jennie. I know some little girl us going to love this quilt as much as I do.
This quilt is completely adorable! Wonderful job– such bright and happy colors without being too childish!
what a sweet quilt! it’s just as cute on the back as the front!
I love this quilt, you’ve really brought out those quilts and highlighted their whimsical colours
I think you did a lovely job with the layout and quilting. I liked your concept so much I went on a mad hunt to find some Appleville – and got some! I hope mine turns out as cute as yours.
What a sweet quilt that will most certainly bring a smile to a child.
Fabulous finish! Definitely worth all the trouble. Love the design and the quilting fits perfectly. It is hard working with panels for me too, suppose to be easy, but spend lots of time figuring out what to do. Love it.
That is so adorable! I love all of it. I have an old panel (not as cute as this one) but what a great idea!!
Beautiful Cath ….you have done a great job. It is so cute and I am sure it will be well received. The backing is fabulous.
What a fantastic finish! I especially love the back 🙂
I LOVE THIS QUILT for so many reasons. I generally don’t do negative white space at all but looking at your awesome quilt has made me completely rethink that. Secondly, I love your quilting. Perfectly spaced lines and perfectly positioned stitching has its place, but I LOVE quilts that look like a human made them and not a machine! Thirdly, love, love love the pieced back and the fact that the quilting went thru the back feature square, which is something that I struggled with when considering a pieced back.
Lovely, lovely job!!
I will be reading your blog regularly for sure!
Have a great day!
Stephanie in Pennsylvania
Thanks Stephanie for the kind comments. I must admit I also love some of the imperfections of my quilts. My quilts are for cuddling, loving and using that is for sure.
I agree with Stephanie, slight imperfection makes it more lovable and human. I was asked recently by an acquaintance who sells homewares online to make her some cot quilts. The only brief was that the quilting and piecing shouldn’t be too perfect, she wanted them to look home made. So, I think perfect quilting has its place on exhibition quilts, but for the rest, I relax and try and enjoy the process, and if lines are little wobbly, well, I call it ‘organic’ quilting… Beautiful quilt, I’d have loved it as a little girl. Kate
Well put Kate. I do enjoy the process and because I give most of my quilts away I do not seat the small stuff too much. I am also resigned to the fact that any exhibition quilt I may do will be pieced by me but quilted by someone else.
Ooh! I like that. I did some home-made machine quilting earlier this week. The piecing is neat but the quilting lines, which were supposed to be straight, are a bit wonky.
Embrace the wonky that is my philosophy.
I love this quilt! I too have issues with the quilting part of making a quilt. I have taken to Quilt as You Go lately and that is helping. Free motion….some day!
Such a pretty quilt! I like the quilting you did (even if it was your third choice). It really frames those pretty fabrics nicely and is effective on the back. The little one that receives this will be tickled pink for sure 🙂
When I saw the photo of the back of the quilt I thought the quilting looked much better than I thought. I am a little smitten by the back of the quilt…can you tell?
Congrats on completing this quilt in a week. Nothing better than focusing on a fun and funky quilt to get your creativity flowing.
It is amazing what you can achieve with a schedule and some determination. I wanted to complete a charity quilt a week in October and I have done it. I am going to breath a little in November,
Congrats on accomplishing your goal of completing the charity quilts! You definitely deserve a break in November! This quilt is too cute! The straight line quilting really sets of the panels and your stash fabric frames them perfectly! I hope your wrist heals soon, in the meantime keep doodling as practice!
This came out beautifully! I have that fabric and can’t wait to try it!
Love!! I think the quilting is perfect! And i love how it looks on the back, awesome!
Good job for persevering with the random layout. I really like it!
This quilt is so cute. It made me smile as soon as I saw it. It’s like a little story in pictures. Someone is going to love it!
As for Y seams, I did plenty of them in my beehive quilt, but I still don’t have any tips. Quite honestly, I found it fiddly and frustrating the whole way through, but well worth it 🙂 Sorry for the lack of help.
Good to know Y seams are not just annoying for me. I am not sure I will be rushing to do any again soon.
Very Sweet!
Congratulation! A fun, sweet quilt sure to be loved! Congrats on taking on all that straight line quilting…I think this is harder than FMQ!
They are awesome! Honestly, I avoid straight lines at all cost. They are really hard! It doesn’t take much for the viewer’s brain to see one that is off. I find that if I just made a few wavy spots or the lines “close enough” it is on purpose and it is ok! 😀 Either way, I think your work looks great and you used the fabric beautifully.
Susan I love the idea of wavy lines. I am going to give it a go this week. I have a couple of doll quilts to finish and thought they would be great for playing with my quilting. One will have wavy lines for sure.
Adorable quilt and of course you are smitten with the back; the back is great! I too dislike Y seams; do them if I “have” to. I tried irregular placement and lots of negative space once — intend to do so again. I agree it is fiddly. Amazing the things that sound easier and turn out harder. Anyway, I avoided Y seams by making sure my pieces ended up in straight columns–three across the bottom. The top piece lined up horizontally. I hoped by mixing horizontal and vertical it wouldn’t look “column” pieced.
I really should have lined my blocks up better this time to avoid the Ys. I will take you advice next time. Thanks.
This quilt is sooo cute! I think the straight line quilting is just perfect….it echoes the shape of the boxes, but doesn’t detract from the main focus of the fabric panels.
Firstly, let me just say how much I love your quilt! It is absolutely adorable. I’ve had an idea in my mind for a quilt similar to this. Sometimes I find graph paper very helpful when designing a layout. I use the formula that 1 square on the graph paper = 1 inch of fabric. Give it a try!
Thank you so much. That is such a great idea and I will definitely try it for the next one.
I think this is so charming and beautiful! I love the way you did the quilting-all those lines look terrific, especially on the back. I just did a quilt with unevenly placed blocks and it was such a bear to figure out how to make it all work together.