In my sewing career I have made hundreds of quilts and one fancy dress costume. Once or twice I have hemmed or mended a few clothing items on the sewing machine but that is absolutely it, until this week.
Rewind a little bit to last month’s Portland Modern Quilting Guild meeting where a new swap was proposed. I had never participated in a swap before, they scare me a little – you have to do something on deadline to please someone else. Too much pressure for me. Last month though, thru a combination of pain medication and peer pressure I said yes to making a quilted container.
Fast forward to this week. I need the container for Thursday’s meeting and I had not even started. I had spent weeks procrastinating and convincing myself I could not do this. With time running out I bite the proverbial bullet and started. The Guild website had helpfully linked to a number of free tutorials, so I picked one – 1/4″ Mark.com’s quilted bucket and went to work.
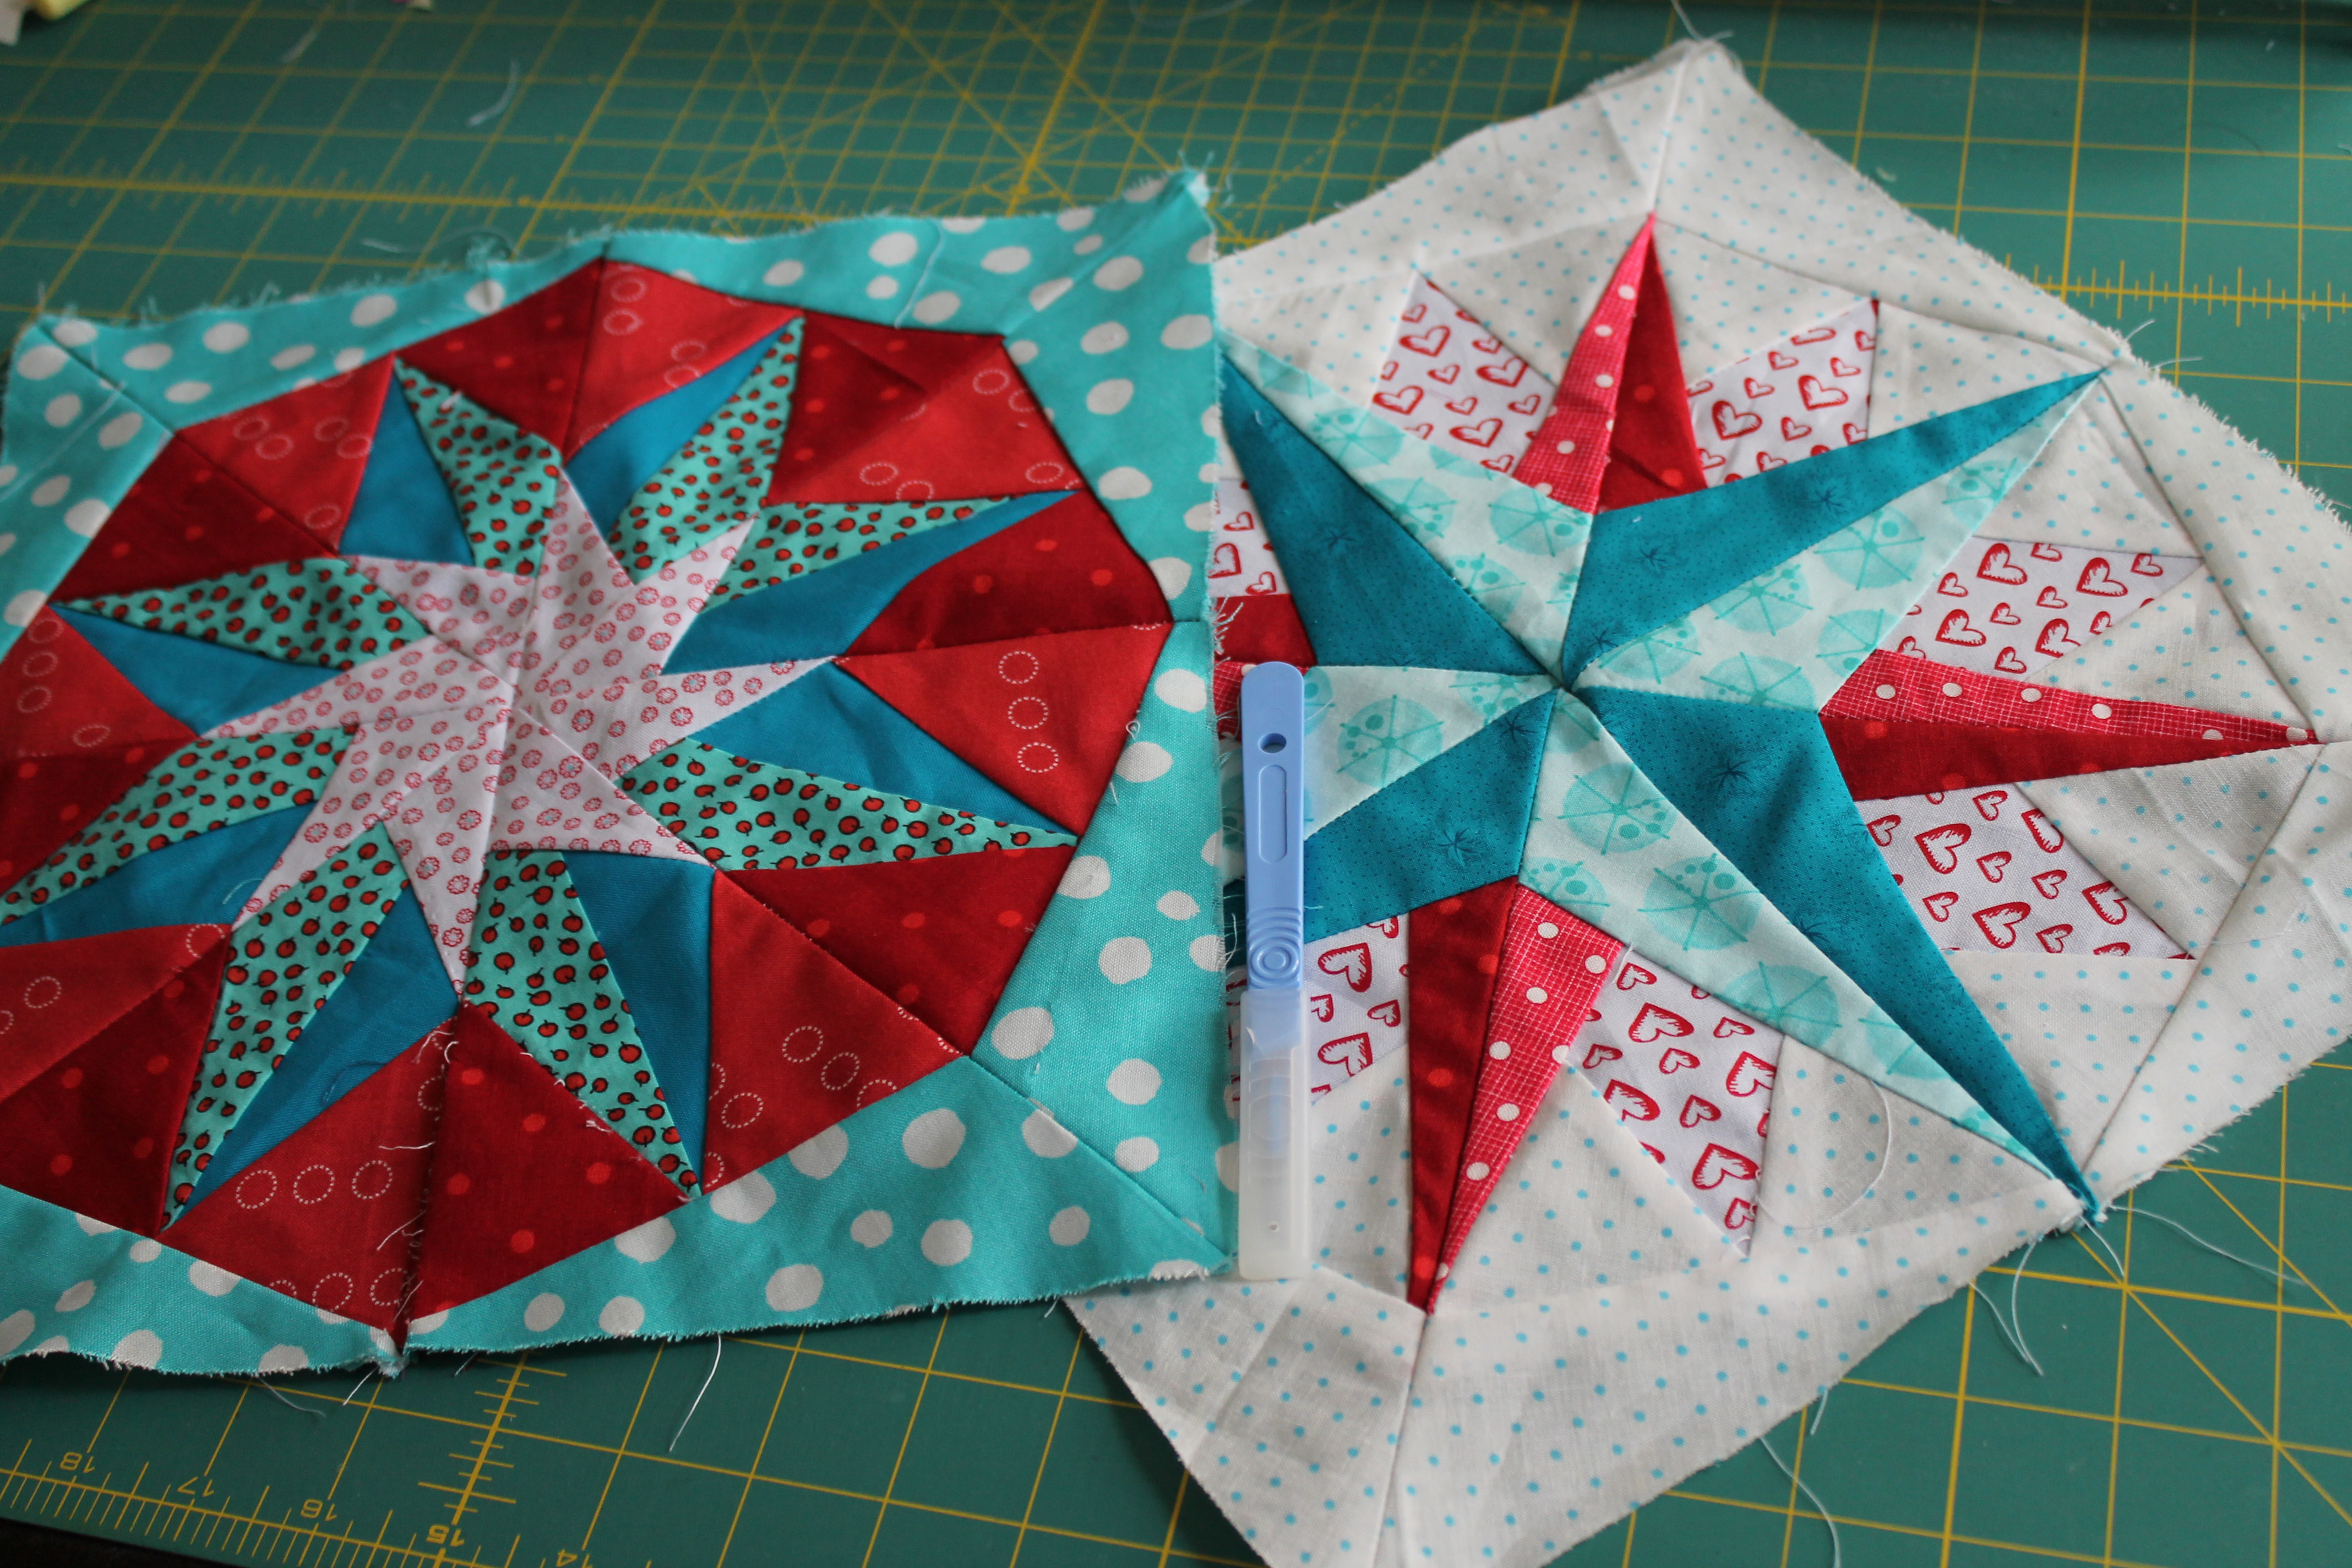
Step one.. I selected some unused blocks to use in the body of the bucket. These paper pieced stars set the colour scheme for the finished piece
Step two… I made the bottom of the bucket (this step also involved spray basting my fingers together)

Step three… I did some maths (the hardest part of the whole darn process), deconstructed the blocks and made the body of the bucket.

Step four, five and possibly six… quilted the bucket body, then pinned the bottom piece to the body piece.

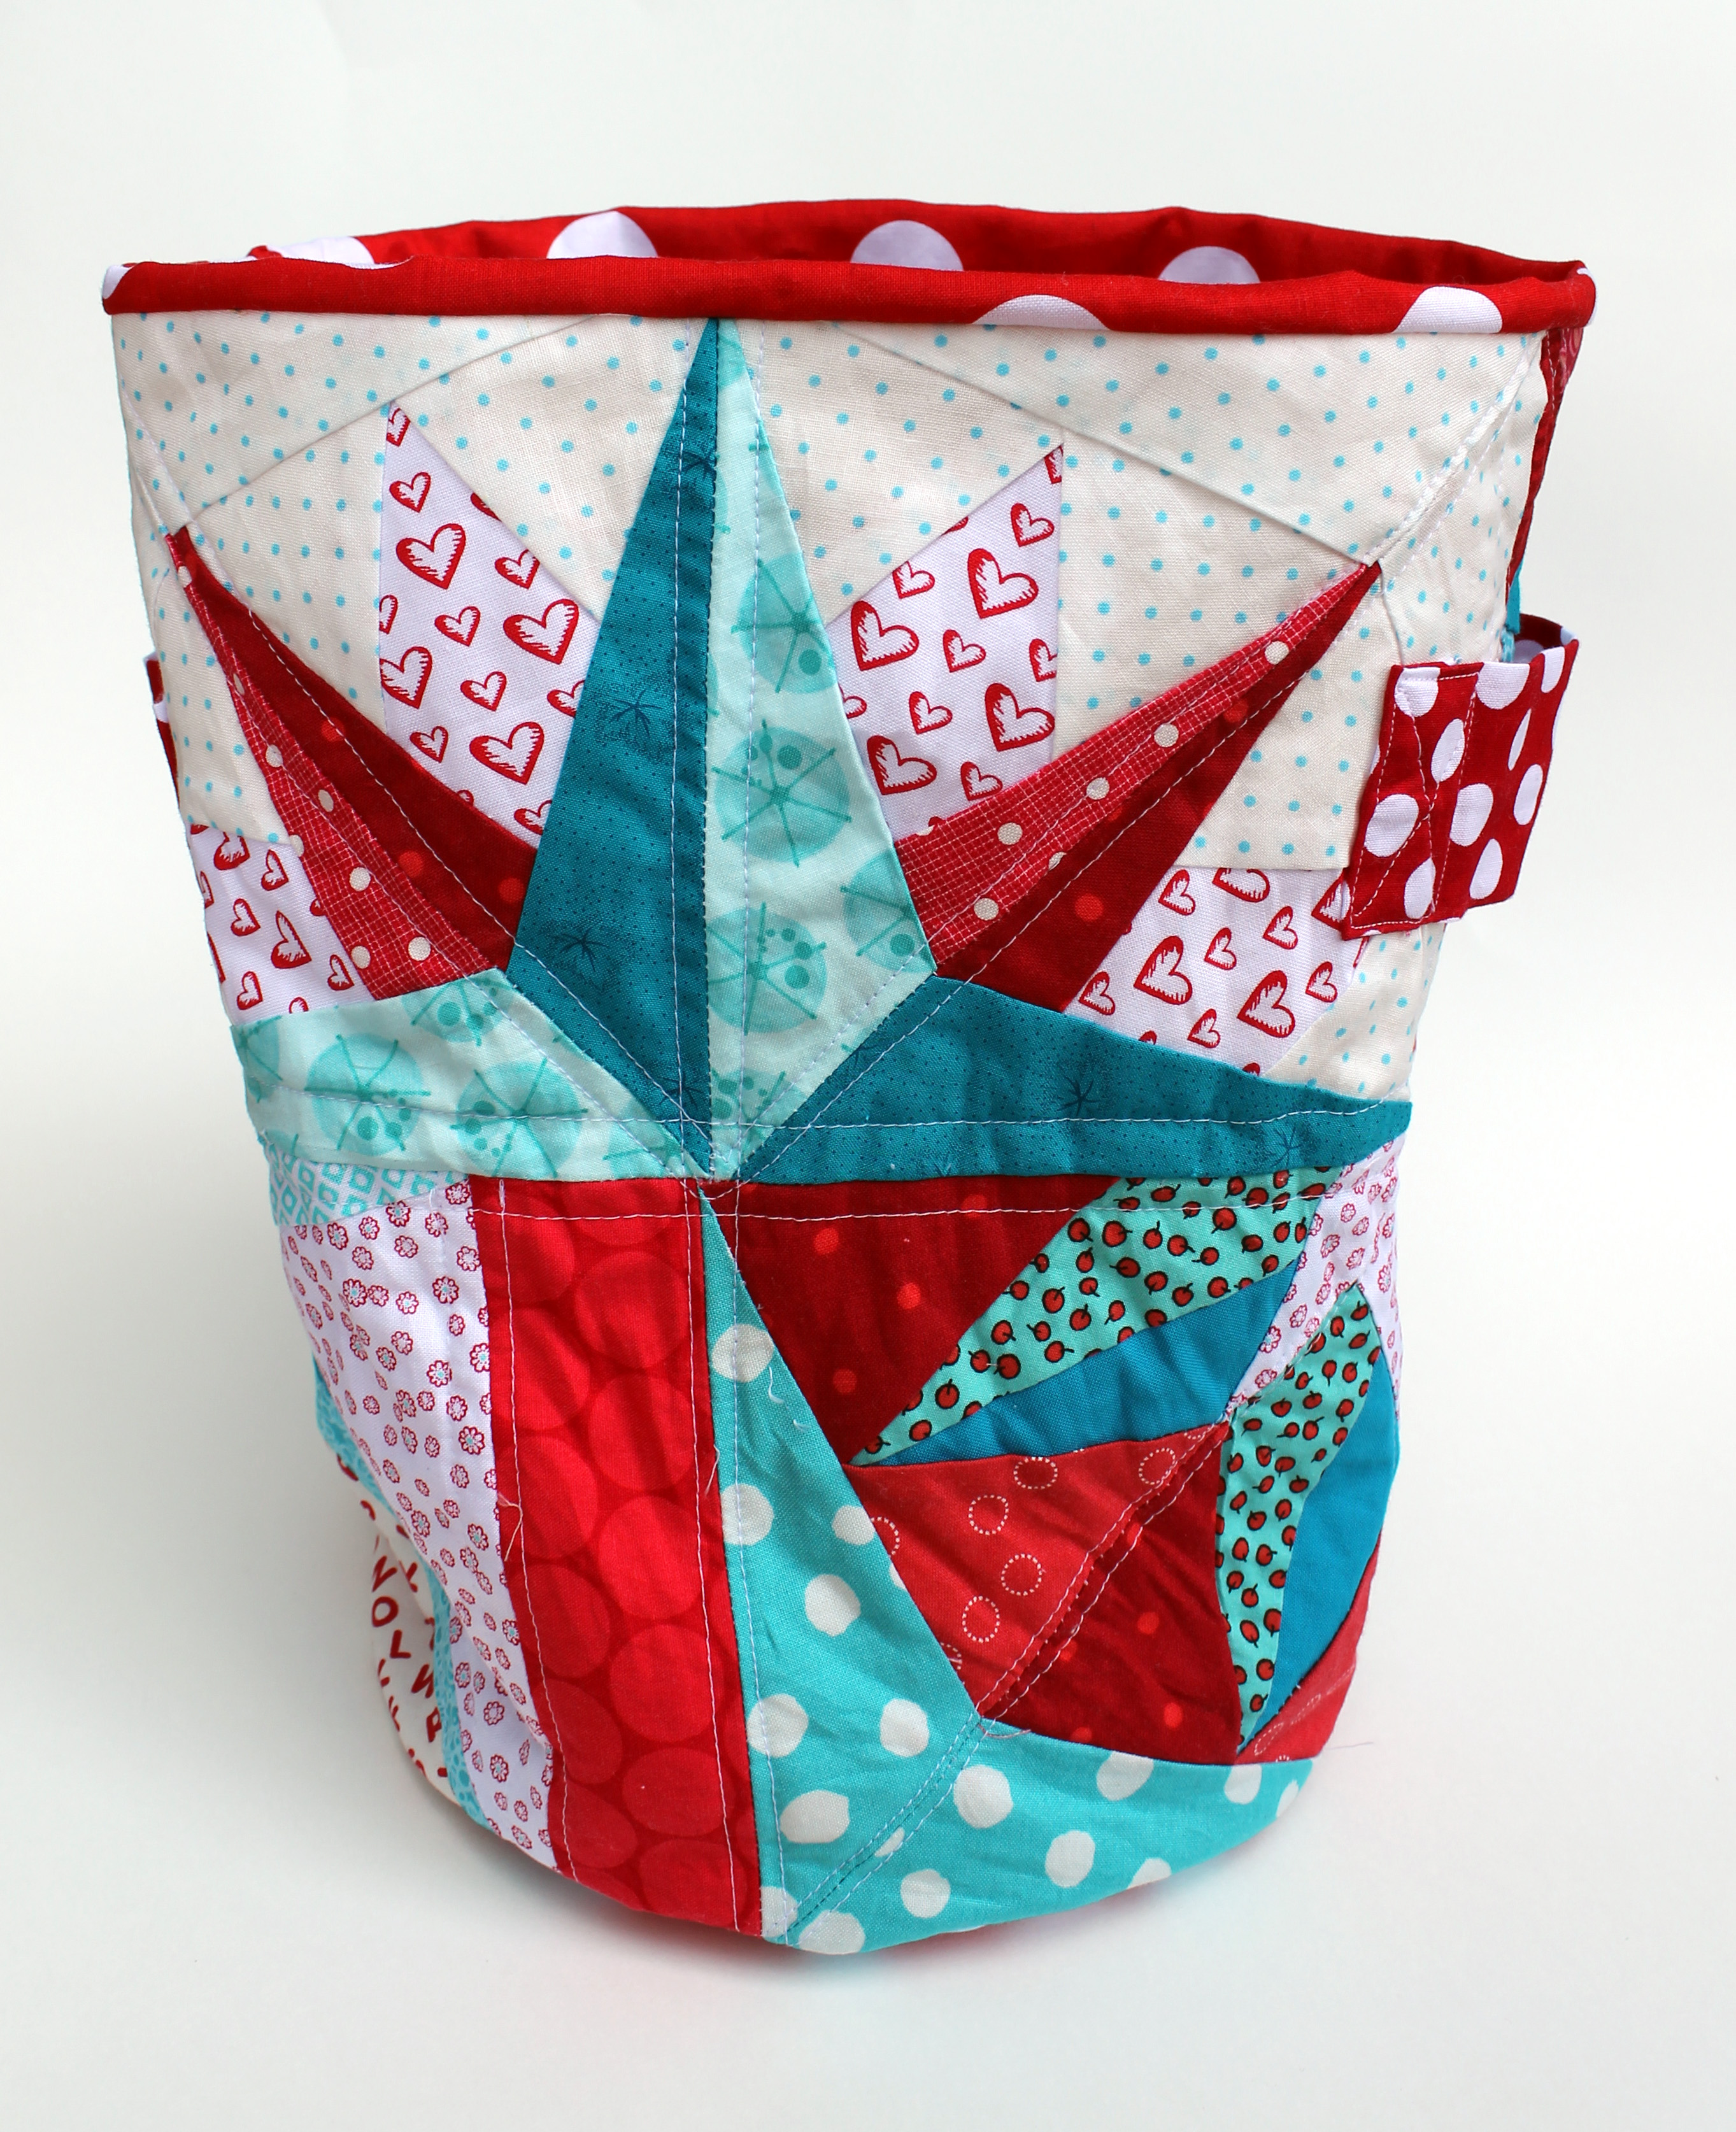
Which resulted in this…

Step seven… turned the outside piece inside out and attached handles

Steps eight to twelve… selected lining fabric, cut bottom and side bits, sewed them together, turned them inside out and sewed them to the quilted outer piece. By this stage I was loosing the will to live, but bravely carried on.

Step two hundred and six five… nearly finished… I pulled the quilted part through a small 2 inch whole left in the lining part to reveal this…

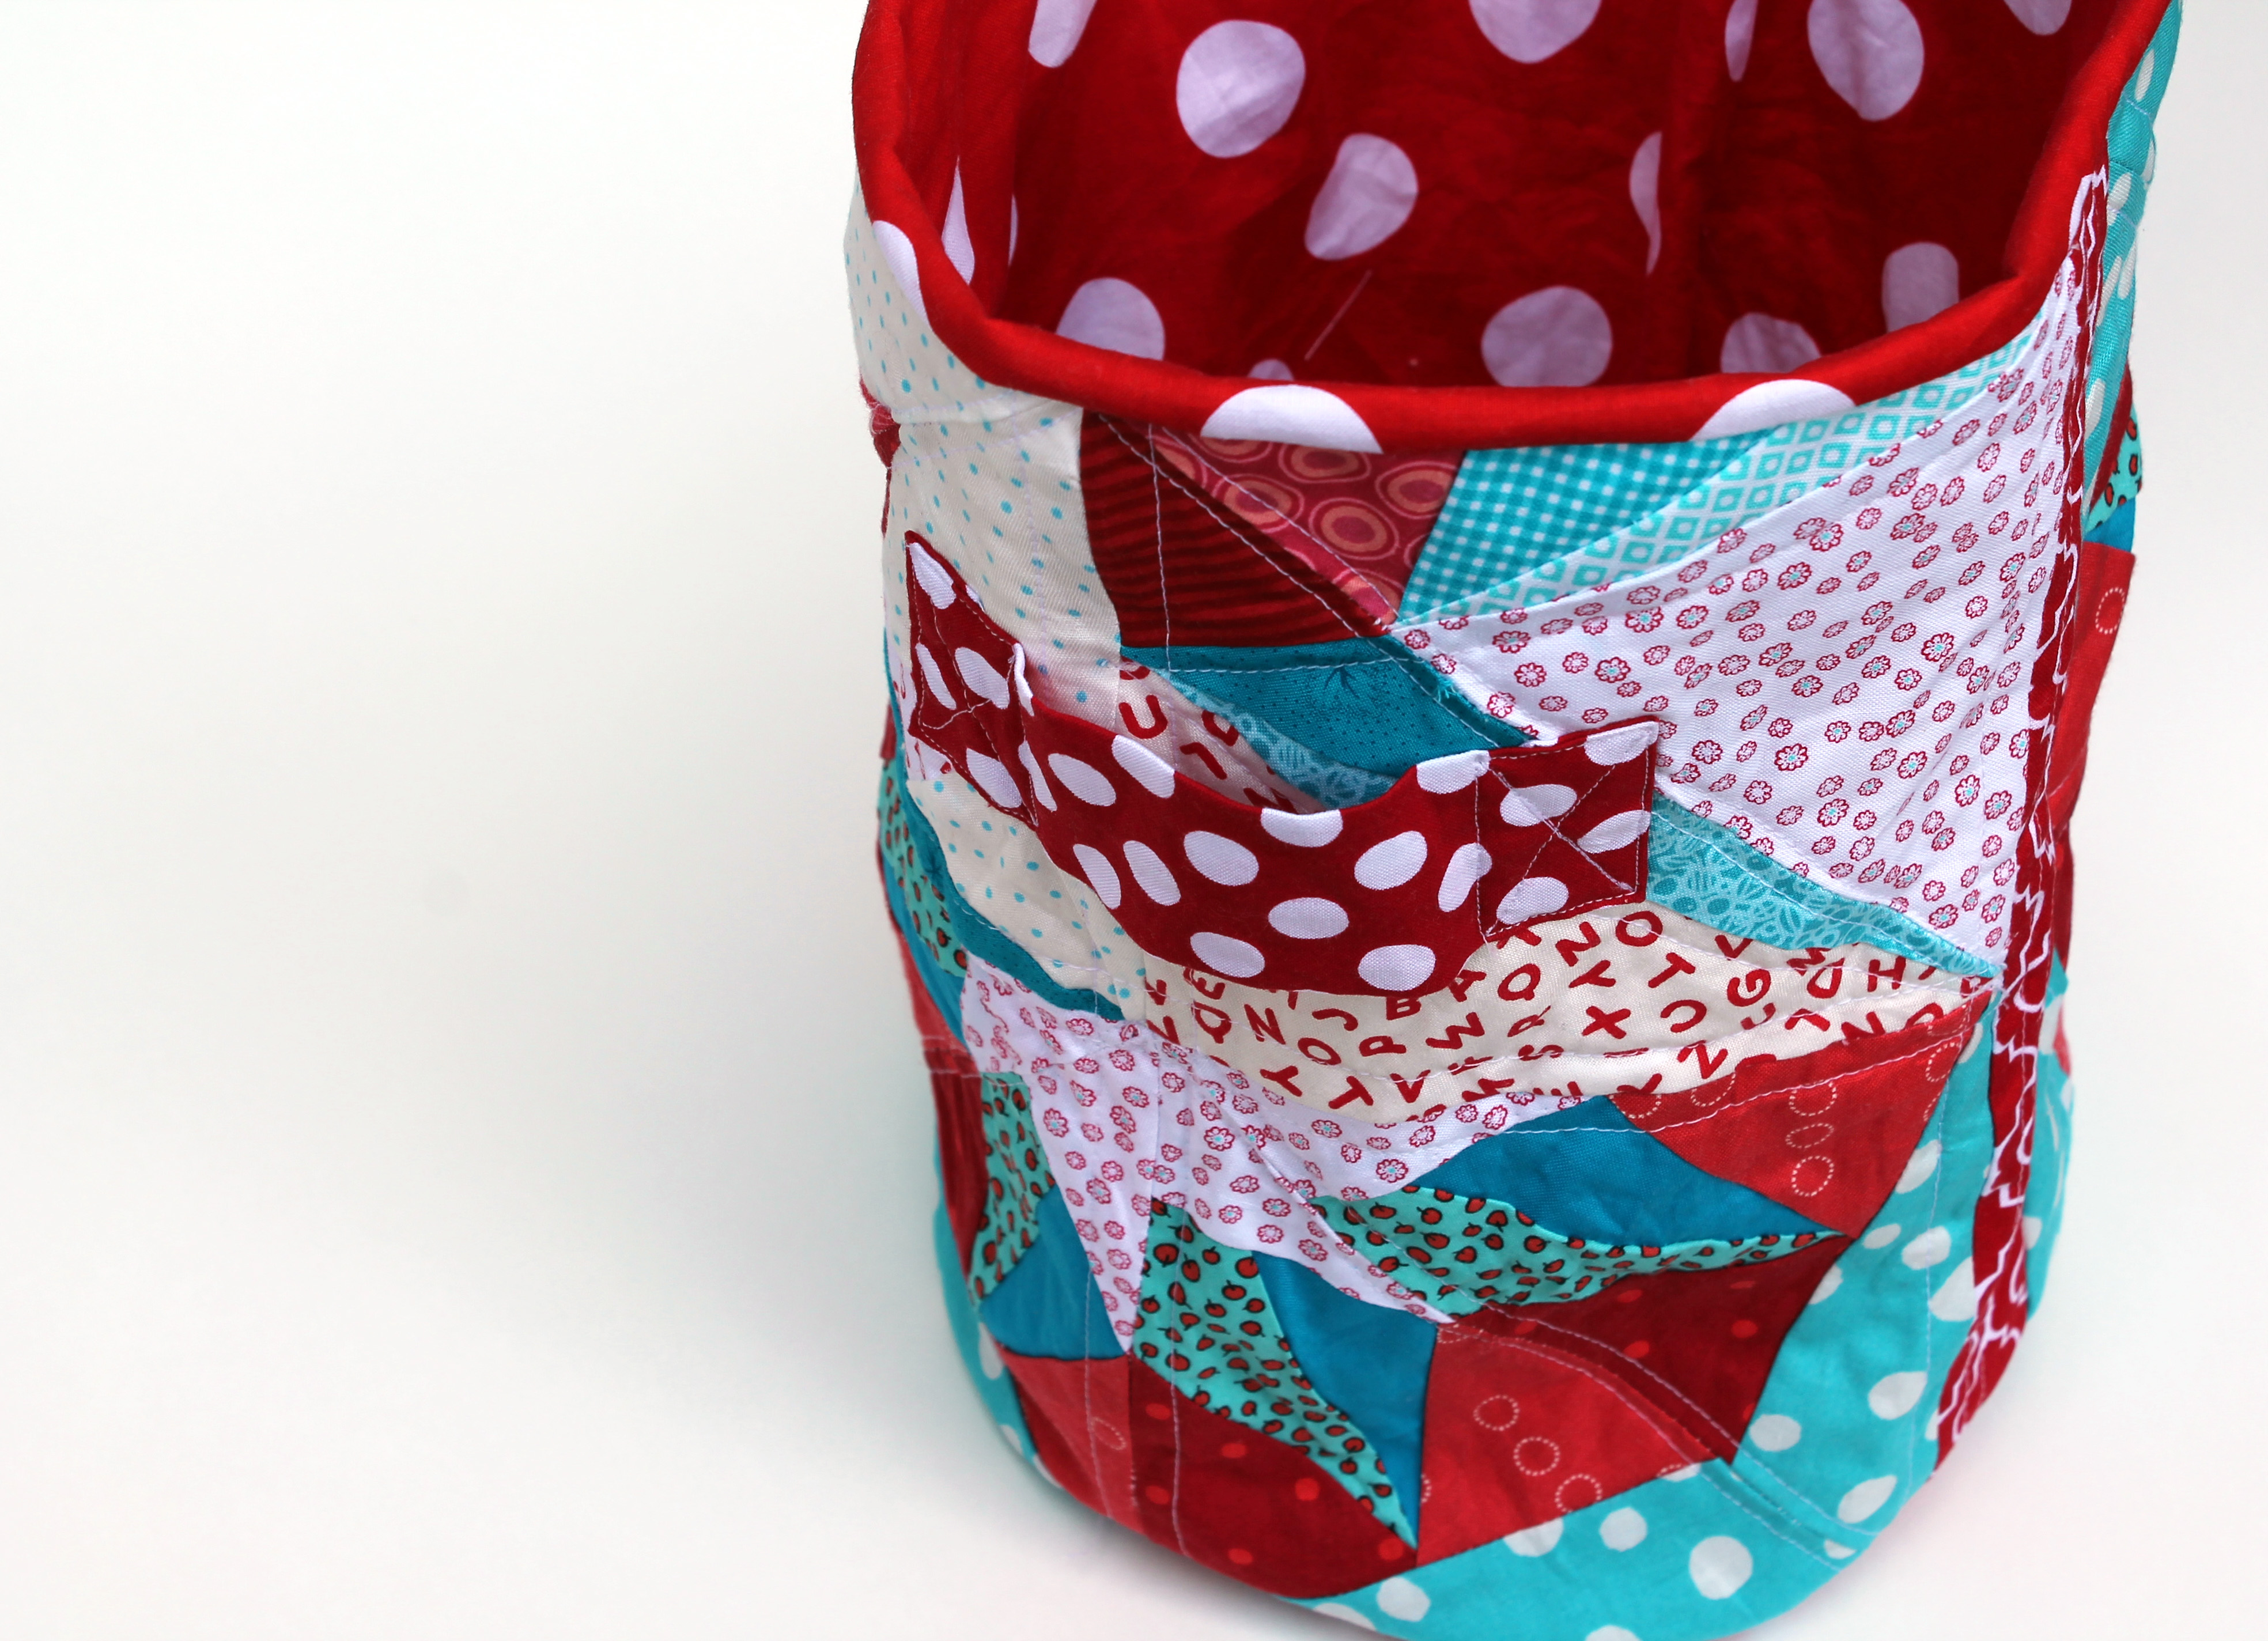
My finished bucket. The sides of the bucket are 12 inches and the base is 8 3/4 inches. I think if I was to make it again I would make the sides a little smaller but other than that I am pleased with the finished product. So pleased I took lots and lots of photos…

Really lots and lots…

From lots of different angles….

Just to document the achievement of having made a quilty thing that was not a quilt…

It turned out great! Yay for peer pressure! 😀
There is definitely something to be said for peer pressure. Being pressured into making this was good, being pressured into shaving my head when I was 16, not so good!
I love it and the color combination is perfect. I’d be pretty happy to receive that for a swap:)
Thanks. I hope my swap partner likes it. If she doesn’t like it I really do not want to know lol.
What a clever way to use orphan blocks. Very cute!
I’ve used that tutorial, it’s great! Well done for going out of your comfort zone 🙂
It was a great tutorial. I loved the slightly broken English. It really made it more fun to make.
Step 265…LOL! I always feel that way when 3D sewing, too. It takes forever and the payoff is never a finished quilt! 😉
I had not thought of it as 3d quilting before but that is exactly what it is. I am now extra proud of myself for finishing. Thanks Kate.
Love the paper pieced stars! I know swaps (participating in my first one this month) and even items outside quilting are intimidating. So proud that you bit the bullet! Thanks for the inspiration.
Nice! Trying out new things are important for all of us, even masters like you! Your swap partner will be lucky to receive this! 🙂
Thanks for the compliment but I am still such a novice. Eg. I have never done a Dresden plate block but you have inspired me to give it a go. It may end up a hot mess but it is the only way you learn.
Your bravery paid off! (I’m not even brave enough to go to any kind of guild meeting. Too shy.) Anyway, lovely color scheme and yummy fabrics and a fun container. Wish I was your swap partner!
You have to try a Guild meeting. I went to meetings for nearly 2 years before I presented a quilt or really talked to anyone. You can sit in the back and listen and learn and see people’s beautiful quilts without interacting too much. It is well worth it. I have learnt so much at the meetings and I am constantly inspired.
the colors look so bright and fresh and i love the use of the polka dots
Fantastic photos! I love yor bucket!
i love how you deconstructed your blocks to make this bucket; very nice!!buckets in all shapes and sizes are always handy for organization! You make such beautiful blocks and it was fun to see you turn them into something other than a quilt. After all the quilts you make it must have been fun to have a small project for a quick finish!!
I had almost forgotten what it was like to finish a project, and you are so right that this was a satisfying quick finish. I may have to do some more little projects.
It turned out great! Aren’t you glad you went for it? I think the way you took apart your blocks and re-pieced the outside was just brilliant. Hope you get something equally fun in return at the swap.
I had not thought about the fact that I got one in return, I was so focused on the drama of making a non-quilt item. I am now excited to see what I receive Thursday night.
Very cute and I love the colors. I am all about functional crafts! I wanted to let you know that I went to respond to a comment you left on my blog and you are a no reply blogger. Didn’t know if you knew that so I just wanted to let you know.
Thanks Melinda. I know I come up on blogger blogs as no reply. It is not on purpose but is because WordPress and Blogger do not get along.
Ooh I love this! You did an excellent job of using those blocks
I see you’re at it again with your colorful splendor 😉 Now, about that shaving your head at 16 bit… let’s hear more about that 😉
quilty things that are not quilts are a challenge for me – I don’t do 3D well, congrats on your accomplishment
I must admit I am feeling a little proud about finishing the bucket. The person who got it last night in the swap loved it which made me happy.
Nothing like a deadline, huh? Good job! And I love the fabrics.
I love the colours! They work together so well.
Awesome bucket… but your description of the process, hilarious!! You’re awesome!
Great job on the paper piecing and I just love that fabric, especially the chairs!
It turned out great – no evidence of a deadline or frustration. Love the colors and use of leftover blocks!
haha spray basted your fingers together. 🙂 I hate quilt math. “QUILT MATH!” I bellow, shaking my fist at my husband, who tells me that I’m not allowed to gripe about math in front of my daughter. The best part, I think, is how you chopped up your lovely paper-pieced blocks. (Didn’t you gasp a little?) But they look so good remixed together in this bucket! Very, very cute. Lucky swap partner.
How pretty! What a fun little tote to have!
Hello from Atlanta Georgia USA
I absolutely love the paper pieced stars – can you please share with me the pattern?
how fun and fantastic
These patterns were from my red/aqua paper piecing Monday posts. Most of these blocks came from Quilting on the Squares free paper piecing series – http://www.quiltingonthesquare.com/compass-collection.aspx or from Carol Doak’s 50 Fabulous Paper Pieced Stars book. If you have problems with the link you can find a pdf of the free patterns on my site, just click the Paper Piecing Monday link and scroll through.
Pingback: Totes interesting… | Wombat Quilts