I am pleased to finally share with you my finished circle top…
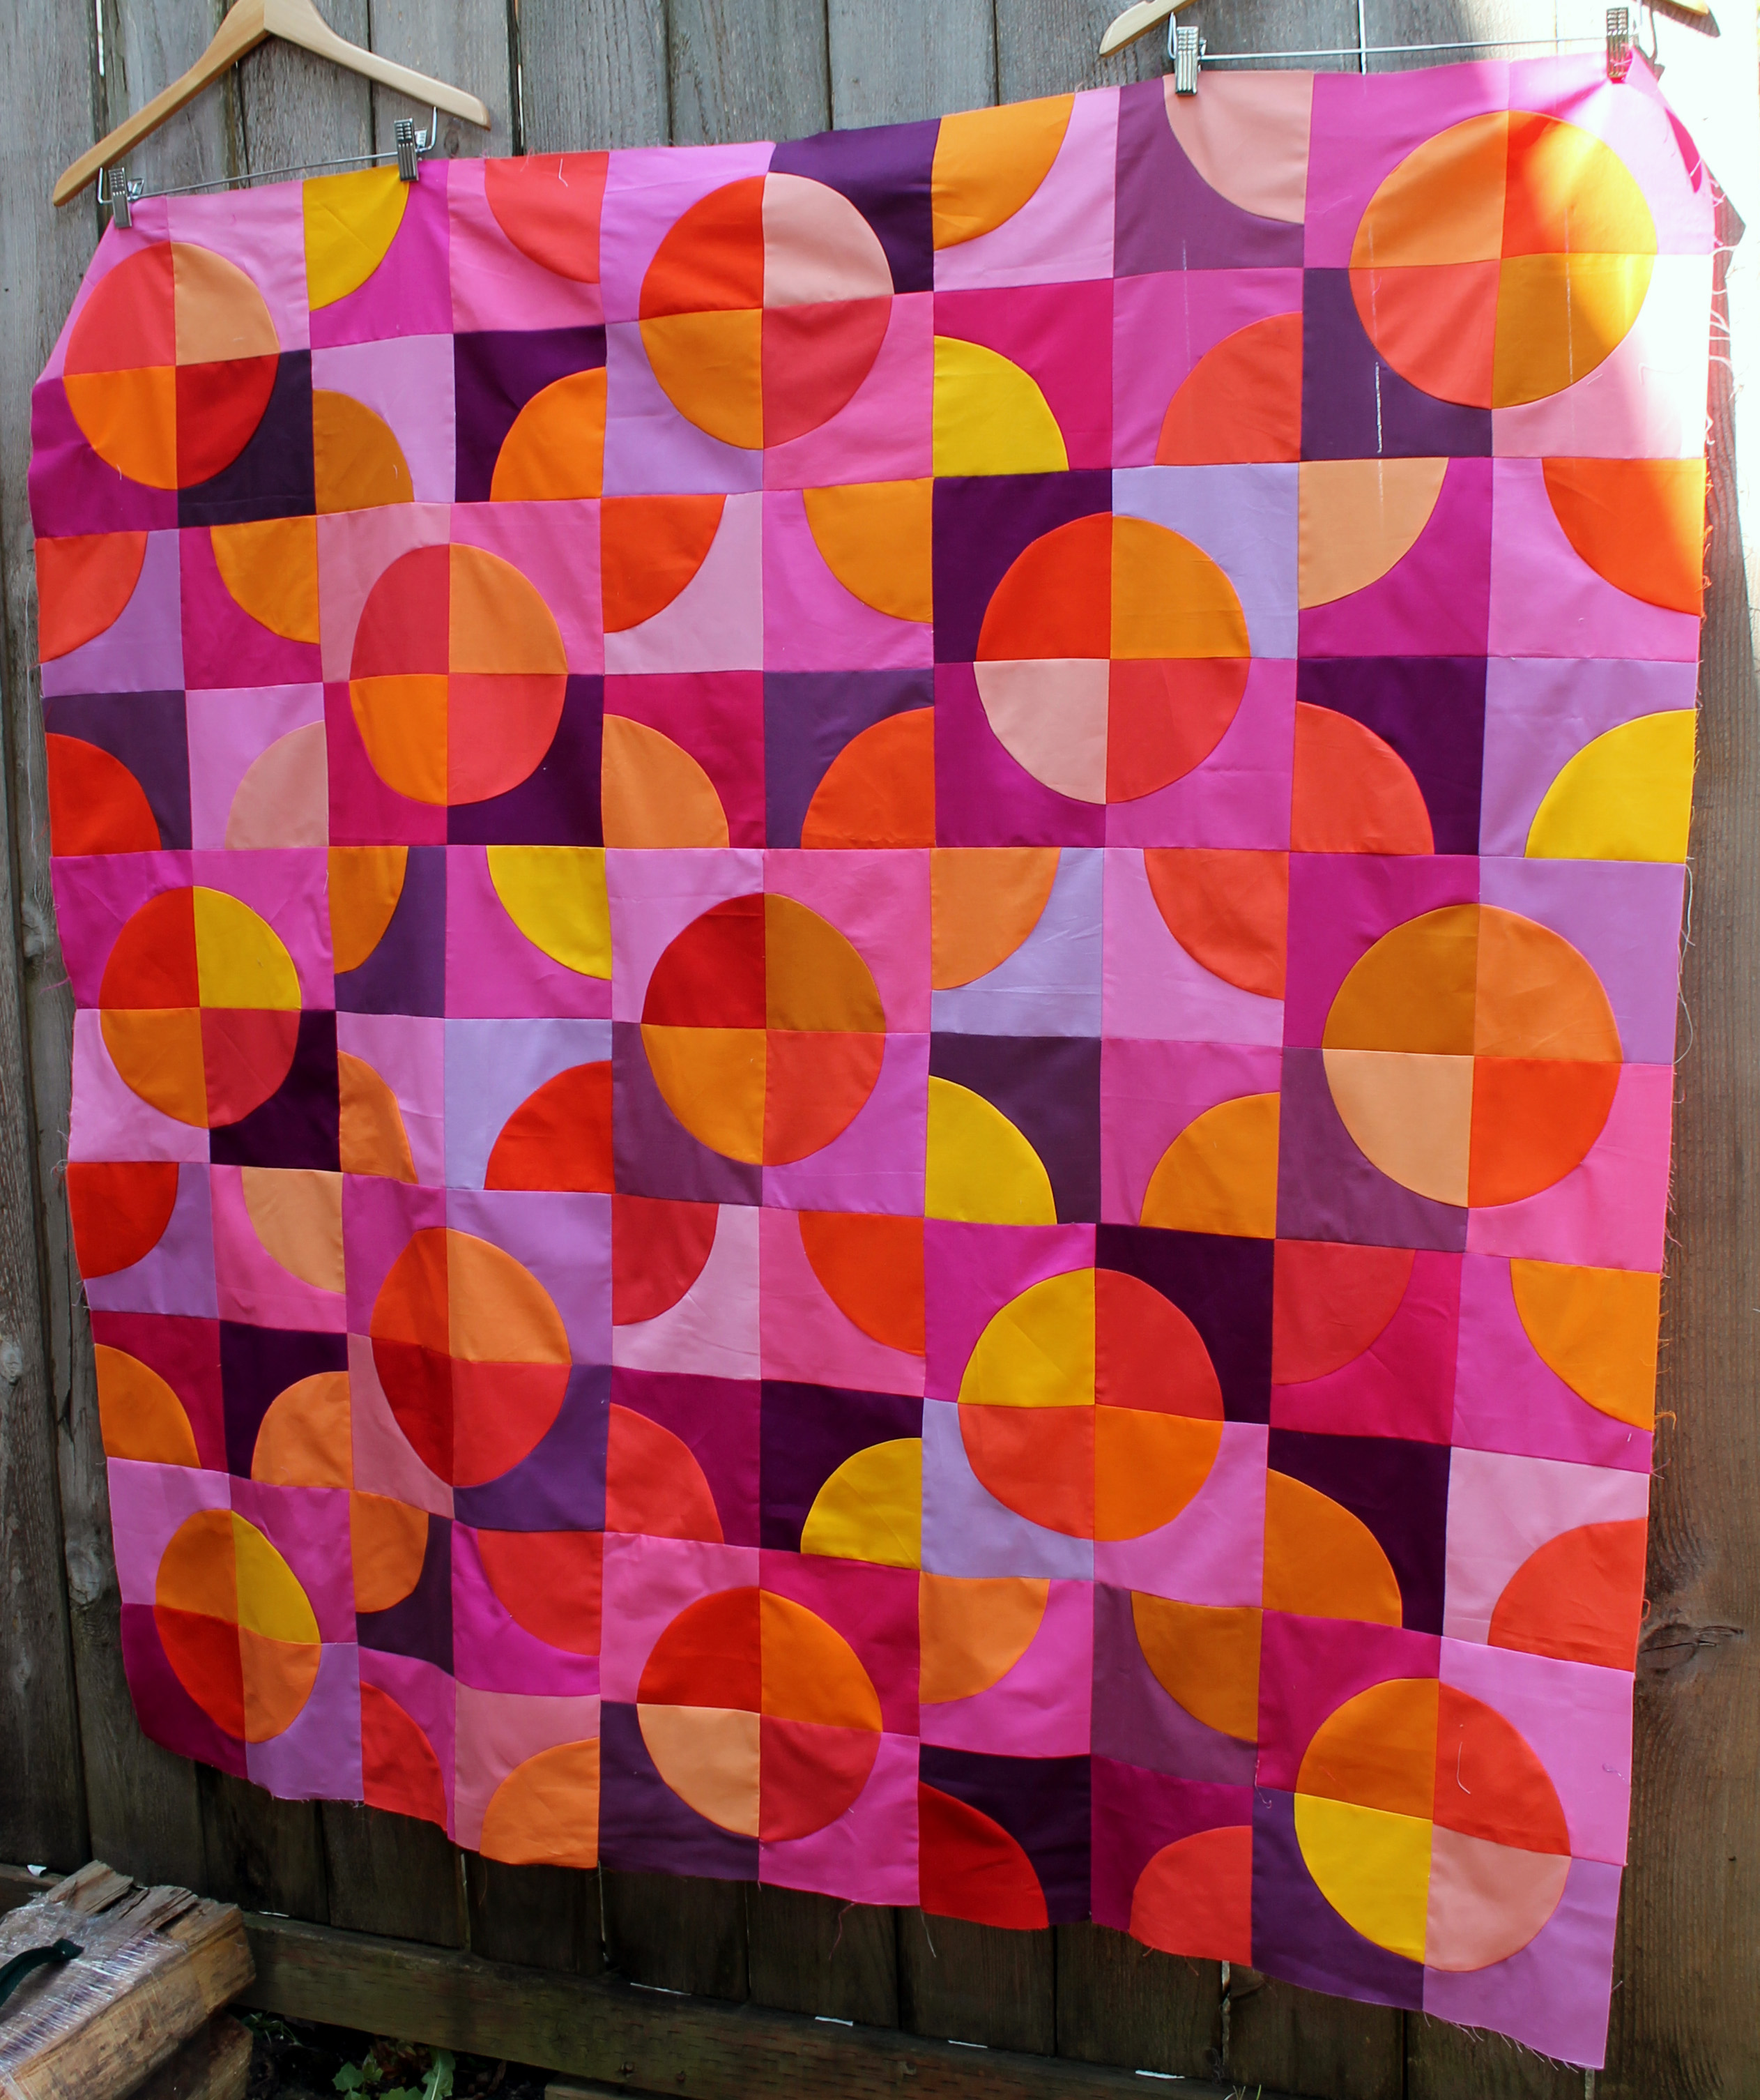
I can not believe how easy this top was to put together and how much fun I had doing it. After years and years of avoiding curves I am thrilled to be able to add a whole new list of quilts to my “must do” list.

In my original post about this quilt I talked about the two different templates I used to make the curved blocks. There were some of questions about the EZ circle template so I thought I would take the opportunity to talk briefly about that process a little more…
For the following example I made a 6 inch Drunkard Path block… so to start I cut out a 5 inch square of my circle fabric and a 6 1/2 inch square of my back ground fabric.
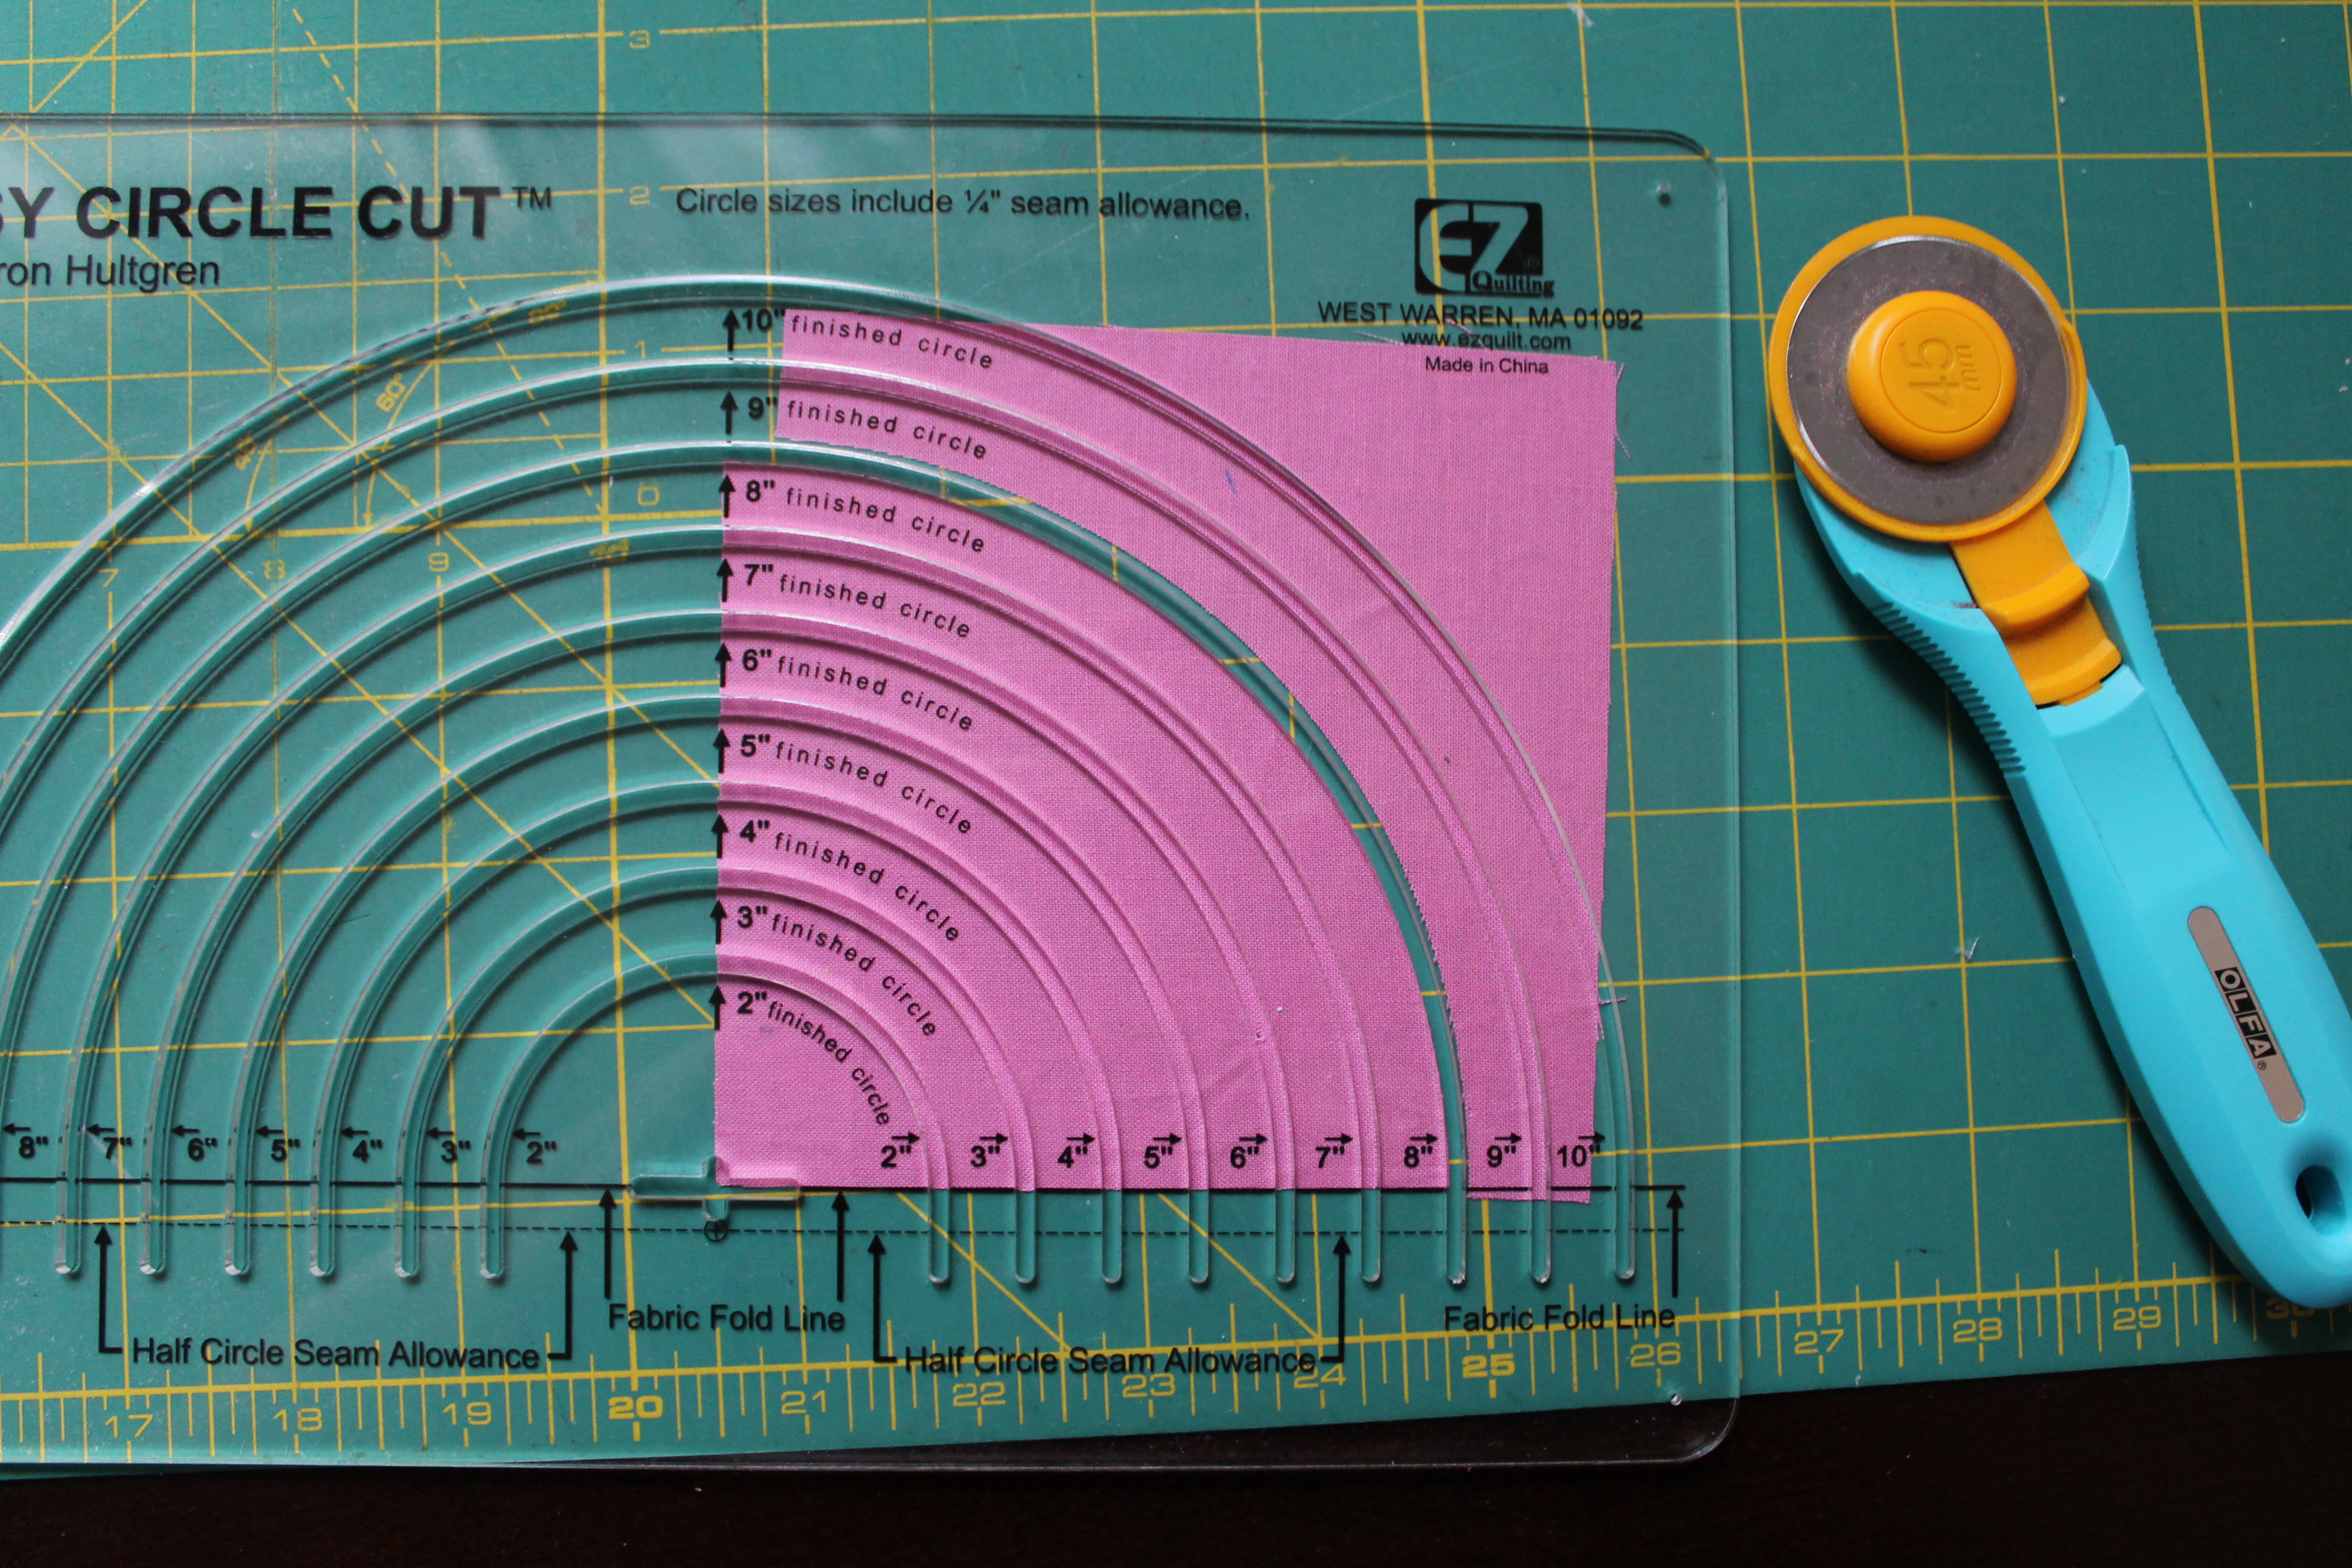
To cut the circle out I aligned my 5 inch square to the bottom line of the ruler marked “Fabric fold line” and to the middle arrows of the ruler.
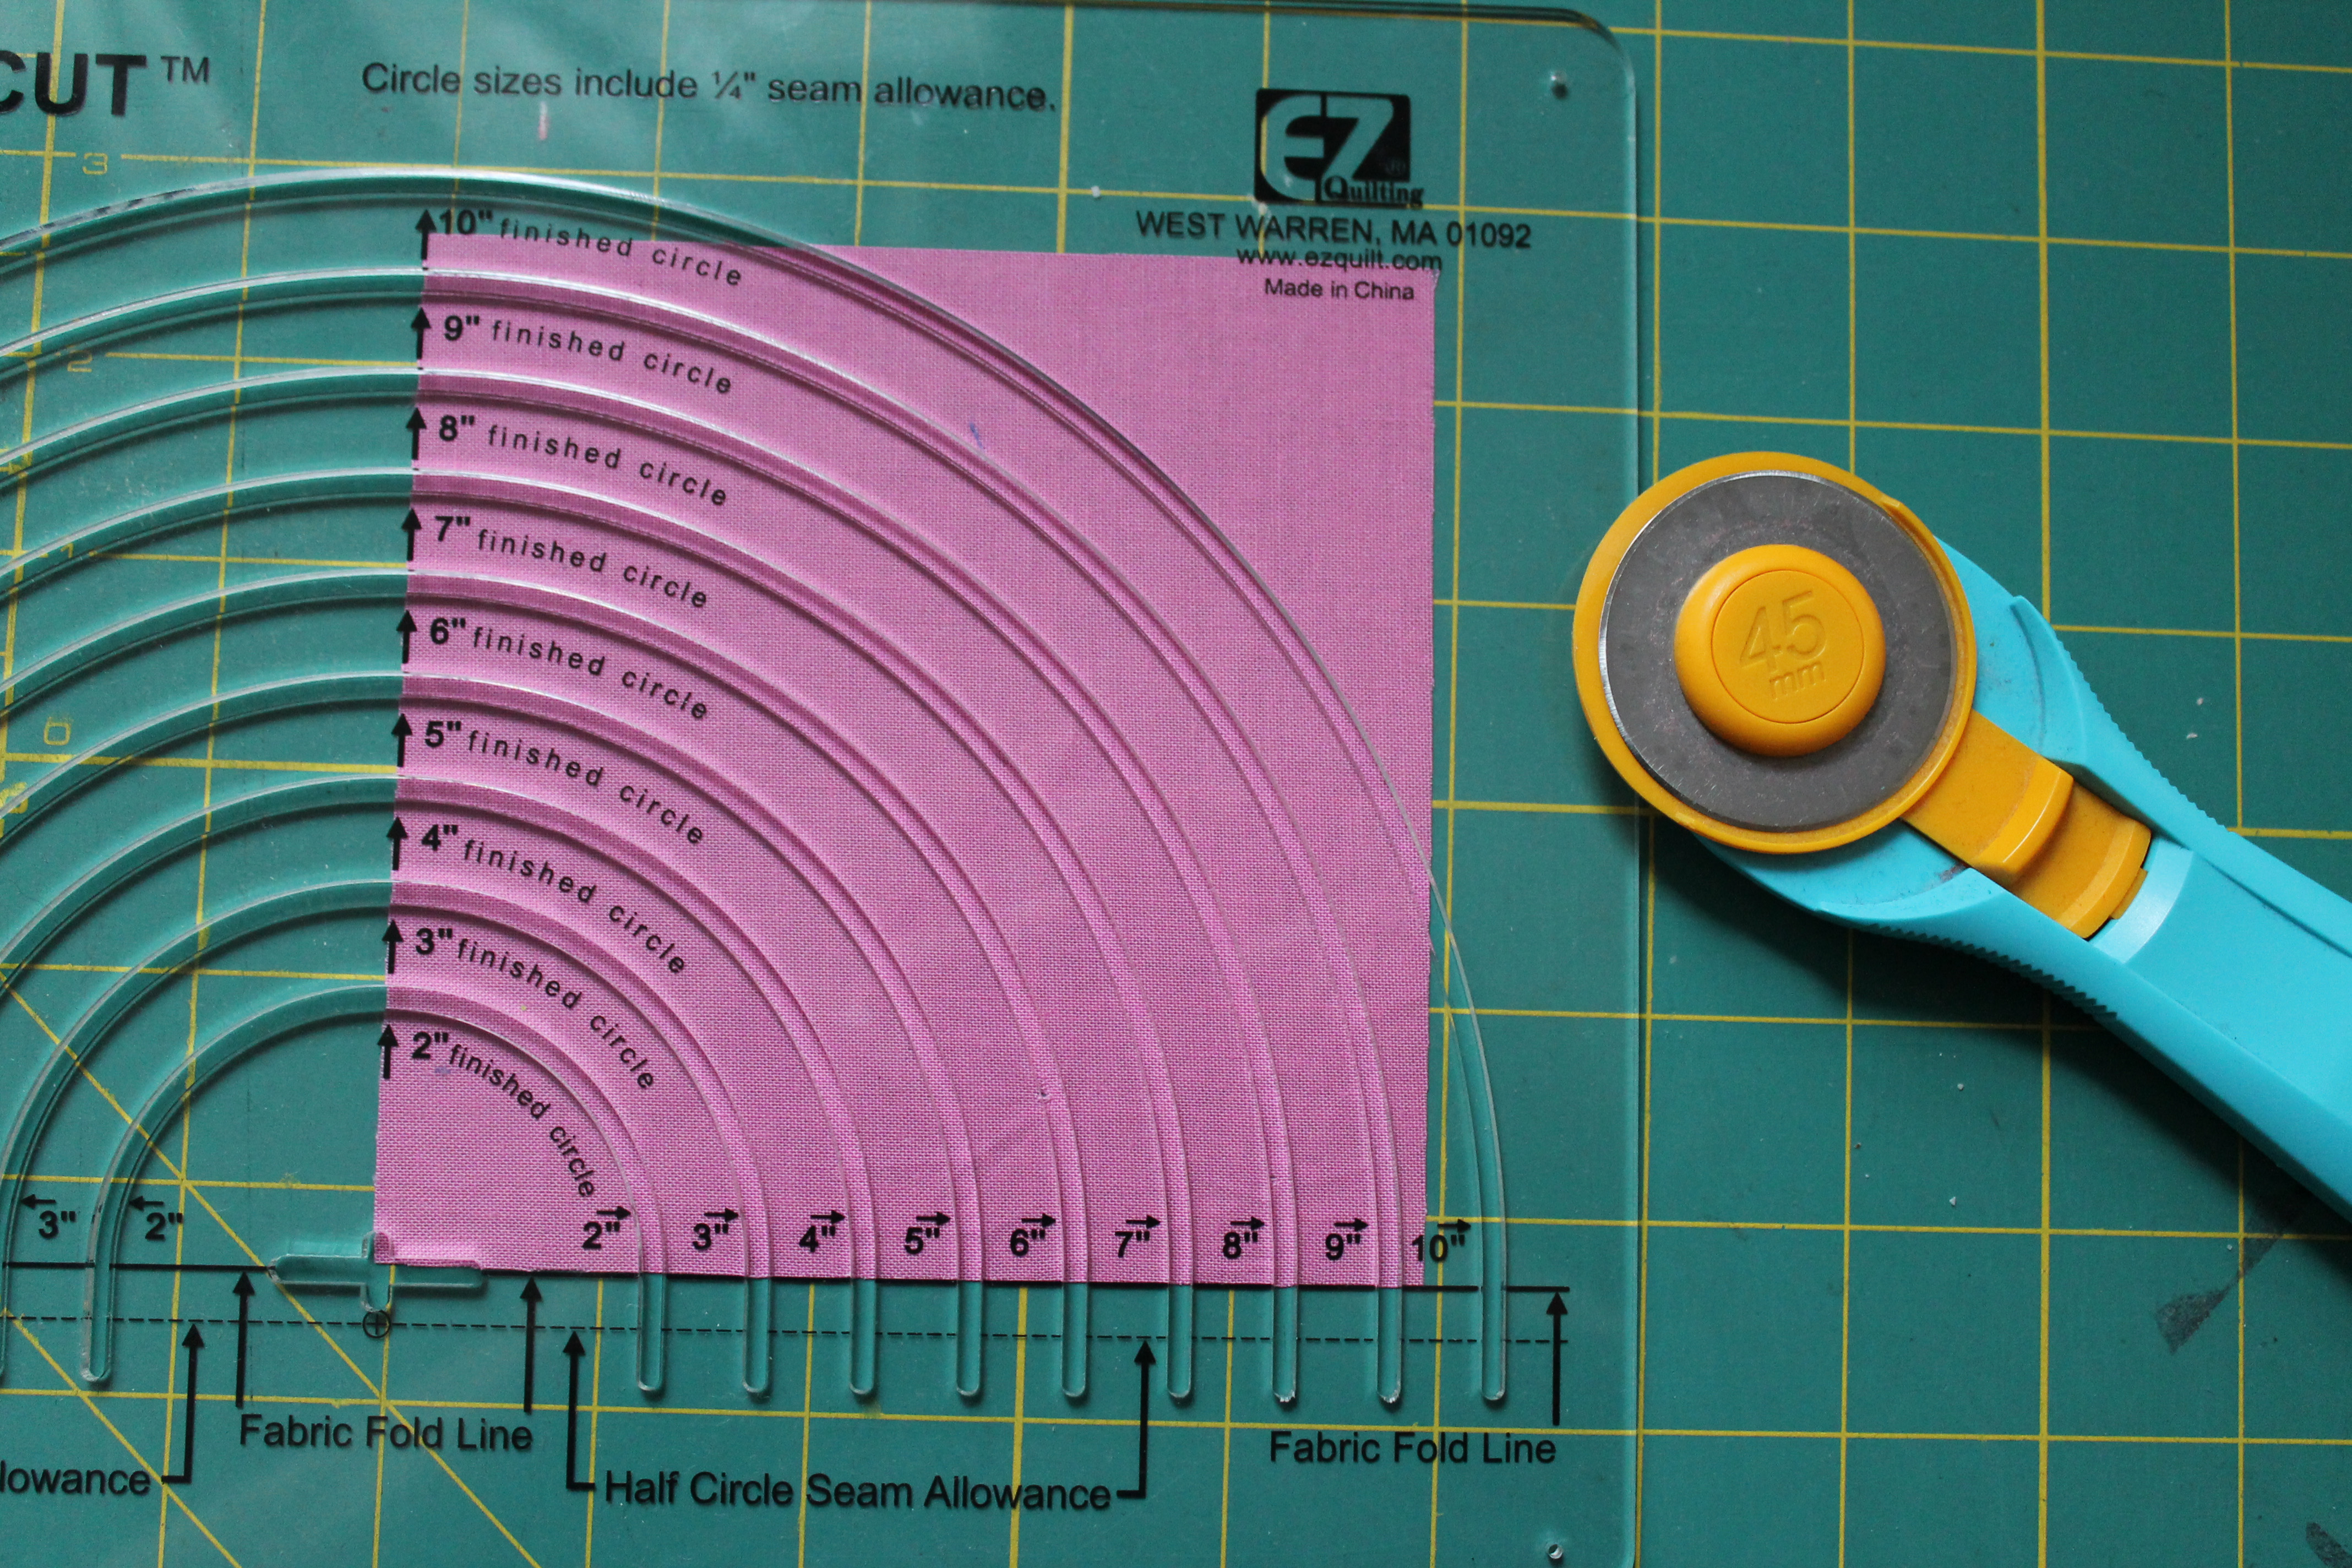 I then ran my rotary cutter along the inside of the “8” finished circle” grove. If you want to make a complete square with this ruler you cut a 10 inch square of fabric and fold it in half length wise and width wise so you end up with a 5 inch square of folded material. You follow the above steps, making sure that the folded sides of the material align with the “fabric fold line” marks on the ruler.
 You now have your inner curve… so onto your outer piece. For this piece I choose to cut a 6 1/2 inch square but you this ruler gives you some great creative choices here. If you want less background in your block you could go down to a 5 1/2 inch square or if you wanted more back ground you can increase your back ground square as you want.
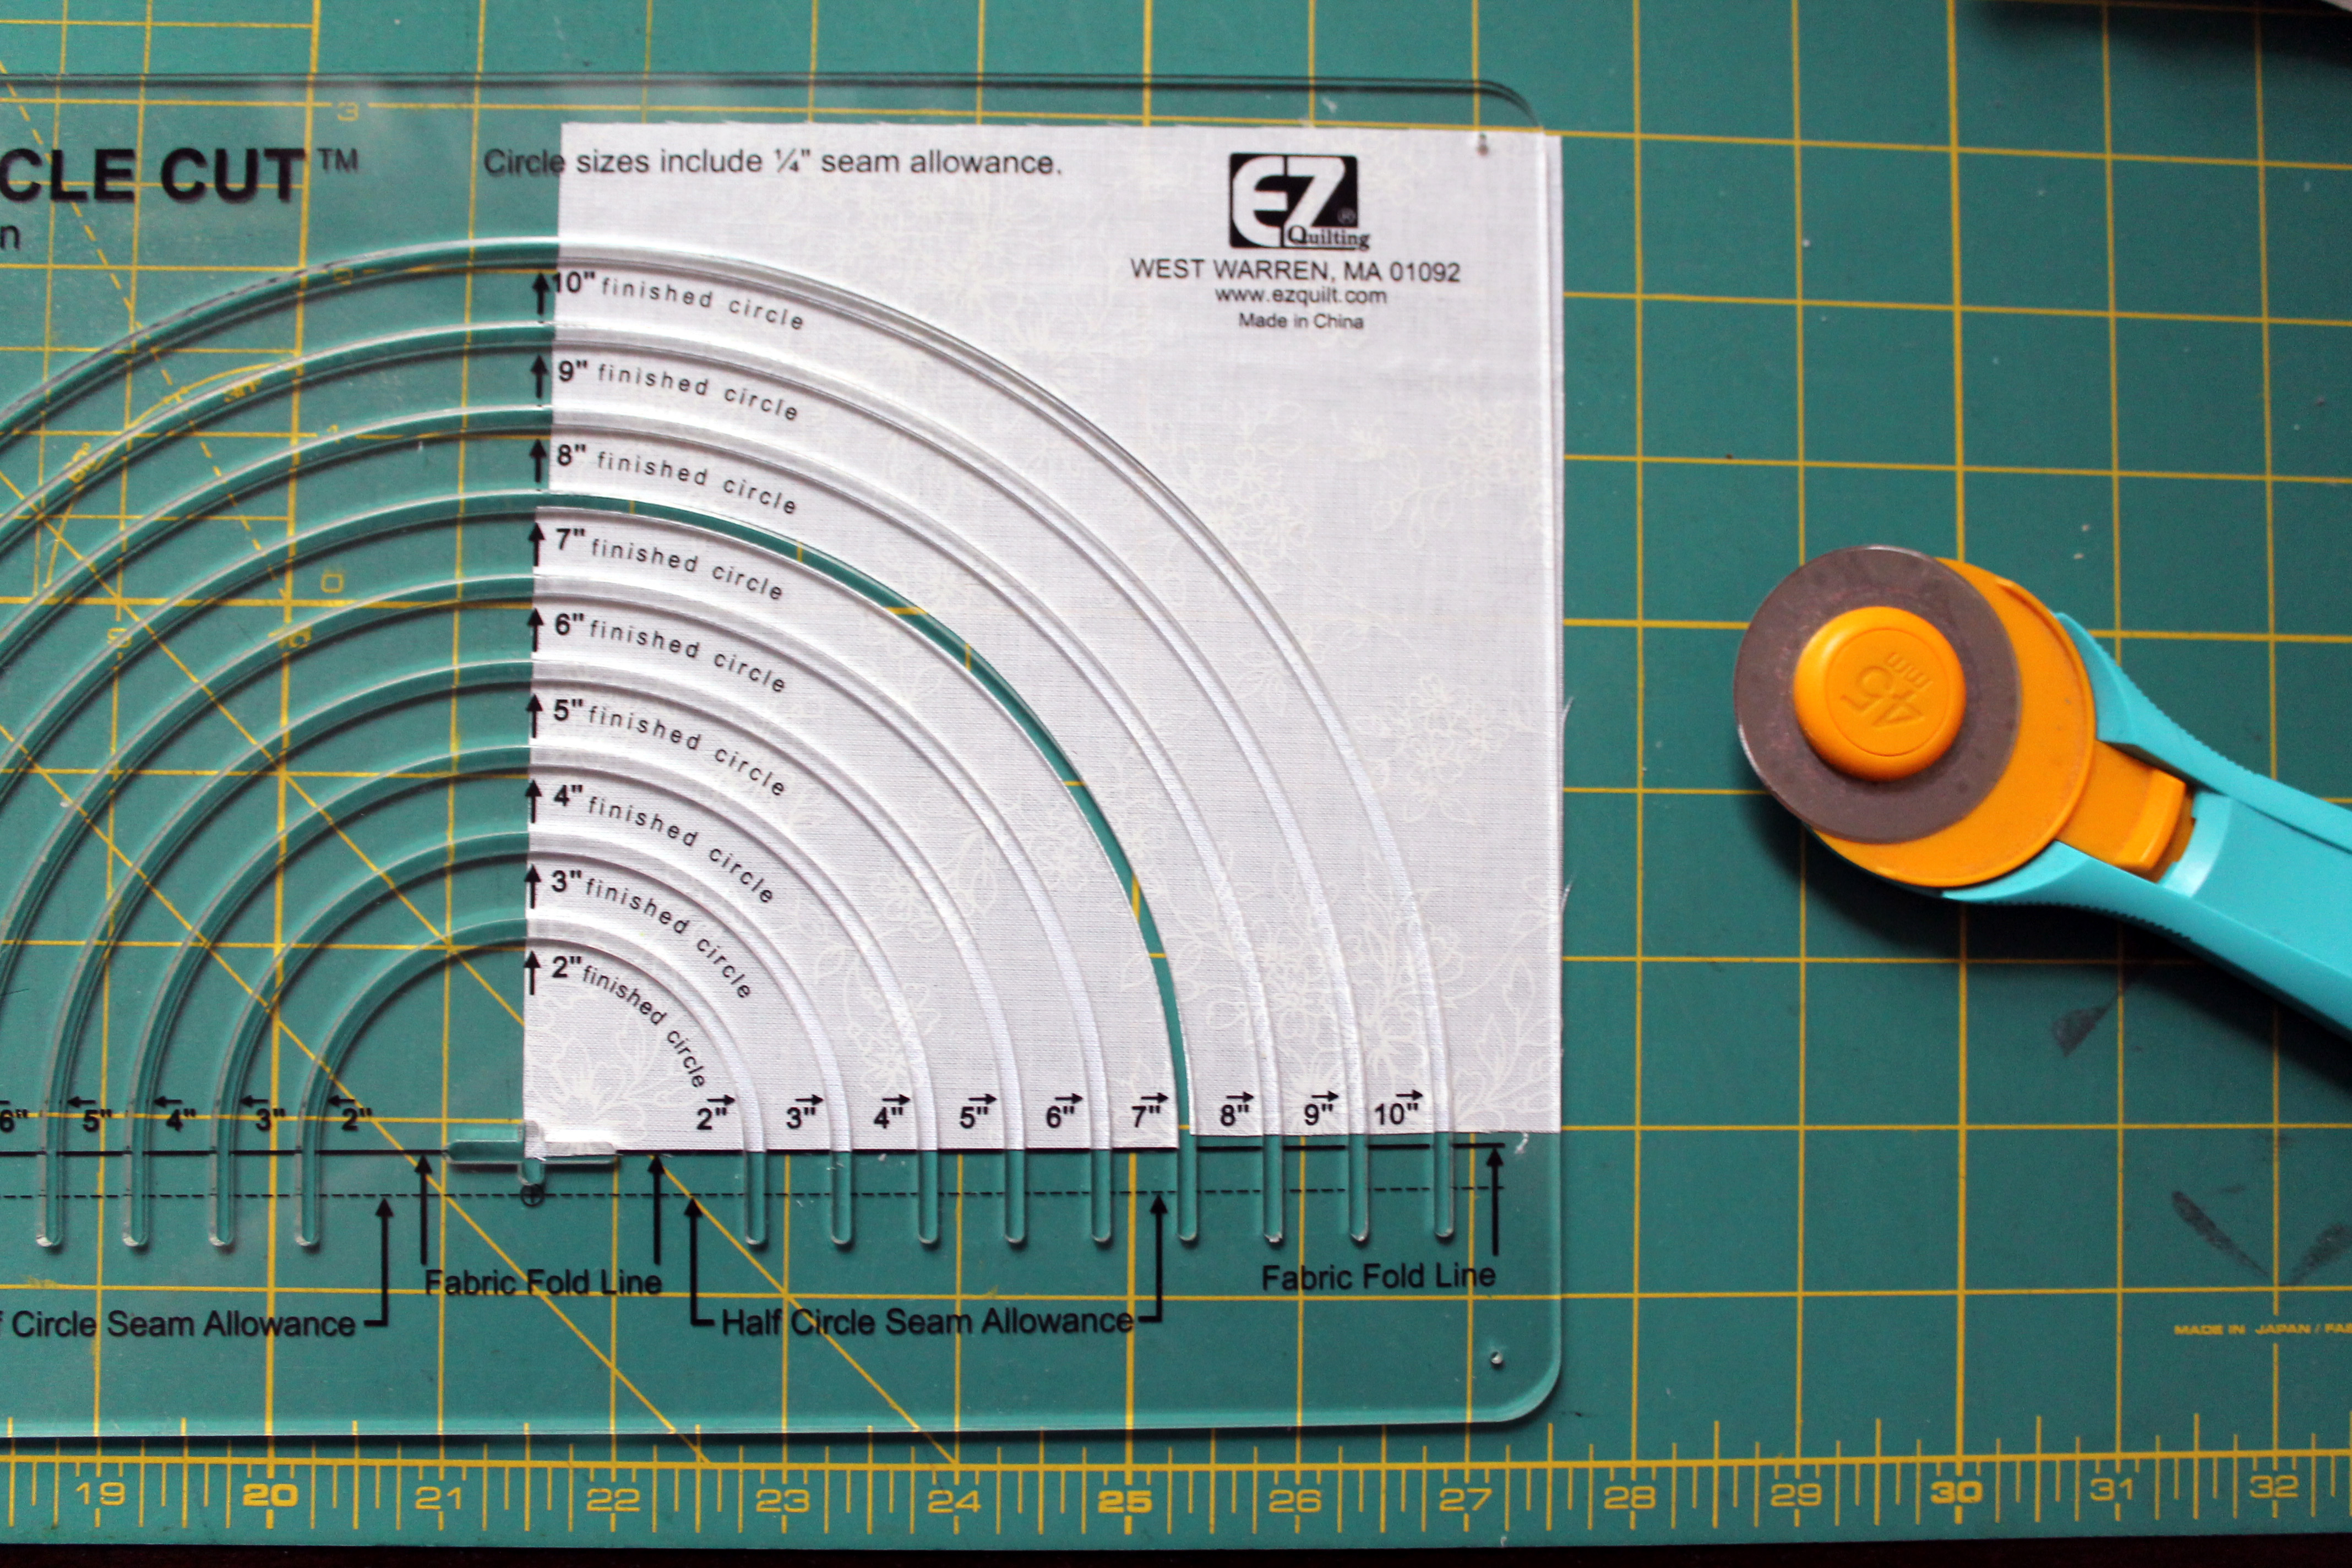 You are aligning your background square as you did your inner circle square but this time you are cutting on the curve 1 inch less than your circle curve. For me this meant I cut on the 7″ finished circle line. Again if you want to make a circle using this ruler, make your background piece double the size (in this case my background piece would be 13 inches square) and fold your fabric before cutting.
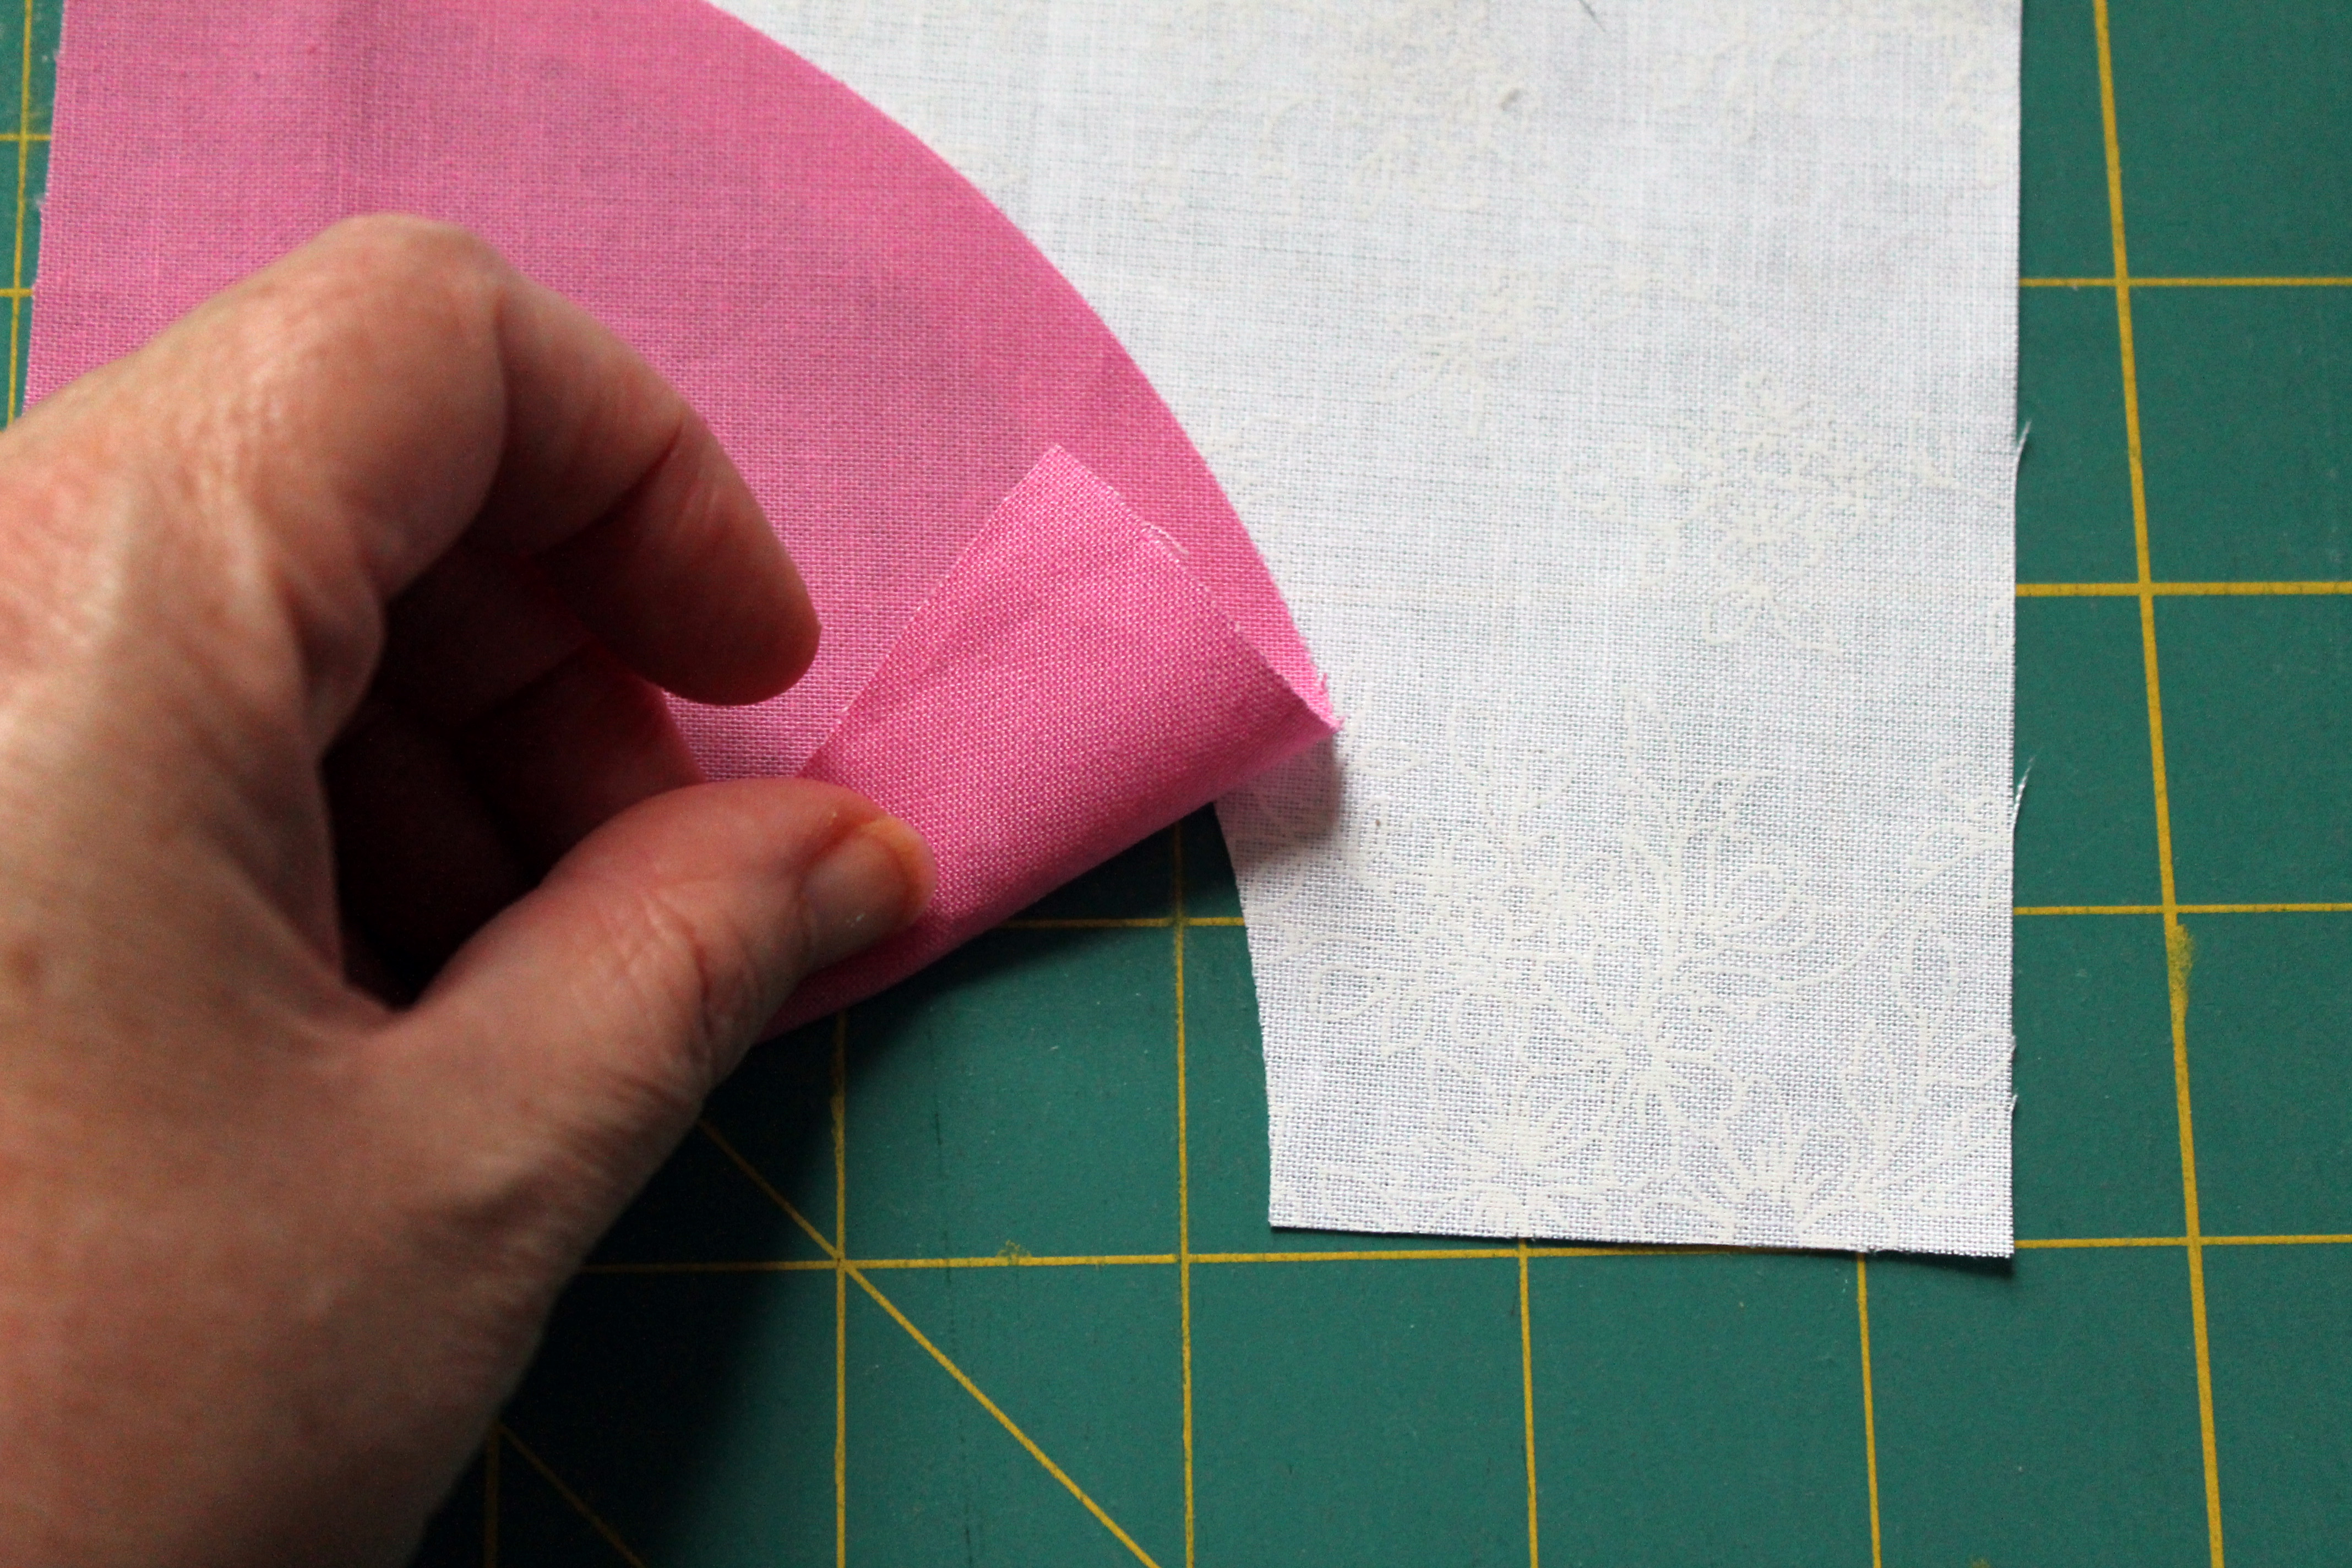 Cutting the background on the ruler curve 1 inch less than your inner circle give you the seam allowance overlap you need. You are now ready to sew your curved pieces together.
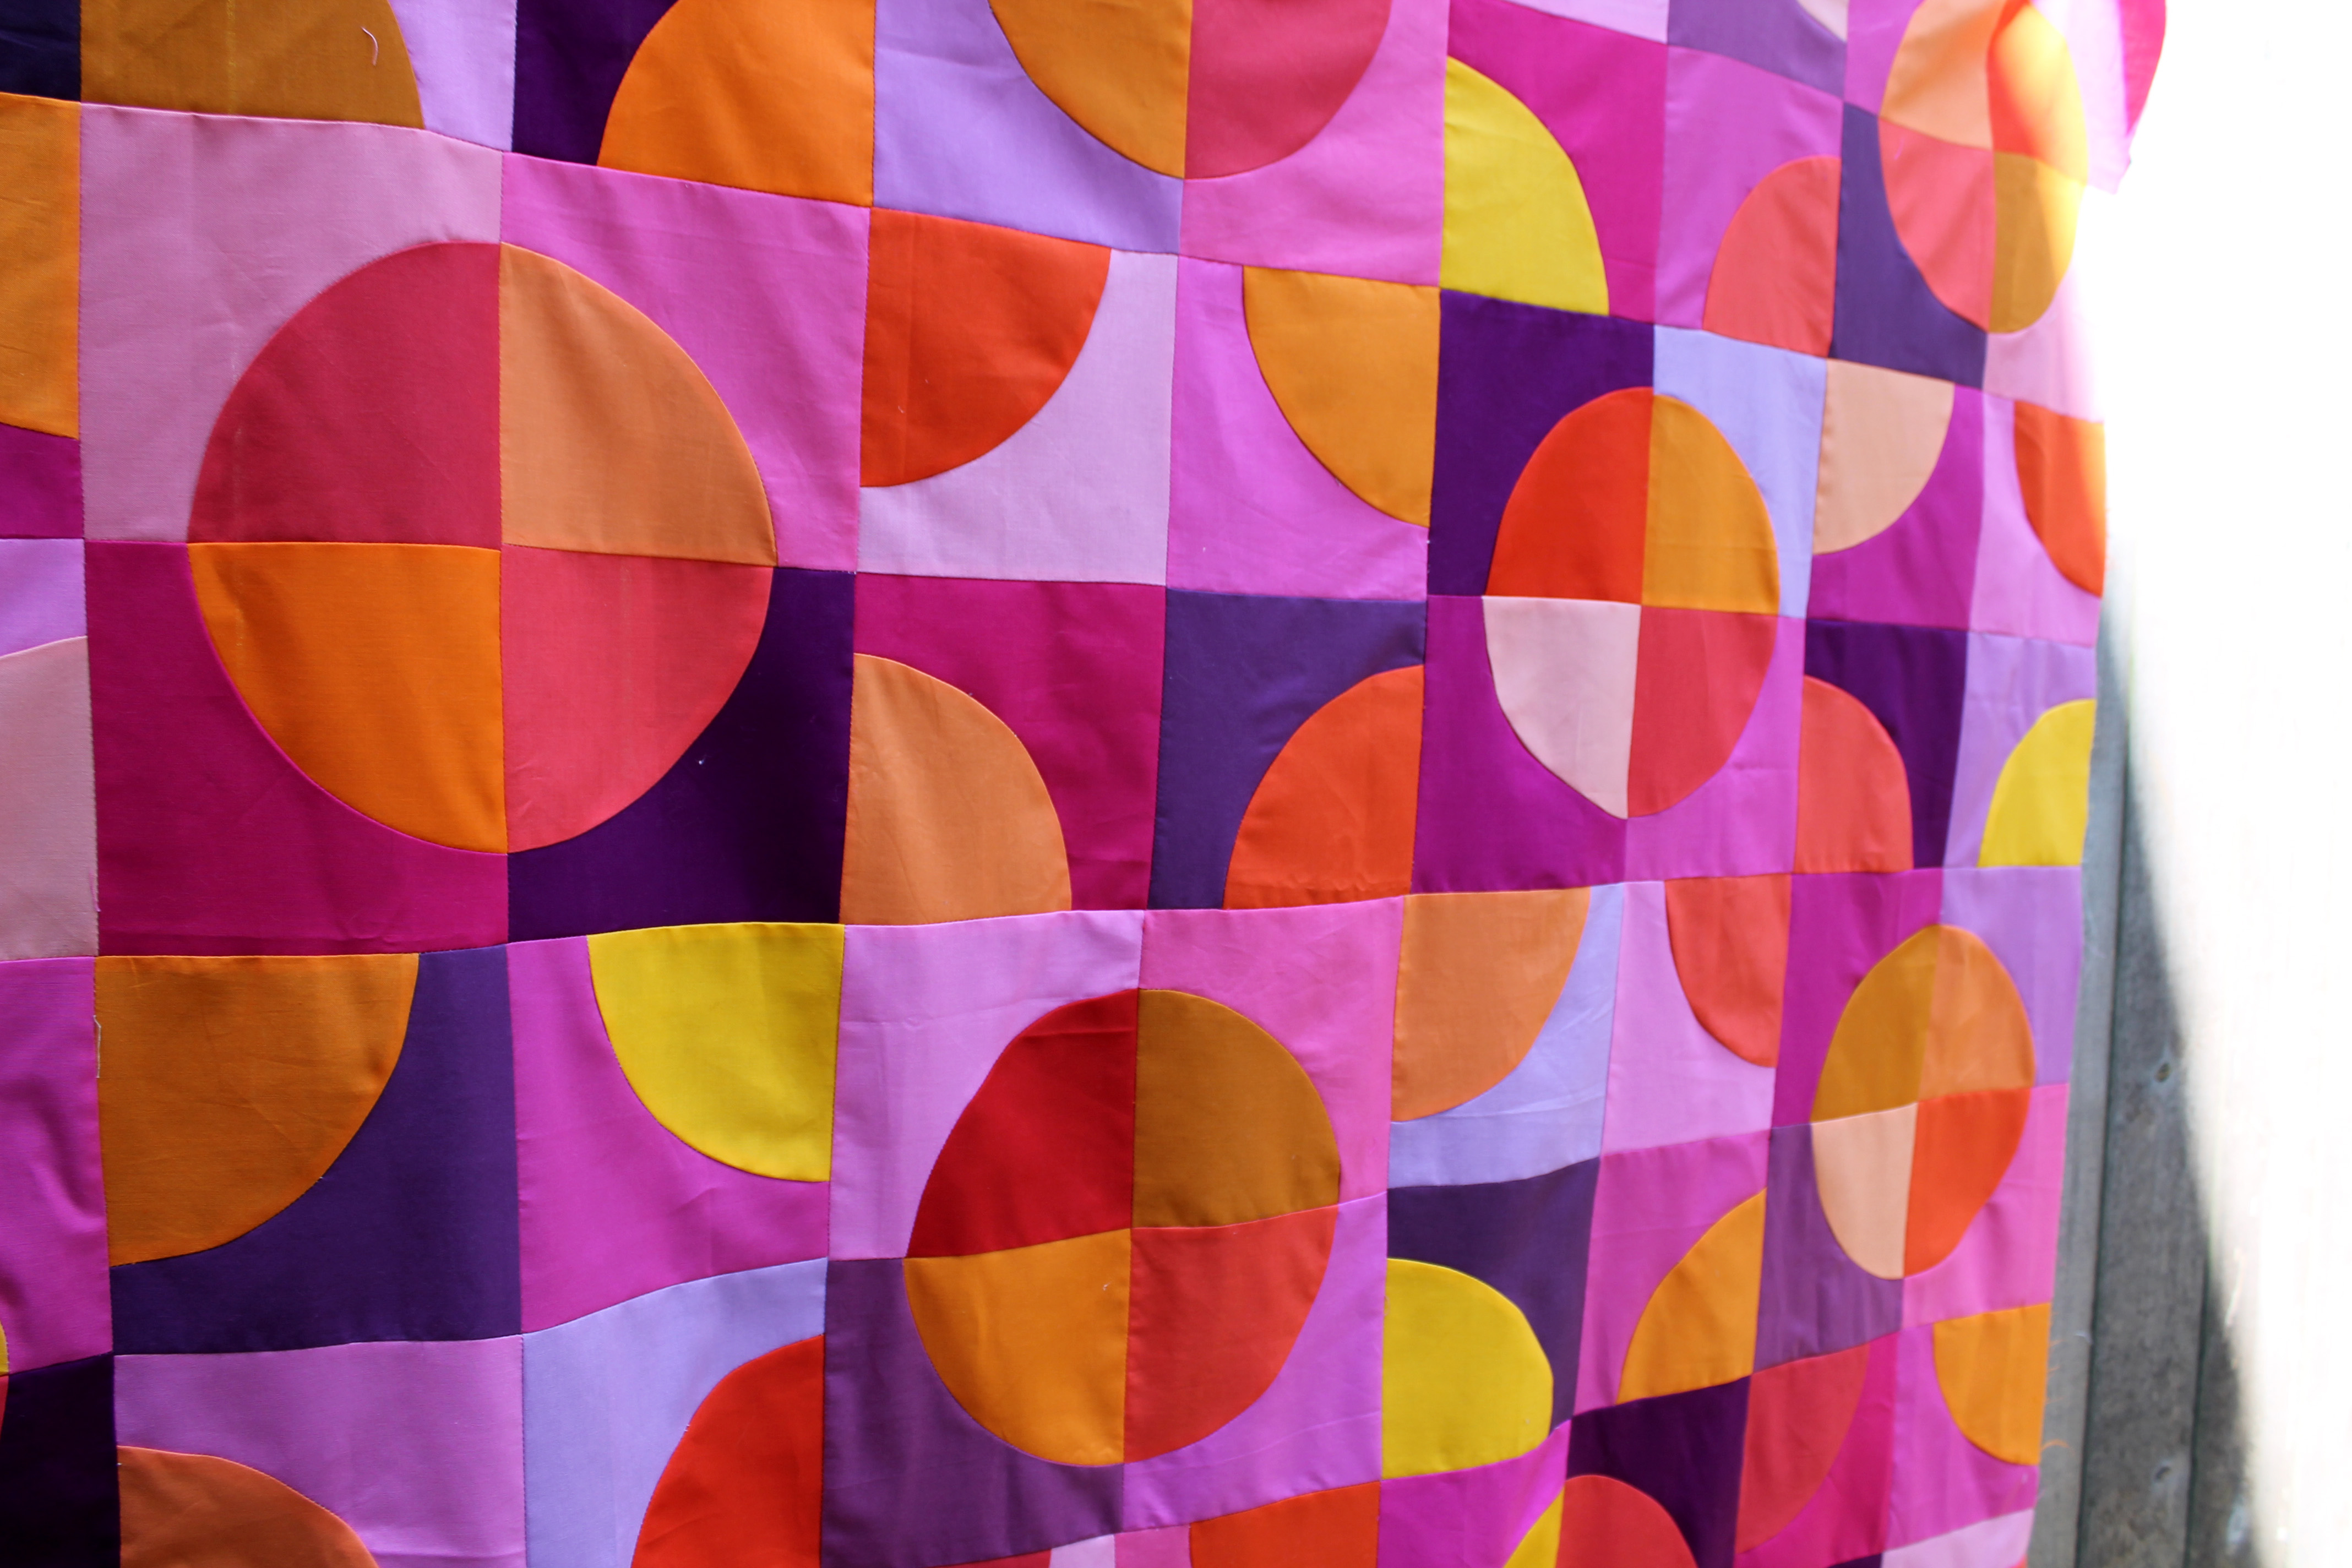 For the blocks of my Acidic Curve quilt I cut a 9 inch curve and then had a 6 inch background block with a curve cut out using the 8″ mark on the ruler. This gave me a finished circle block of 11 inches to work with.
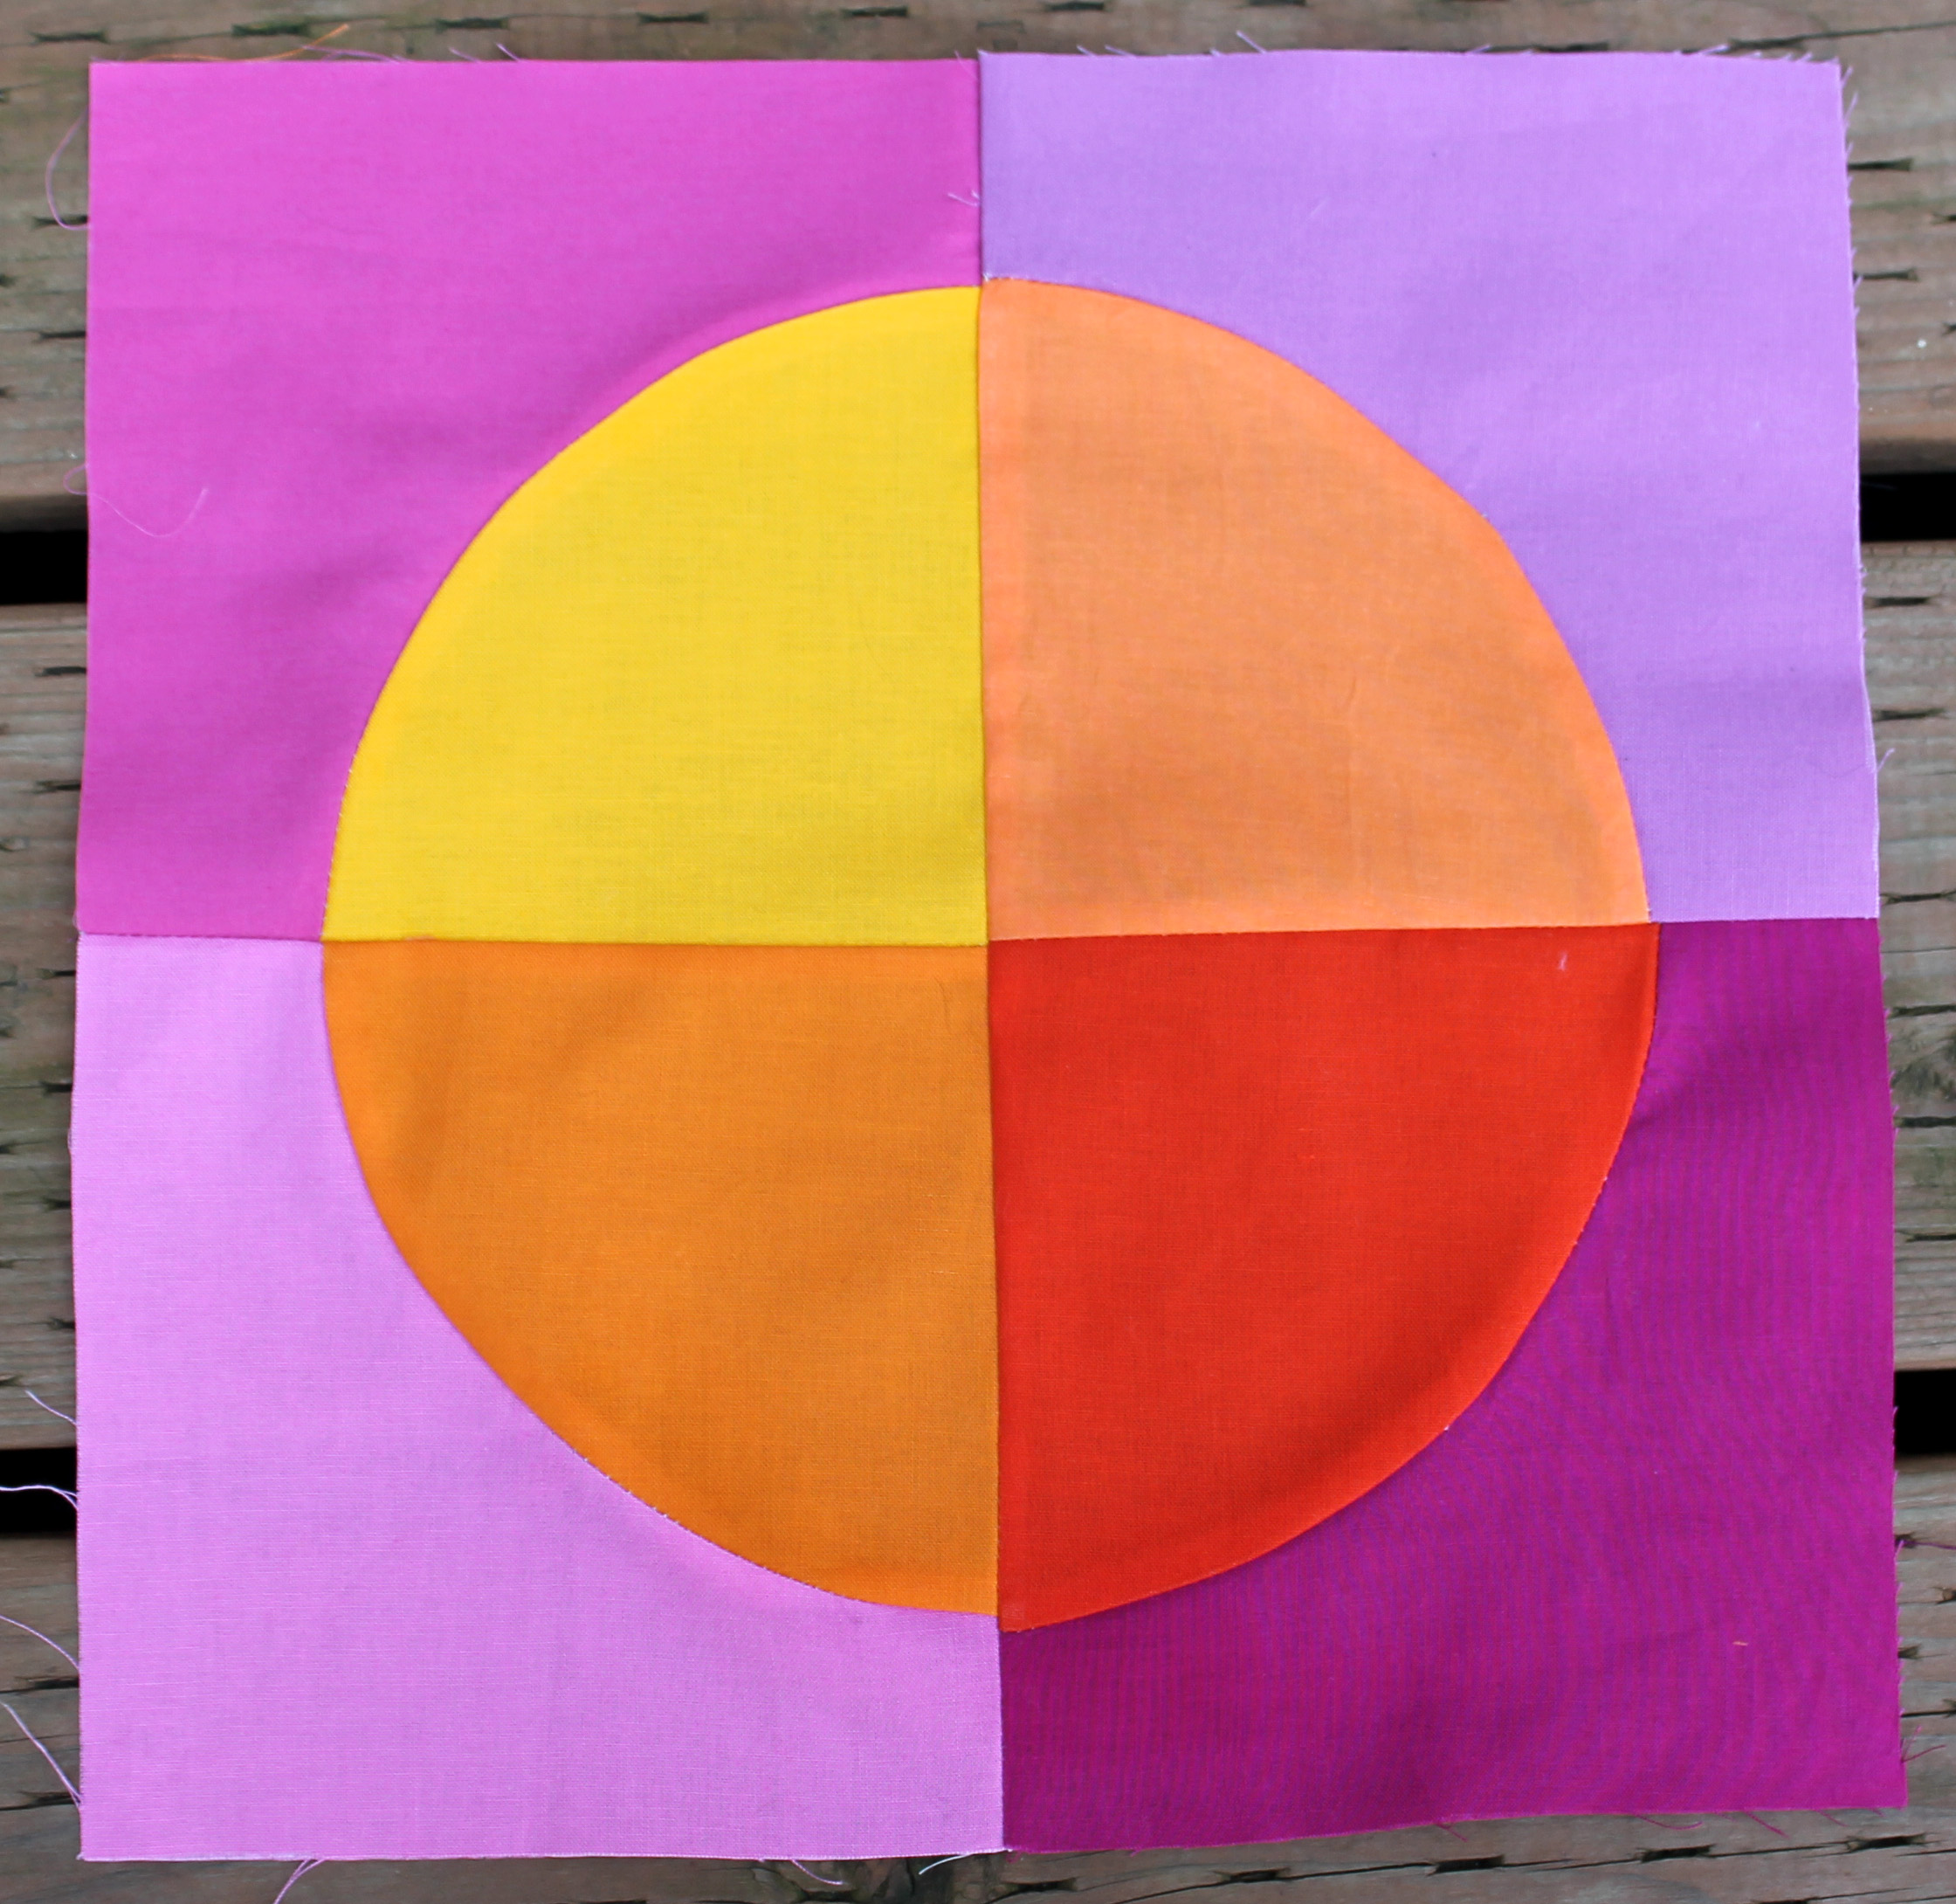 Hopefully I have not confused you too much… but I can definitely recommend the EZ ruler. I am finding it is giving me great creative choices for the curved blocks I am making, though the biggest curve I can make with it is a 10 inch finished circle.

I have no words to express how much I love this! It’s Gorgeous!!!! Do you happen to remember what colors you used for these? It’s purple and pink and surprisingly I love it, so I should probably ride that train as long as possible. 😀
I grabbed fabric from my stash, some of which I have had for years and do not know who it is by. I know that there is Couture Cotton in Apricot, Tangerine, Orange, Clementine, Lava, Coral, Petal, Watermelon, Berry, Orchid, Magneta, Raspberry, Bubblegum,Violet and a little Peach and Cherry. There is also Kona purples, magenta and bright oranges. And a touch of bright yellow which is Citrus in Cotton Couture but I think I would leave it out if I made it again.
Cool! I just received one of these EZ Circle Rulers as a gift and now I know how I can use it! Thanks
Lynne it is really fun. I would love to see what you create…so let me know when you have posted something.
It looks simply wonderful!
It’s great! And wonderful that the right tool has made you conquer your fear, because obviously it wasn’t a sewing issue – you’ve done a beautiful job. And personally, I like the yellows, they add a touch of ‘heat’. I’ve been wanting to make a quilt with different sized circles appliqued to it for some time, and this would certainly make life much easier.
That is stunning!
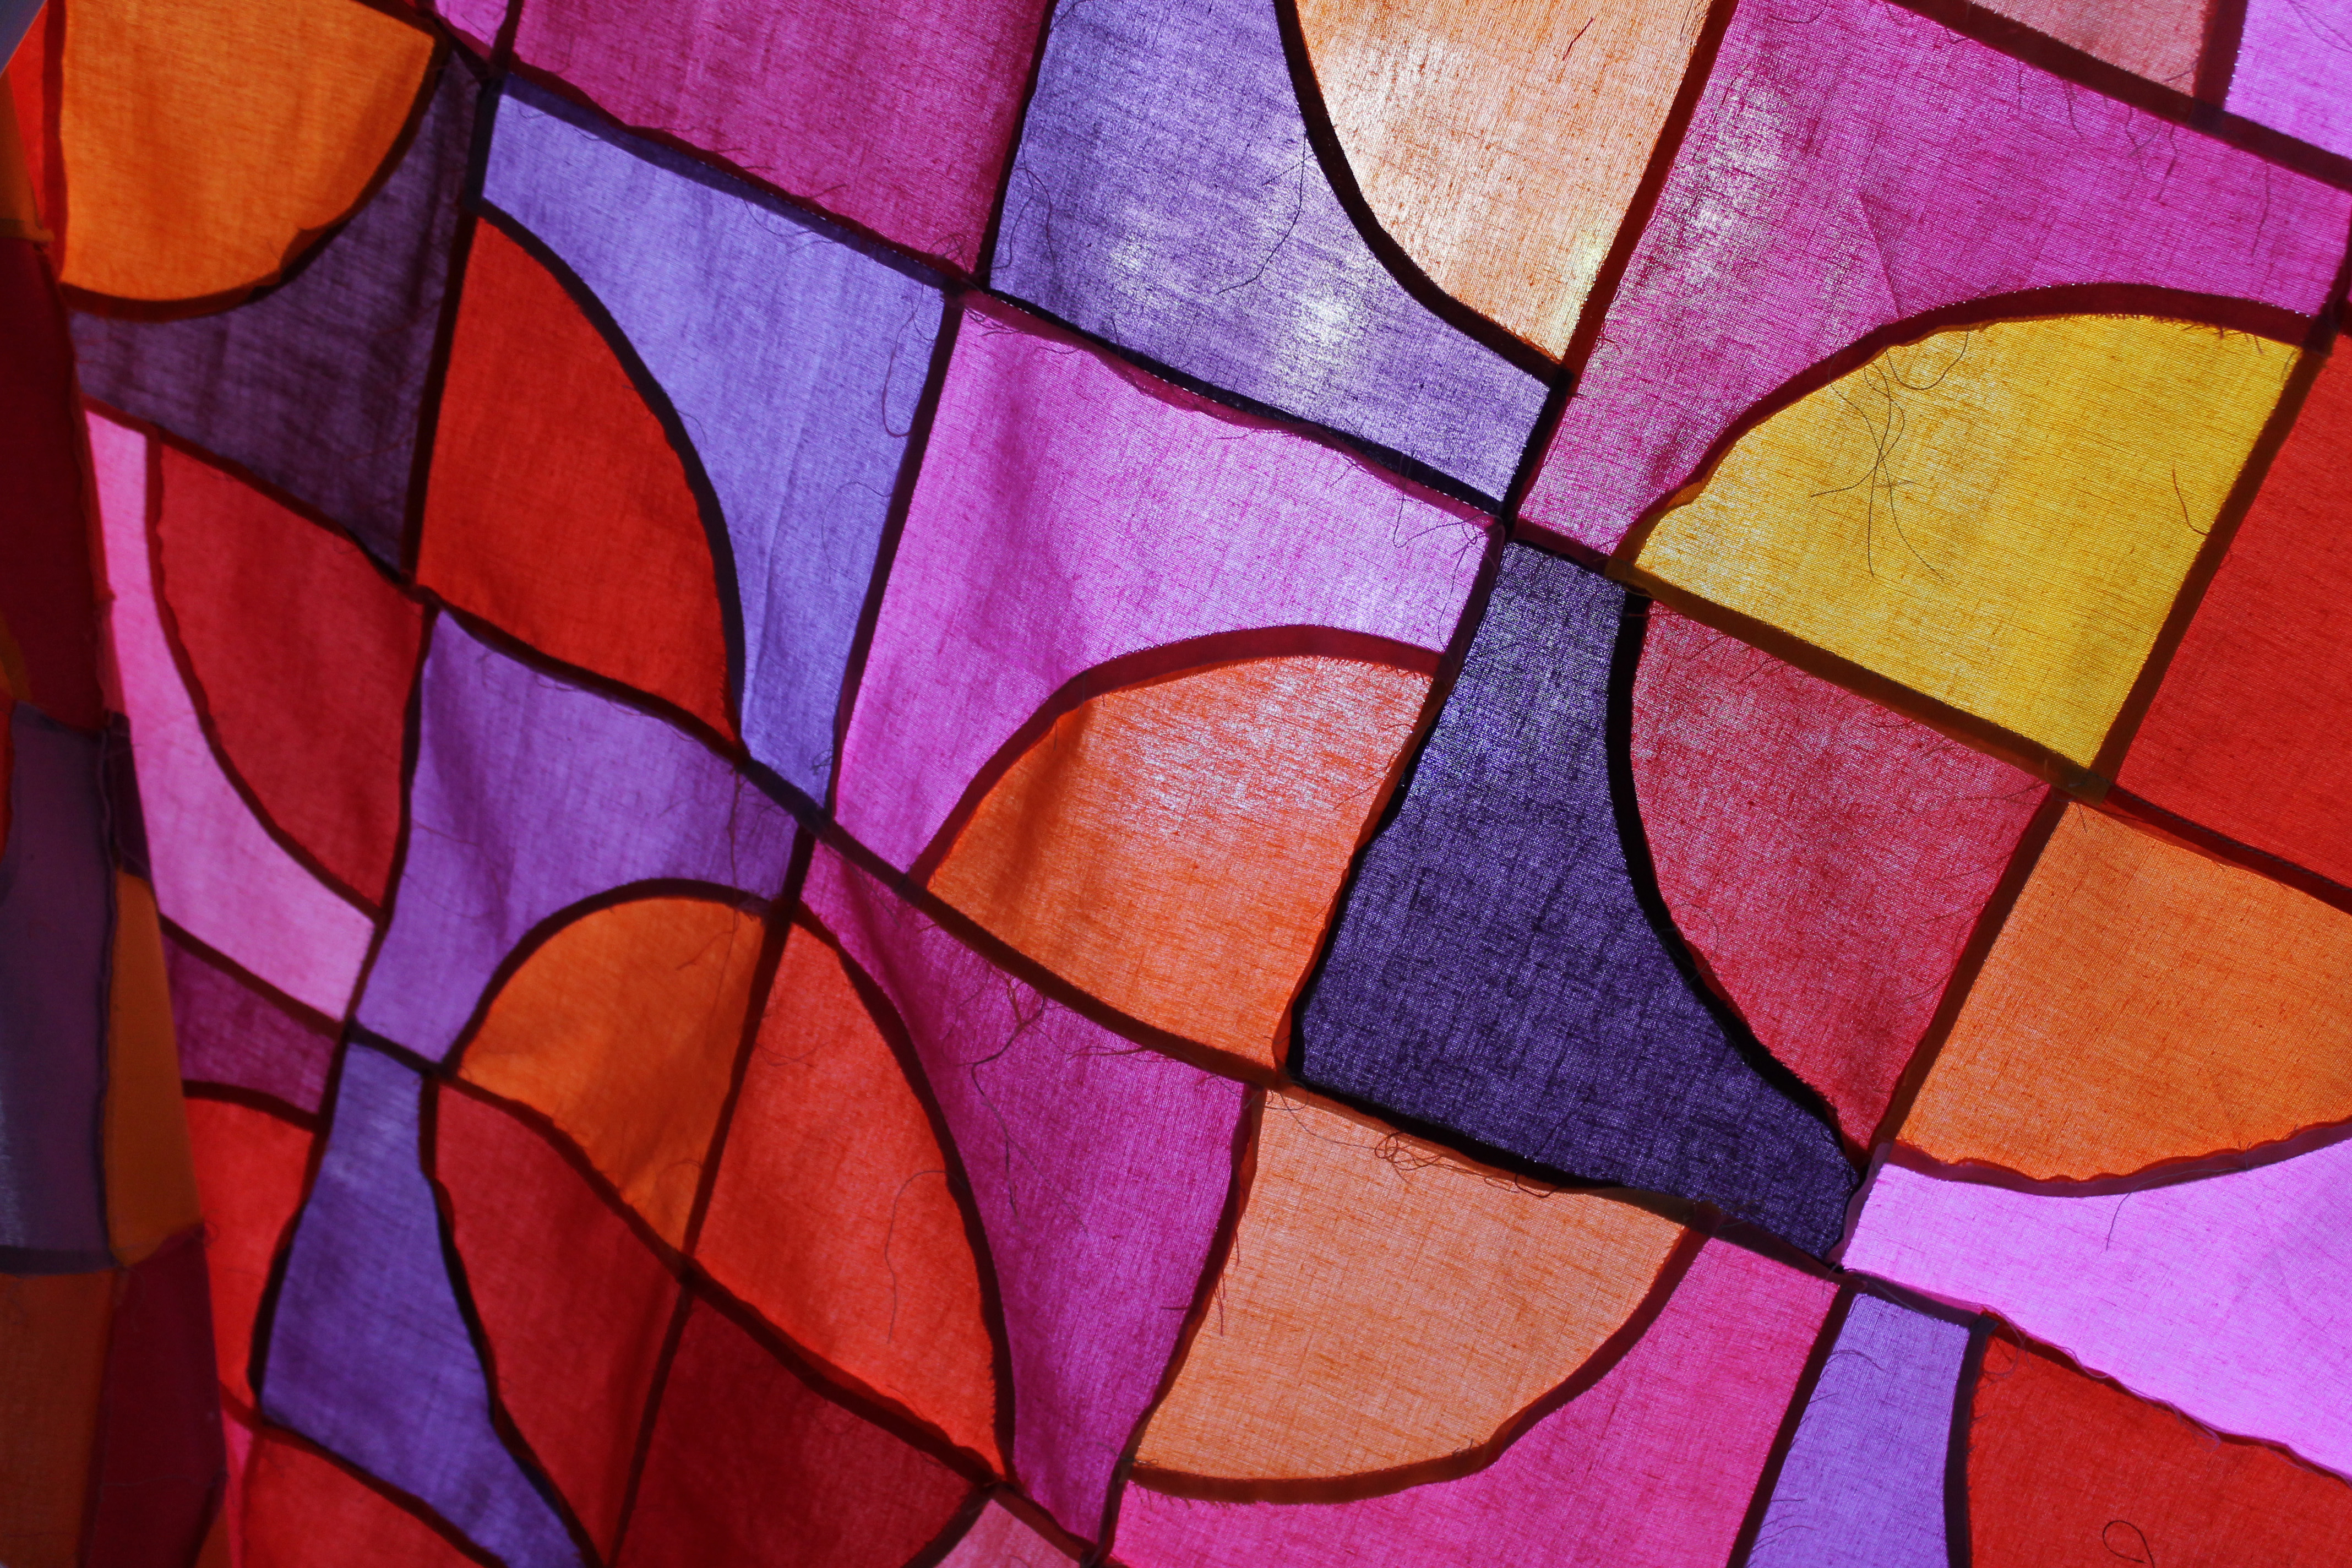
Love the colors and seeing it displayed like a fine stained glass is always one of my favorite views of a flimsy finish!
So beautiful! Now I want to know what you did with the leftover bits 🙂
Fantastic quilt! I just love those colours. They look great made it up in the drunkards path block.
I missed your earlier posts on this, but I’m impressed! Love your color choices and the solids, of course, but Wow– that EZ ruler looks fun! I made a mini drunkard’s path a few years ago with templates I drew myself on cardboard. It came out quite nicely but I realize I haven’t been looking forward to the fussing enough to ever give it another try. Now maybe I will…..thanks!
It is beautiful!
Fantastic colors…LOVE!!!
This is absolutely GORGEOUS! I love the colors!!!
This is so gorgeous!!!
Love the colors a lot!
Gorgeous colours. It looks amazing 🙂
Great colour combinations! Absolutely love it, so bright and happy.
Love this! This is kinda the color scheme I’m wanting to use in my next do Good Stitches quilt! Fantastic!
Oh this colour scheme would be great for a scrappy quilt, and Do Good Quilts are always so fabulously scrappy. I am never this brave with colour when I set my Do Good blocks….I need to be braver.
Hi Cath! Looks fantastic! Thank you for showing how you do it. I’m sure we are many WHO are affraid of the circles – perhaps it’s time to try. x Teje
I had a discount voucher, and you might have accidentally inspired me to put it towards a drunkard’s path ruler. Not a fancy one, but a start.
Yipee. I am excited to see what you do with this block Carla.
This looks truly incredible! And I think I mentioned in my comment on your previous update that you’ve inspired me to try curves once I’m finished with my current projects.
The colors are fantastic! Thanks for sharing this project and your experience with the ruler.
So awesome Cath!! The colours are just wonderful!
And i now think i may need to pick up that ruler 🙂
The fabric you chose are so fab and the circles ~ perfect!
This is such a pretty quilt top! Love the colors and layout you chose!
Cath, this is awesome! I swear I’d love to raid your house and snag all of your projects!
Julie…this comment somehow ended up in my Spam…you will have to let me finish a few more before you come and raid the house. LOL.
So THAT’s how it’s done!!! Perfect curves! I very well might have to buy one of those rulers! So far, I only have straight rulers, but on my list is the hex-and-more ruler, a flying geese helper, and now this EZ curves ruler. I might need to do some notion shopping soon!
Pingback: Continuing the catch up with curves | WOMBAT QUILTS
Pingback: Drunkard’s Path….by any other name! | Freckled Fox Quiltery
WOW, you are amazing…and thanks so much for sharing your brilliance! I knew there had to be a switch in the cut size somewhere, but wasn’t sure how much. I really appreciate this. Dolly in Alaska