Mini Charm Square block

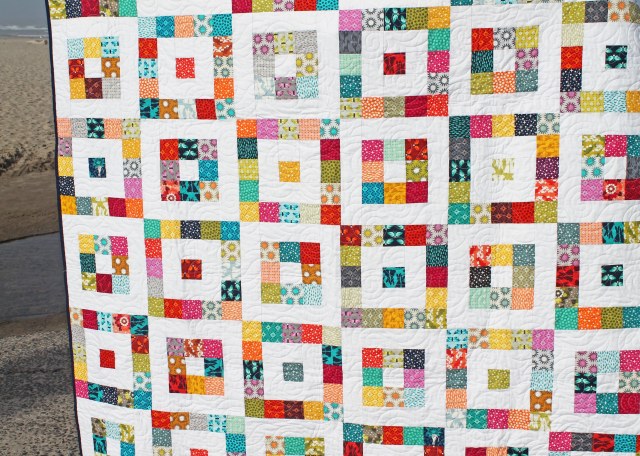
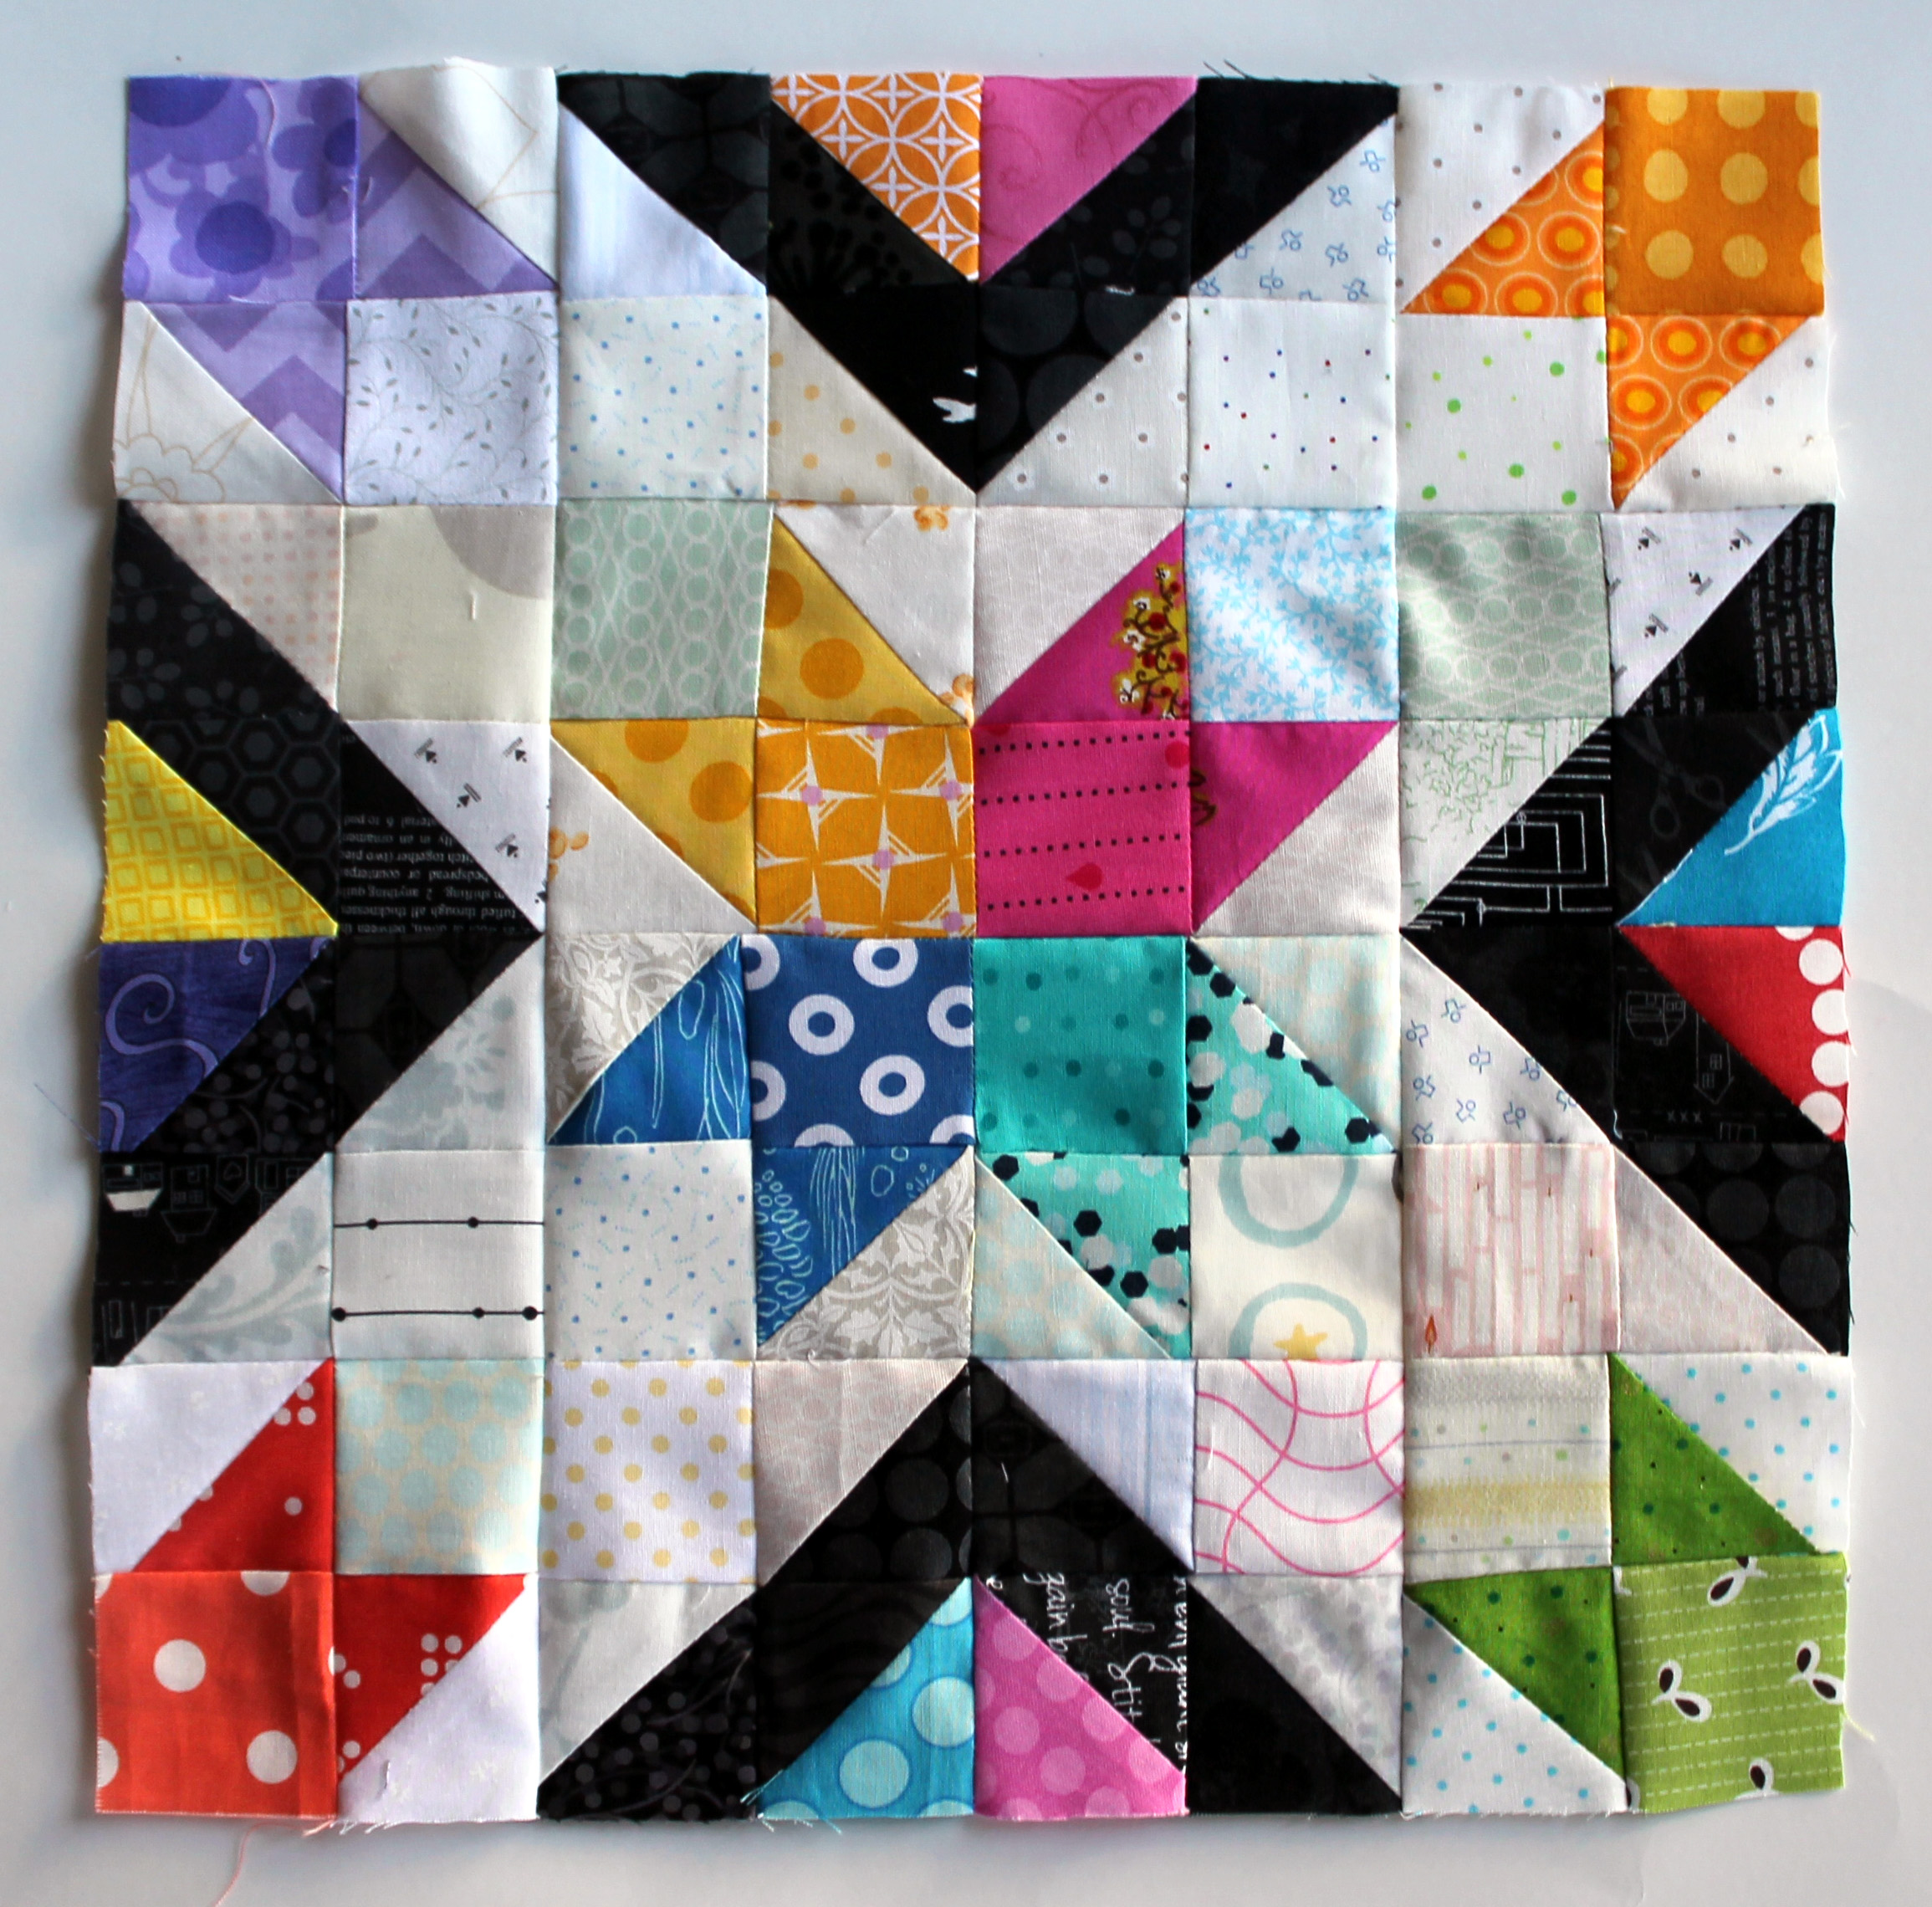
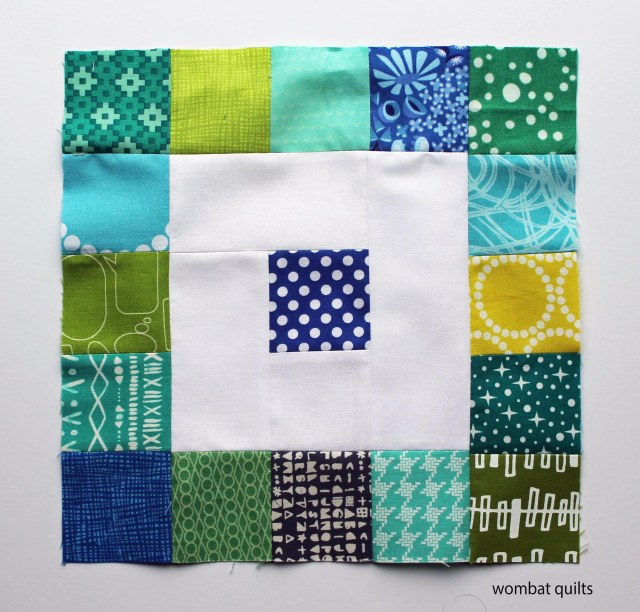
After I posted the scrappy quilt on Friday I had several requests for a  link to the block pattern, which was hard to do becauseI had not followed a pattern.  I had been inspired by some log cabin blocks I had seen and some quilts I had seen on the internet and so worked out the math and then did a step out for our charity sew group.

So on the weekend I photographed the steps just in case you want to play with your own pile of mini charm squares.  There are two blocks that make up the quilt…

Block One…

mini charm block 1

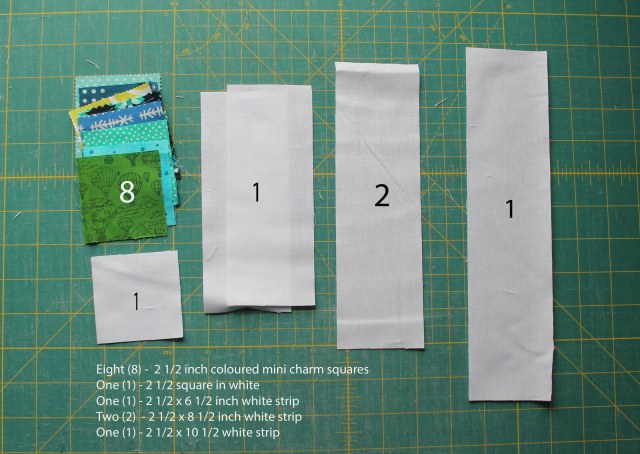
For this block you need:

mini charm block 1 cut instructions

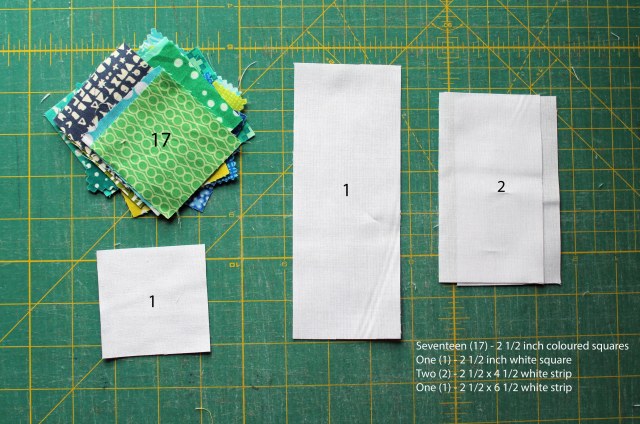
When making these blocks I sew the mini charm squares into strips first…

block 1 construction

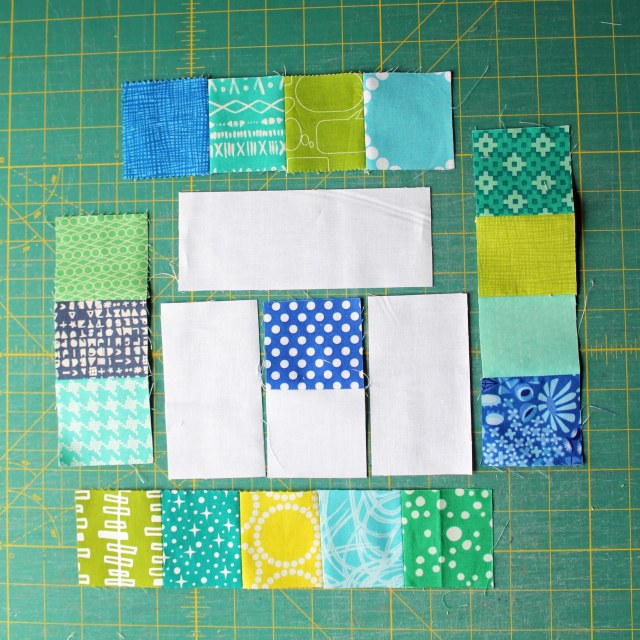
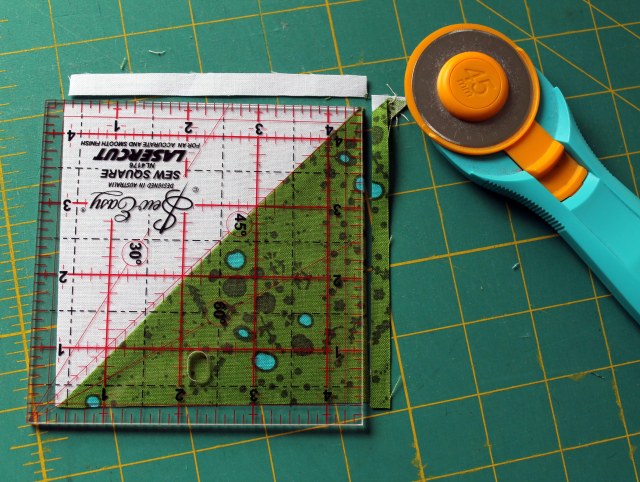
The block is then put together as a log cabin block would be… adding the smallest strip to the side and working my way around.  If you are using mini charm squares cut by manufacturers be aware that they do come in slightly different sizes… some cut with. straight edge and some cut with a crimped/pinked edge.  The squares with the zig zag edges can be slightly larger than 2 1/2 inch.  If in doubt trim your mini charm strips to get a clean sewing edge.

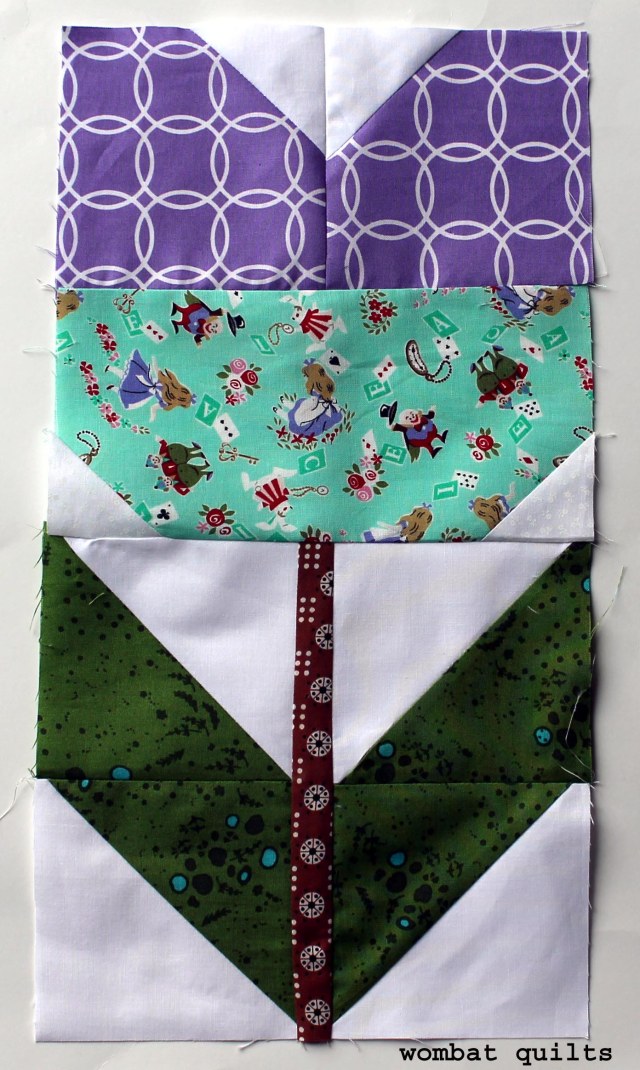
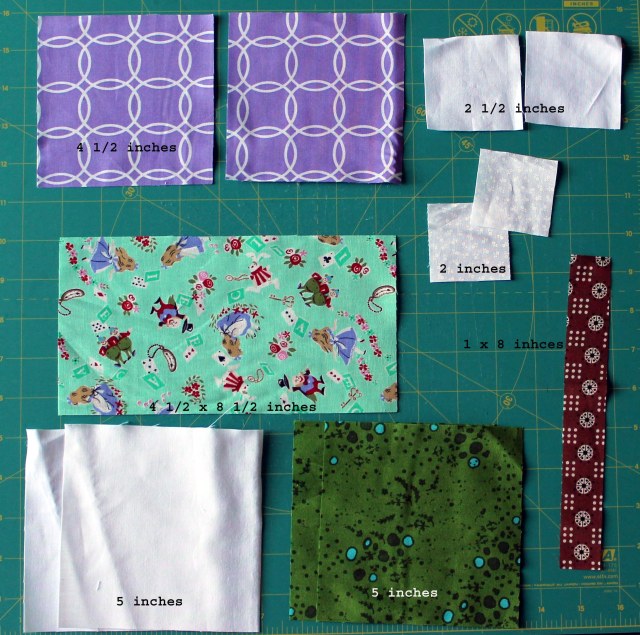
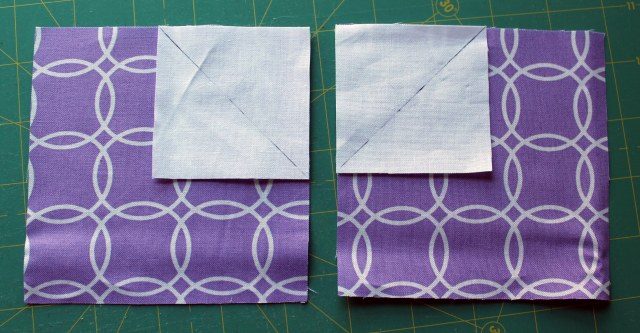
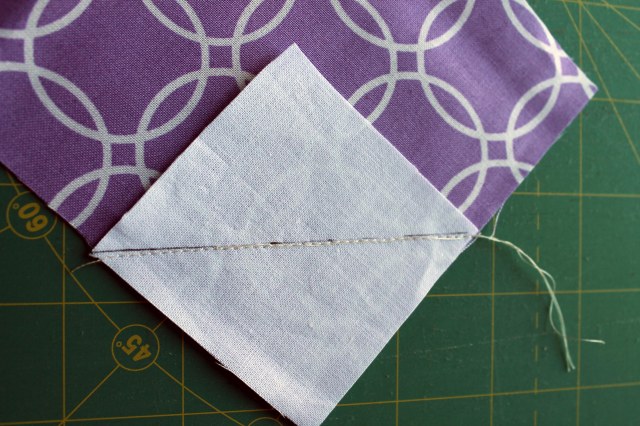
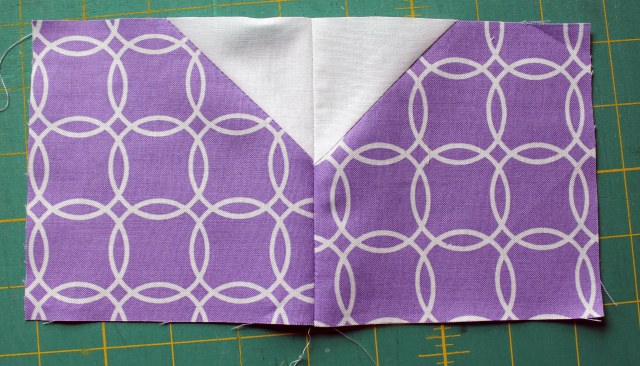
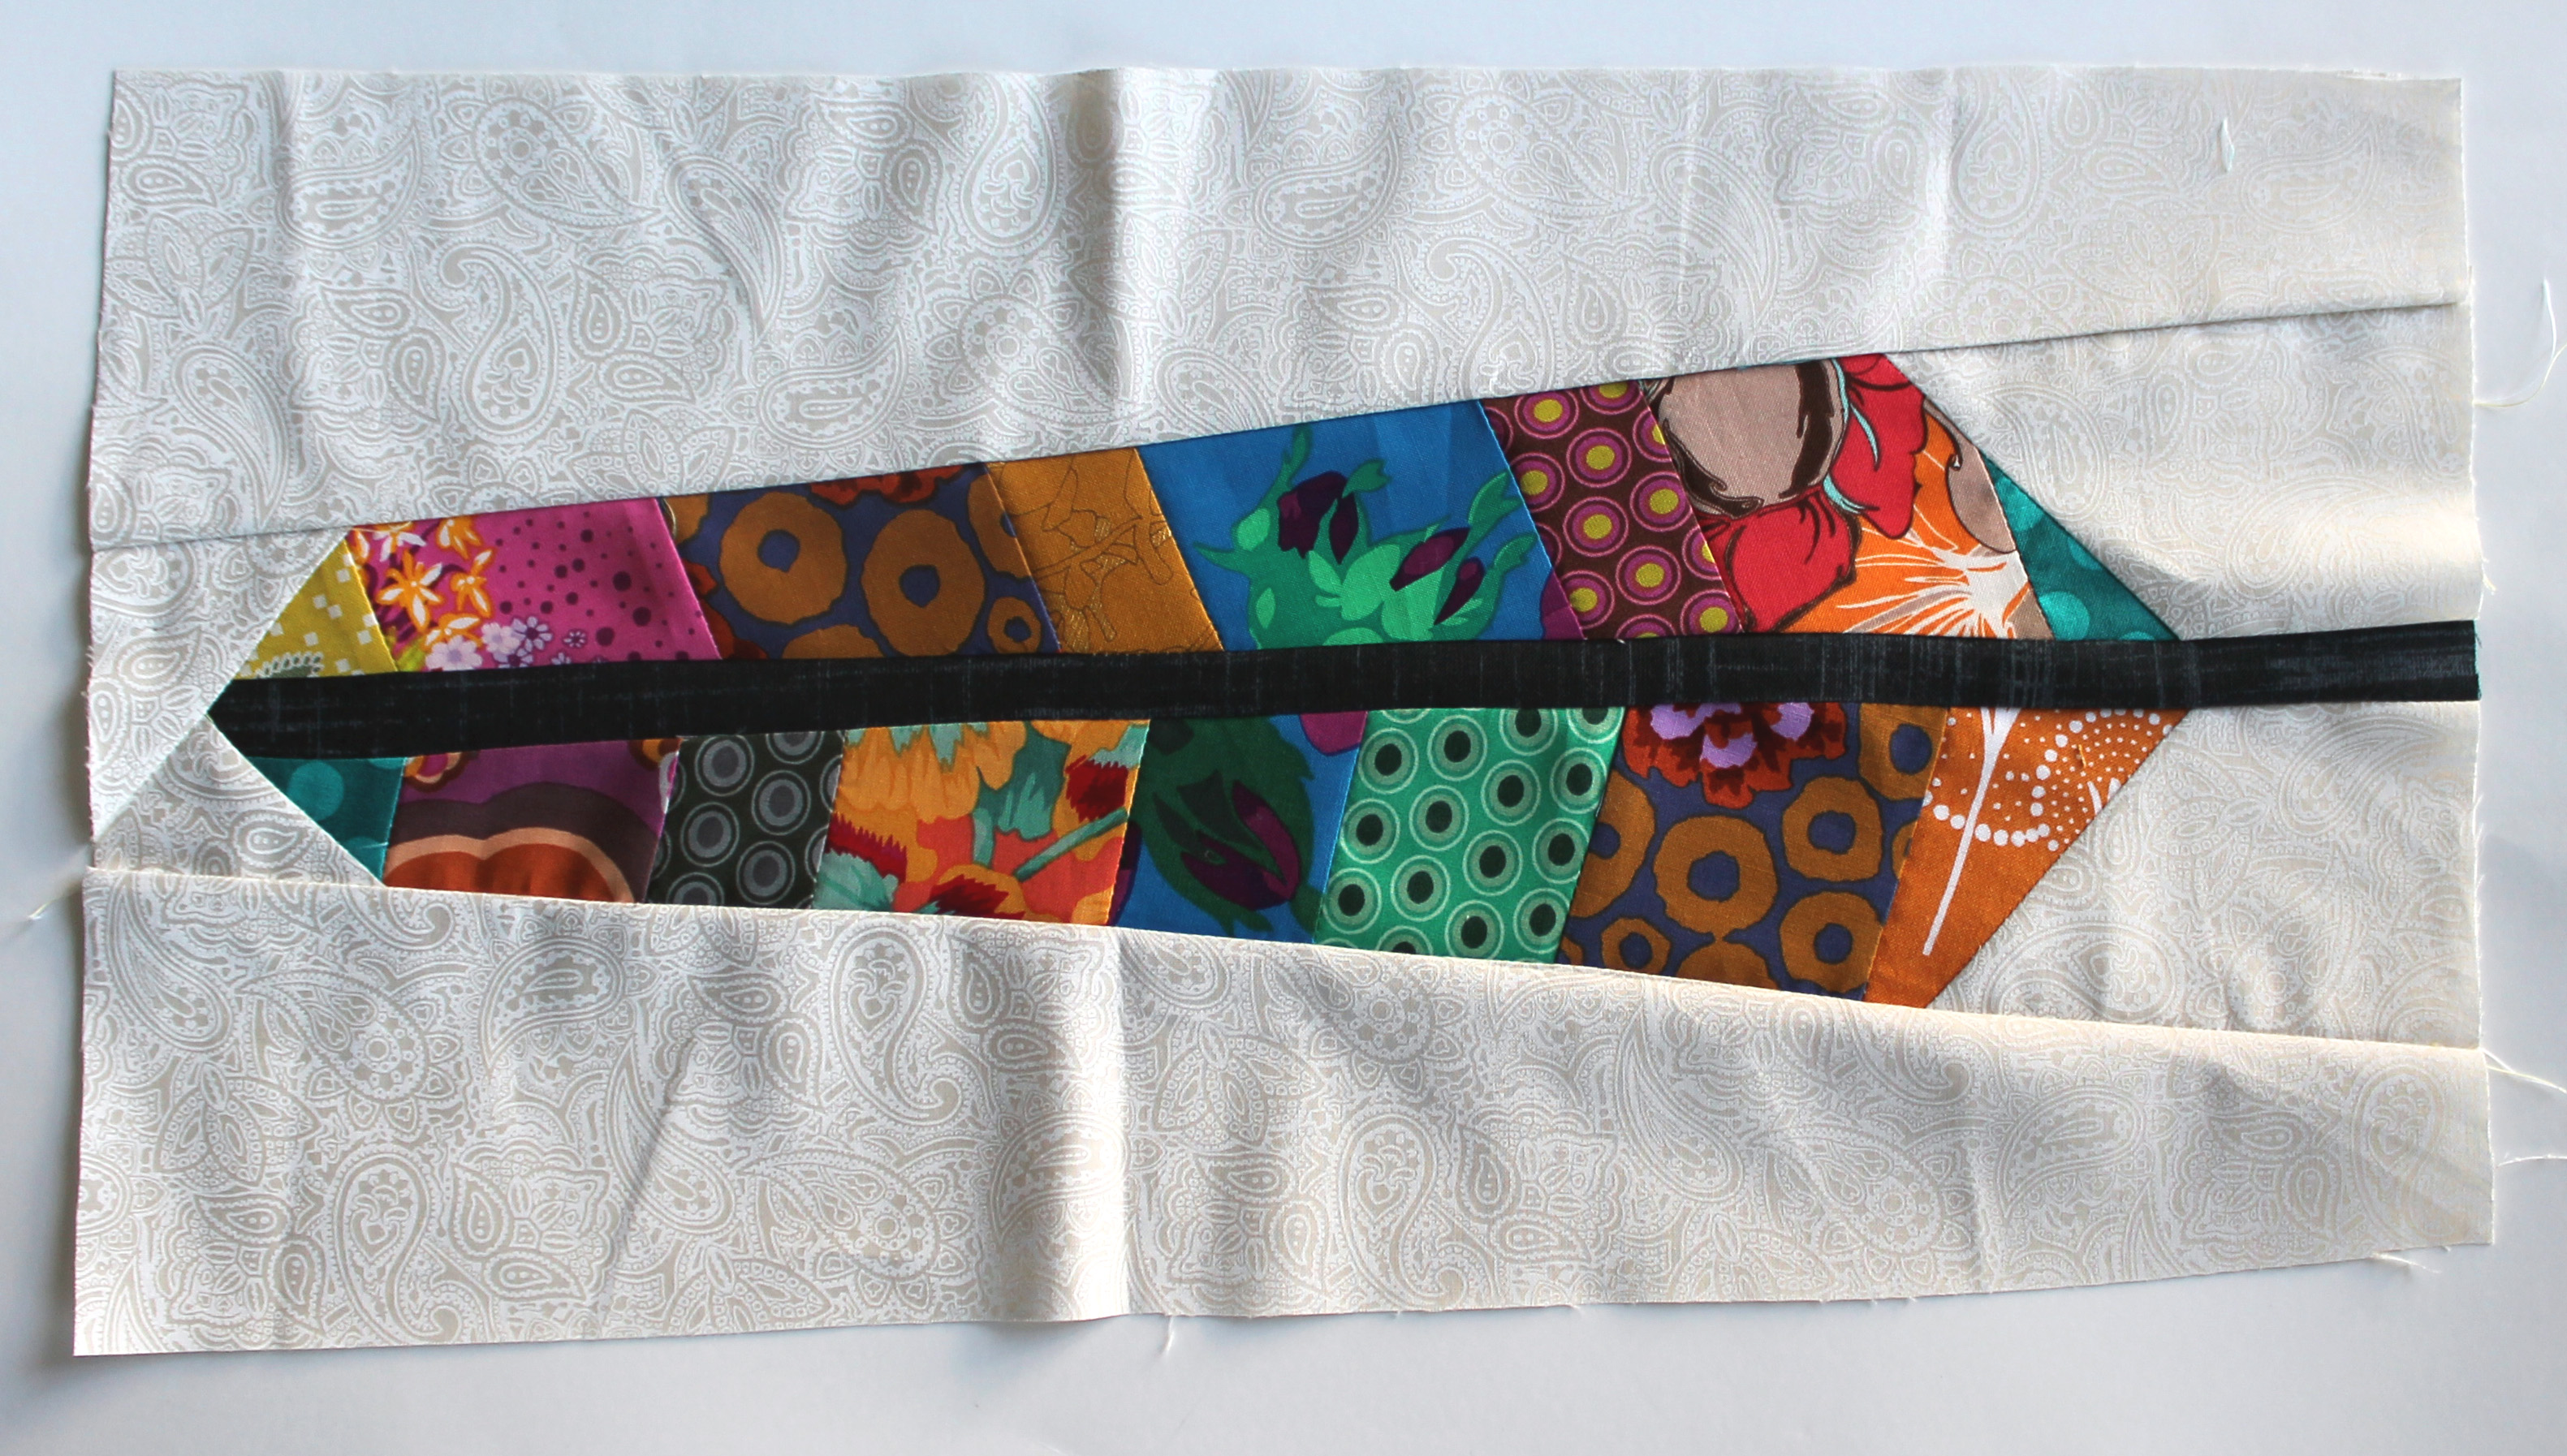
For every block 1 you make you will need a Block 2:

mini charm block 2

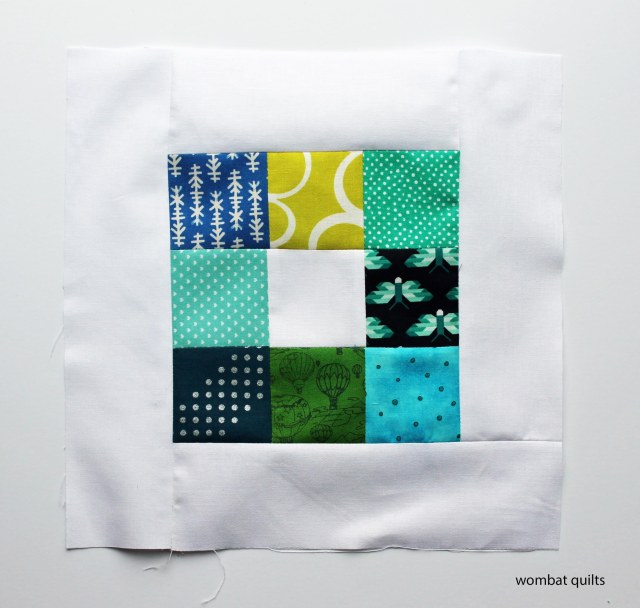
For this block you will need:

block 2 cut instructions

Please note that I made a mistake with this photo, so follow the words not the picture and make sure you have two strips of 2 1/2 x 8 1/2 inches.

Both finished blocks should measure 10 1/2 inches square unfinished… trim blocks as needed.  Make as many blocks as you need to get the sized quilt you want.  My quilt on Friday was 60 x 70 inches finished  and there were a lot of hands making blocks for this quilt, which made it a quick process.

Elizabeth Hartman quilt detail

A Bee Block for July…

So June has been a crazy month.  If you want to know what I have been up to you can check out this post by Living Room Real Estate… here is a hint… it involves fabric and kids…

modern-domestic-fabric-portland-7

But in between classes I have manged to get some sewing done… and have spent my precious free hours this week finishing my Quilts for Pulse quilt top (which I will blog this week I promise) and testing blocks for the Do Good Stitches bee.  This month I am setting the block for the group and I finally decided on this beauty…

flower block

The pattern is a free pattern from Cloud Nine called The Amsterdam Quilt.
The pattern is for 12 of these flowers but I need my Bee members to make just two of the flowers, so I have broken down the pattern to outline making just one flower so here goes…

fabric for one block

For one flower you will need:

Two (2) x 4 1/2 inch squares for the top of the flower
One (1) x 4 1/2 inch by 8 1/2 inch rectangle for the bottom of the flower
Two (2) x 5 inch green squares for the leaves
Two (2) x 5 inch squares of white for the background
Two (2) x 2 1/2 inch white squares for the flower top
Two (2) x 2 inch white squares for the bottom edges of the flower
One (1) x 1 inch by 8 inch brown rectangle for the stem

Construction is pretty simple.  I started by marking a diagonal line down the middle of all the white squares using my trusty Frixon pen…

line marking

The squares will form the corners of the flower top and bottom.  You need to make sure that you are making a mirror image when you sew them to the flower top pieces and the bottom section…

mirror image

I then sewed down my marked line..actually I sew just a hairs width on the outside of the line as it seems to give me a more accurate corner…

corners

The top piece is then completed by sewing the two 4 1/2 inch squares together to create a white V in the center of the top…

flower top

I then used the same technique to sew the 2 inch squares to the bottom of the flower section..  Then onto the leaves, where you are making four (4) half square triangles using the green and white 5 inch squares…

trim leaves

There is quite a bit of wiggle room with the HST’s so you can easily trim them to  4 1/4 inches square.

leave construction

You end up with four half square triangles that are then sewn together to make the leave sections..  The flower pieces then go together quickly and easily, as per the instruction sheet.

For my Bee flowers I have requested bright/jewel coloured flowers.  I want the flowers to be bright and happy and I have limited each flower to one busy novelty print and one more graphic colour as I did not want the flowers to be too insane… it was hard as I love my novelty prints but top and bottom busy novelty prints was just a little too much for even me!

finihsed flower blocks

I think this is going to be an fabulously bright and cheerful quilt when done.  I love how easy to make these blocks were…and just warning they are a little addictive.

Tackling some challenging blocks

Things came to a crunch this week with some very over due Bee blocks that could no longer be ignored, no matter how hard I tried.

One of the things I love about doing quilting Bees is that you are challenged, every month, to make different blocks and for me it is a good way to try new, non paper piecing stuff.   This month’s challenges included…

Texan star 2This block is 12 1/2 inches square and was requested as part of the ScrapBeelicious Bee.  When I first looked at the pattern I was a little overwhelmed, but I cut the squares as I was cutting fabric for another quilt and chain piecing made the process less daunting.

scrap bee blockThe pattern, Star Value by Happy Quilting, is perfect for a Bee, because you do not want to be making a whole quilt of these suckers.  The free tutorial also has the calculations to make the block in different sizes from 12 inches up to 28 inches.

Surprisingly, I had a much more harrowing experience making these Bee blocks…

Feather 2The ScrapBeelicious  January block (yes yes I am very very late with this one) challenged us to make the Ann Marie Horner’s Feather Blocks

Feather 1For some reason these were the blocks I had to unpick the most.  The center grey spine of the feather was too short and I struggled with getting the pattern pieces to align.  In the end I just wanted to make a paper piecing pattern to make this sucker… it would have been so much easier!

The last lot of Bee blocks for this week were a simple and fun….

Rainbow starMy February do.Good.Stitches Block was the Starflower block by Ellison Lane. This block was so easy and the pattern makes two blocks at a time… genius!

So I have now done my quota of half square triangles (HST) for the month. For the rest of the month I am only tackling those suckers via paper piecing.