The splodge block…

November is once again my turn to set a block for Do Good Stitches Hope circle. As always I procrastinated and pontificated and finally landed on this block….

I decided to call it the Splodge block. It is an improv log cabin…with most of the precision coming from choosing your fabrics carefully and not from cutting. Here are the steps to making this block…

STEP ONE:

Pull out all your blue, grey and white scraps.

STEP TWO:

Sort your colored scraps. This is a really important step in all scrap quilts and I am going to give you some guidelines for these blocks. This quilt is based on a cool palette and to make the block work you need to weed out some of your scrap because they will muddy the block.

BLUES: For the blues you are going to need dark, medium and light scraps… but in fabrics that are blenders, tone on tones or solids. Any fabric that has colors other than blue needs to go. That means…

You can see from my test block that I still used novelty prints, it is just they were cool prints with no extraneous colors.

GREYS: For your grey you are going to use the same principle as blue – tone on tone or blenders and no extra colors. But with grey there is one extra step.

Did you know that not all grey are the same and that grey fabrics have an undertone to them? This is a color cast that makes grey take on the hue of another color.

Grey can have a blue, green, orange or purple undertone. For this project we want to have cool greys in our block… we want to avoid using the warmer grey because it will muddy the block. A piece or two of the warm grey will not hurt but we want to mainly use the cool grey – the ones with a green, blue or purple undertone.

WHITE: The final pile of scraps to sort is your whites. We are looking for bright whites – solid or prints. In my blocks I have used a few white fabrics that have a bright white background with a cream print on them which have worked well… but we want to avoid cream fabrics if we can. Cream is a warm version of white and can again add warmth to a block if too much of it is used. A random piece is okay though.

You should end up with a curated pile of scraps that you can work with to make these blocks.

STEP THREE:

Start making your improv log cabins. The center of your log cabin is going to be your darkest navy blue fabric.

You can tell from this photo that I do not pretrim anything…. if I need to cut a piece of fabric smaller I use my scissors.

STEP FOUR:

Keep building outward using lighter blues and greys as you move out from the center. Once the log cabin has started I do press as I add new pieces and I do trim the block….
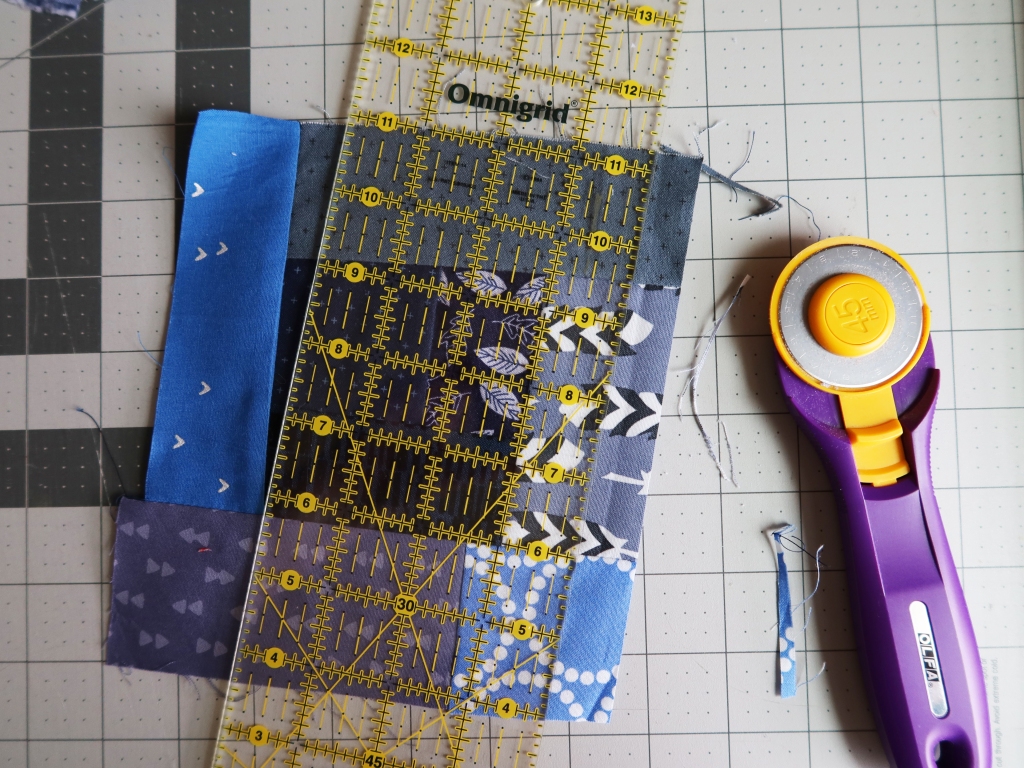
…and when I say trim I mean I use a rotary blade and ruler to get a straight edge but I do not square anything up or check that anything is even. I just want a straight edge to sew my next strip too.

As you progress, I encourage you to make “logs” for your log cabin by sewing smaller pieces of fabric together to make your own strips.
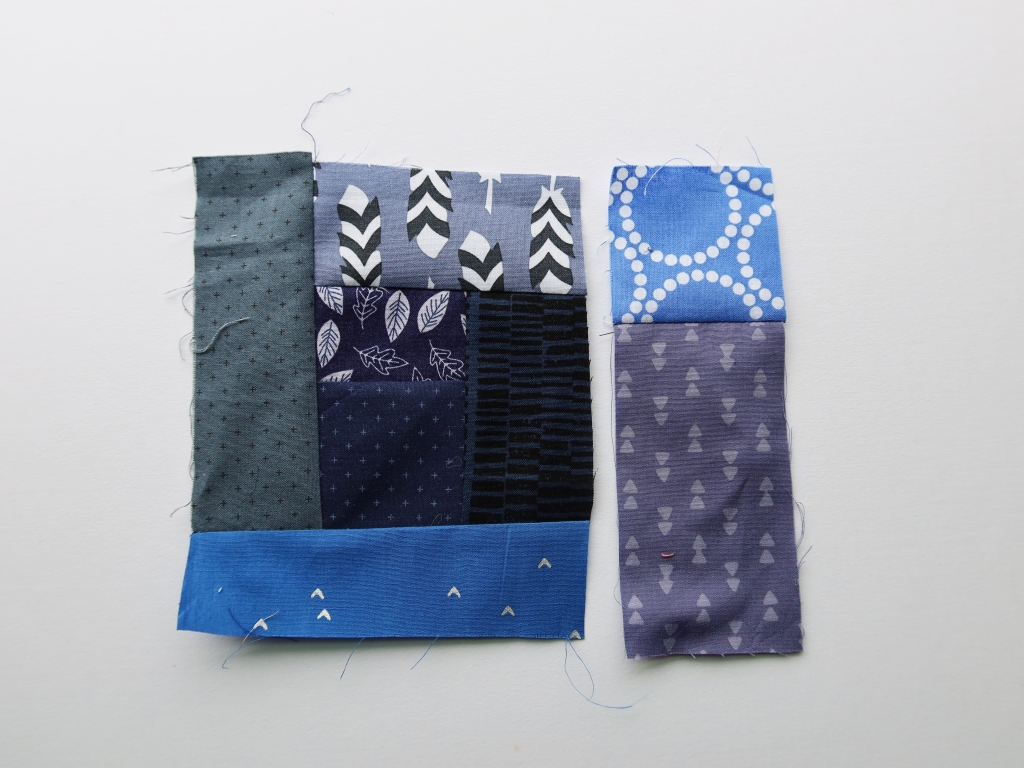
These custom made strips are a great way to break up the traditional log cabin structure and give the block a more improv feel. They are also how the block becomes a splodge of color and not just a square of color.

STEP FIVE:

Keep building your log cabin out until you have a piece that is just larger than 12 1/2 inches square. You want to make sure the your last logs are white and/or light grey…you need a white frame around your splodge.

Once you have a large enough improv log cabin give it a final press and if you have starch (eg. Best Press) use it liberally at this stage to get your block to lay as flat as you can.

STEP SIX:

Using your 12 1/2 inch ruler trim your block to it’s finished size.

Note your splodge does not need to big. In my first block the blue splodge took up most of the block…while in this block there is a smaller lot of blue. You can make your splodge as big as you want….have fun….let go….play.

FINALLY:

When I go to put this quilt together I decided I wanted to use filler blocks to give the splodges room to breath. These filler blocks are being made using just light grey and white fabric with the occasional blue or darker grey spot.

They are 12 1/2 inch by 6 1/2 inches unfinished and will allow me to layout the finished quilt in a irregular pattern…. the splodges will not all be neatly lined up but rather scattered around the quilt.

So there you have it… the splodge block. I am looking forward to seeing how my fellow DGS peeps interpret the splodge…and really looking forward to putting this quilt together.

It is not easy being green…

First of all I want to thank everyone who reached out to me after my last post. I was scared to post about what was going on with me personally but you all made me feel so loved and supported… thank you… you may have even made my mum tear up a bit.

Now onto the business at hand… quilts.  Today I am sharing a recent Do Good Stitches finish.  This one was a simple block that chose for the Bee… you can see directions on making it here

DGS green quilt

This quilt top came together quickly, once I had received all the blocks from my fellow DGS peeps…

green quilt detail 3

I want to use the palette I selected for this project again… but this time I want to just use the colors with no white…it is such a fresh color scheme and I want to really get the citron to pop.

CW_MoodBoardMonday_BluesGreens

On Pinteres I have a whole folder full of color schemes and I love taking inspiration for how other people put together palettes… particularly when I am having a color block (which is a quilters equivalent to writers block).

green quilt detail

I also find it easy to point my fellow quilting bee mates in the direction of a color palette when setting a block for them to make…. and so far the results have been spot on.

green quilt detail 4

I got a wonderful mix of colors back from my team and also a variety of tones… does anyone else use other peoples colour palettes?

green quilt detail 2

I had fallen a little behind with my Do Good Stitches finishes so this quilt got an all over stipple… thanks to my darling friend Sam Hunter… and a Martha Stewart sheet for the back…

quilt back

This quilt has already headed to the local PICU and is hopefully giving a warm Quilty hug to someone.

Quilt Details:

Block:  12 inch Double T block
Made by: DGS Hope Circle
Fabric:  Green, turquoise and citron scraps
Finished size:  48 x 60 inches

The weather has finally co-operated…

After some miserable weeks of rain here in Portland it has recently fined up enough for me to drag Mr Wombat out and about to photograph some quilts.  It used to be much easier when I hung the quilts on the back fence, but not as much fun.   The first of the recent quilts I am going to share is a Do Good Stitches finish….

double cross quilt

You might recognize the block as I shared the details for making the double plus block in November and if you are interested you can find the pattern here

pinkies close up

It is a fun block and a real scrap buster…and my fellow Do Good peeps did a great job with their Double Pluses.   Mr Wombat was also on good pinkie form don’t you think?

double cross quilting

In true scrappy form it is full of fussy cut goodness and fun bright colors… and is wonderfully gender neutral I think.  I do love my charity quilts to be cheerful and worthy of a good game of I spy.  I was talking to a friend today about stashes and I realized where other people (aka. grown ups)  go for simple blenders, I will always go for a novelty print if I can.

double cross detail 4

The quilt was quilted and bound by one of the fabulous PMQG members.  Our Charity program receives quite a few quilts from different Do Good Circles (or Bees), and each one is sent to our local Pediatric Intensive Care Unit.  Every month or so we send to the hospital between 15 to 30 quilts… some of them are panel quilts but most of them are beautiful handmade masterpieces.

double cross detail 5

I am constantly in awe of the people of my quilting community and the wonderful work they do.  I have always made charity quilts – it has been my passion/obsession for over 20 years… but I never expected so many people to jump in so enthusiastically and help out.  I am constantly speechless at the generosity I see.   There is such good in the world.

double cross detail 3

Quilt details:

Pattern:  12 inch Double Plus block
Fabric:  Scraps…nothing but scraps.
Quilt Size:  48 x 60 inches

It is time for another Bee Block….

Ah yes it is that time again… I am setting another block for my fellow Do Good Stitches gang… and this month snuck up on me so I have resorted to a variation of an old faithful….the wonky star…

dgs wonky star

For this 12 inch block I used:

  • Fifteen (15) low volume 3 1/2 inch squares
  • One (1) black/dark grey 3 1/2 inch square
  • Eight (8) black grey triangles – I used scraps but you can cut a 3 inch square in half to make the triangles.

Step one is to make the star points:

To make the star points you will need 4 of your low volume squares and your triangle pieces.

step 1


Take one of the squares and sew a triangle onto one corner, making sure the pattern sides of your fabric are together and when the triangle is flipped it covers the corner of your square.


step 2


Next trim the excess low volume fabric from the corner and press the triangle over into place.


step 3


Then add another triangle of fabric to the other side of the square…. sew it down … trim the excess low volume fabric and press over.


step 4


Your next step is to trim your block back down to 3 1/2 inches square.


step 4a


The back of your block should look like this…. now repeat the process until you have 4 star point sections.


block layout

Step Two:

Lay out your block as illustrated….

sewing block together


Step Three:

Sew the block together in rows… then sew the rows together to make a completed block.


What I love about this block is that has built in negative space which allows for you to stagger the stars layout when putting the quilt top together.  You can also make a couple of blocks that are just low volume squares (no star) to break up the layout of the quilt.

In the coming months I will have two different variations of this quilt to show you, as I also used this block recently at out Guild charity sew day.   For the sew day we used a rainbow of solids and a white star which gave us a really fun bright quilt.  If you want to see a work in progress shot of that quilt head over to my Instagram account.

Mini Charm Square block

After I posted the scrappy quilt on Friday I had several requests for a  link to the block pattern, which was hard to do becauseI had not followed a pattern.  I had been inspired by some log cabin blocks I had seen and some quilts I had seen on the internet and so worked out the math and then did a step out for our charity sew group.

So on the weekend I photographed the steps just in case you want to play with your own pile of mini charm squares.  There are two blocks that make up the quilt…

Block One…

mini charm block 1

For this block you need:

mini charm block 1 cut instructions

When making these blocks I sew the mini charm squares into strips first…

block 1 construction

The block is then put together as a log cabin block would be… adding the smallest strip to the side and working my way around.  If you are using mini charm squares cut by manufacturers be aware that they do come in slightly different sizes… some cut with. straight edge and some cut with a crimped/pinked edge.  The squares with the zig zag edges can be slightly larger than 2 1/2 inch.  If in doubt trim your mini charm strips to get a clean sewing edge.

For every block 1 you make you will need a Block 2:

mini charm block 2

For this block you will need:

block 2 cut instructions

Please note that I made a mistake with this photo, so follow the words not the picture and make sure you have two strips of 2 1/2 x 8 1/2 inches.

Both finished blocks should measure 10 1/2 inches square unfinished… trim blocks as needed.  Make as many blocks as you need to get the sized quilt you want.  My quilt on Friday was 60 x 70 inches finished  and there were a lot of hands making blocks for this quilt, which made it a quick process.

Elizabeth Hartman quilt detail