The splodge block…

November is once again my turn to set a block for Do Good Stitches Hope circle. As always I procrastinated and pontificated and finally landed on this block….

I decided to call it the Splodge block. It is an improv log cabin…with most of the precision coming from choosing your fabrics carefully and not from cutting. Here are the steps to making this block…

STEP ONE:

Pull out all your blue, grey and white scraps.

STEP TWO:

Sort your colored scraps. This is a really important step in all scrap quilts and I am going to give you some guidelines for these blocks. This quilt is based on a cool palette and to make the block work you need to weed out some of your scrap because they will muddy the block.

BLUES: For the blues you are going to need dark, medium and light scraps… but in fabrics that are blenders, tone on tones or solids. Any fabric that has colors other than blue needs to go. That means…

You can see from my test block that I still used novelty prints, it is just they were cool prints with no extraneous colors.

GREYS: For your grey you are going to use the same principle as blue – tone on tone or blenders and no extra colors. But with grey there is one extra step.

Did you know that not all grey are the same and that grey fabrics have an undertone to them? This is a color cast that makes grey take on the hue of another color.

Grey can have a blue, green, orange or purple undertone. For this project we want to have cool greys in our block… we want to avoid using the warmer grey because it will muddy the block. A piece or two of the warm grey will not hurt but we want to mainly use the cool grey – the ones with a green, blue or purple undertone.

WHITE: The final pile of scraps to sort is your whites. We are looking for bright whites – solid or prints. In my blocks I have used a few white fabrics that have a bright white background with a cream print on them which have worked well… but we want to avoid cream fabrics if we can. Cream is a warm version of white and can again add warmth to a block if too much of it is used. A random piece is okay though.

You should end up with a curated pile of scraps that you can work with to make these blocks.

STEP THREE:

Start making your improv log cabins. The center of your log cabin is going to be your darkest navy blue fabric.

You can tell from this photo that I do not pretrim anything…. if I need to cut a piece of fabric smaller I use my scissors.

STEP FOUR:

Keep building outward using lighter blues and greys as you move out from the center. Once the log cabin has started I do press as I add new pieces and I do trim the block….
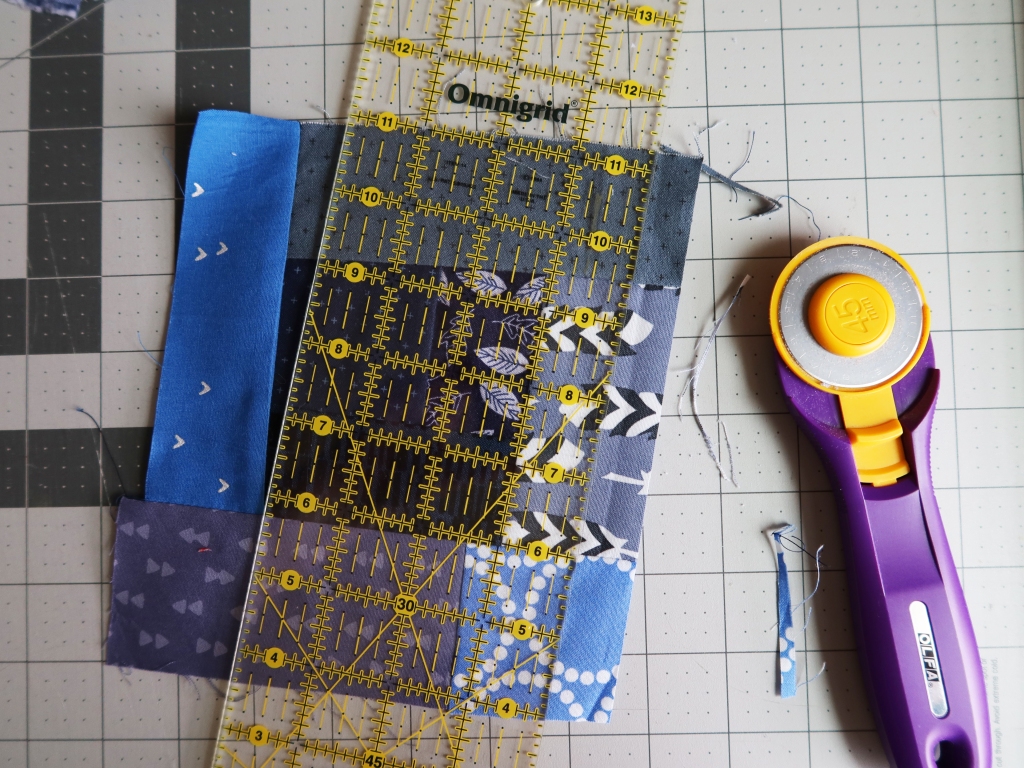
…and when I say trim I mean I use a rotary blade and ruler to get a straight edge but I do not square anything up or check that anything is even. I just want a straight edge to sew my next strip too.

As you progress, I encourage you to make “logs” for your log cabin by sewing smaller pieces of fabric together to make your own strips.
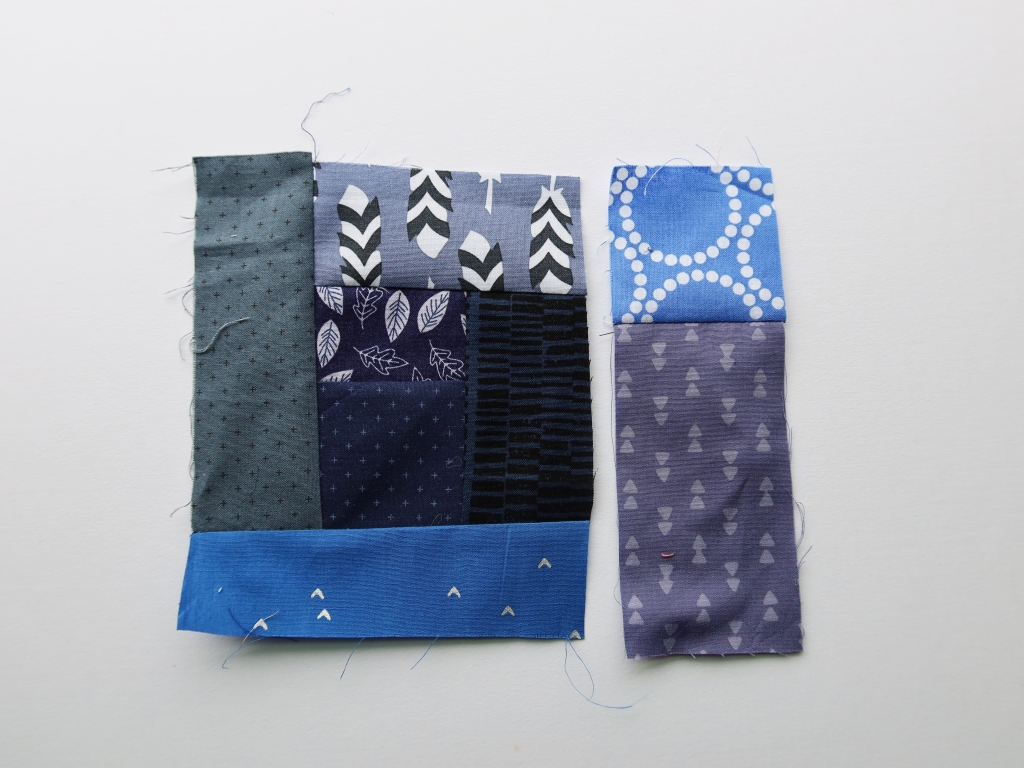
These custom made strips are a great way to break up the traditional log cabin structure and give the block a more improv feel. They are also how the block becomes a splodge of color and not just a square of color.

STEP FIVE:

Keep building your log cabin out until you have a piece that is just larger than 12 1/2 inches square. You want to make sure the your last logs are white and/or light grey…you need a white frame around your splodge.

Once you have a large enough improv log cabin give it a final press and if you have starch (eg. Best Press) use it liberally at this stage to get your block to lay as flat as you can.

STEP SIX:

Using your 12 1/2 inch ruler trim your block to it’s finished size.

Note your splodge does not need to big. In my first block the blue splodge took up most of the block…while in this block there is a smaller lot of blue. You can make your splodge as big as you want….have fun….let go….play.

FINALLY:

When I go to put this quilt together I decided I wanted to use filler blocks to give the splodges room to breath. These filler blocks are being made using just light grey and white fabric with the occasional blue or darker grey spot.

They are 12 1/2 inch by 6 1/2 inches unfinished and will allow me to layout the finished quilt in a irregular pattern…. the splodges will not all be neatly lined up but rather scattered around the quilt.

So there you have it… the splodge block. I am looking forward to seeing how my fellow DGS peeps interpret the splodge…and really looking forward to putting this quilt together.

More improv…

So this week’s quilt uses a technique similar to last weeks but gets a very different looking quilt… which I love.

Like last week this quilt uses a foundation, this time a navy blue 5 inch square, and uses scrap strips…. but this time I used just warm solids and a band of white.

Also this block’s component adds fabric to two opposite sides of the foundation…last weeks only added fabric to one side of the foundation. The result is a tighter collection of diamonds on the quilt and the navy foundation feels more like sashing.

As you can tell I used a variety of different shades of blue for the foundations…mainly because I was using up scraps… but I love how the variety gives the quilt some depth and interest.

The backing of this quilt was one of my favorite sheet – a London themed Whim sheet. I have been using sheets for a few years to back quilts and love Martha Stewarts “Whim” line that Macy’s stocks. I actually bought two of the London sets and are hoarding the last of it for a special quilt that I have planned.

This quilt has also already headed out to Dornbecher PICU… I will eventually catch up and be showing quilts before they head out into the world, I promise!

The pinkies will, of course, have the final word…..

Quilt Details:

Blocks: Improv diamond using 5 inch foundation

Fabric: Variety of Kona solid scraps

Size: 54 x 63 inches

Wonky Circles tutorial

February is my month again to set the block for my Do Good Stitches Circle.  After setting some more precision based blocks for my last two times out, I decided to go the wonky route this month…

finished wonky circle block

Yep I am asking my fellow Bee mates to make some wonky circles using a low volume palette.  To help out I am taking them (and you) step by step through the process to make two 12 inch blocks, starting with fabric selection.

For each block segment you will need two fabrics that have a small amount of contrast in them.   My colour scheme for this quilt is warm so I am using yellow, apricot, pink and a touch of grey.  For my fabric pull I went with predominantly cream and white background fabrics…

low volume background fabrics

and for the contrasting fabric I choose more solid low volume fabrics…

darker lv fabric pull

For each block you need 8 different fabric – four light and four darker (note: you actually get two different finished blocks from this process).  I selected my eight fabrics in pairs, making sure that there was a contrast between each pair.  If you are not sure how the fabrics are reading against each other you can always use the black and white setting on your camera or phone to see how things look…

bw block

Now for the fun part…making the blocks.

Step 1.  Cut out eight 7 1/2 inch squares from each selected fabric…  Take two of your contrasting fabric squares and align them on top of each other.

align two squares

Step 2.  Using your rotary cutter, cut a curve shape out of your squares… making sure that you leave at least an inch or so between your curve and the edge of your block.

wonky curve cut

Step 3.  Because you cut the two pieces of fabric together your background and center curve pieces should match exactly, no matter how wonky the curve you cut is.

Put together one of your fabrics as the background and the other as the center curve, making sure that they are as closely aligned on your cutting mat as you can get them.

Take a ruler and place it corner to corner across your block pieces.

find center of block

Step 4.  Using a chalk pencil or Frixon marker, mark the center of the block, making sure your mark across both pieces of fabric.

mark center of block

Step 5.  Place your pieces of fabric face together, using the center mark to align the pieces…

center mark

Step 6.  Pin your two pieces of fabric together at this center point… your fabrics should still be face together and the bottom corners of the block should be roughly aligned.

pin center of block

Step 7.  To sew the pieces together, begin at the center part of the block… where you have pinned.  I put my machine foot down on pin, remove the pin, lower my needle manually and I am ready to sew.

start of curved piecing

Step 8.  Slowly sew from the center point out to one edge of the circle block, nudging fabric into alignment as you go.  The fabric may not want to lay flat and that is okay… just try to avoid sewing creases into the block.

Note:  I always sew with my machine in the needle down position, as it allows me to stop and adjust the block pieces as needed, without the risk of anything slipping or moving.


sew curve

Step 9.  As you are sewing you will notice the block ends do not align, this is okay…do not panic.

finishing the curve

Step 10.  When you have come to the end of the block, lift your needle, cut your thread and re-position your block back in the center, this time sewing the half of the block you have not done.

center of curve

Step 11.  Your block segment is now ready for pressing… an important step because it will not be laying flat at all and you will have to iron it into submission…

sewn block piece

Step 12.    When pressing my block I press my seams first from the back side of the block…… and then press the front side of the block, making sure that my curve is sitting as flat as I can get it.

Note:  When pressing the block I always use starch as it helps persuade the fabric to do what I need it to do.

press block piece

Step 13.  The block piece is now ready to trim down 6 1/2 inches… you should have a bit of wiggle room with this block to trim a little off kilter, or with more background or more circle, depending on what you want to do.

trim block

Step 14.  Repeat the process until you have all segments of your blocks done.  For each colour pairing you make you will end up with two blocks….

block pieces

For my Bee blocks I am asking for two (2) 12 1/2 inch unfinished blocks…. laid out with alternating light and dark circle pieces.

blocks layout

What I love about this colour palette is that it compliments the wonky so well… the mismatch, strange curves are subtle, there are no stark contrasts drawing your attention to the off kilter shapes.   I think this is going to be a charming quilt when done.

A little creative play…

After weeks and weeks of working on just old WIP’s I found I was going slightly crazy. It initially seemed like a good idea to spend January and February finishing up old projects and not starting anything new but this week I discovered the down side…I was bored and creatively stunted.

My solution was to pull out my large pile of low volume scraps…

scrap pileand to start making some improv blocks…

low volume improv blockI love how freeing this process is. I usually start by sewing similarly sized pieces together into strips of various sizes…

improv processI then just go with the flow…I will grab a piece of fabric I like or a colour I want to use….

improv process 2The joy of these blocks is that anything goes.  My finished blocks are 12 inch (12 1/2 with seam allowance) but they can be any size you want.  There is no right or wrong way to do things with these blocks….  there is no measuring, no patterns just play….pretty pretty play.

low volume improv wipI am now heading back to finish up quilting another WIP…but when I need a break I will be making some more of these fun blocks.    So how do you get your creative groove going when you are in a rut?