100 Blocks seems like a lot…

Last year I attempted to take part in the 100 days 100 blocks quilt along. I started out strong posting 4 blocks on four consecutive days on Instagram then life got in the way…

100 block 1

I had not attempted a Quilt Along (QAL) before… it is not that I am not a joiner, I just do not do well with enforced schedules….

block 29

I do love the idea of being given a structure to work to but trying to make a block a day can be a hard practice to get into….

block 12

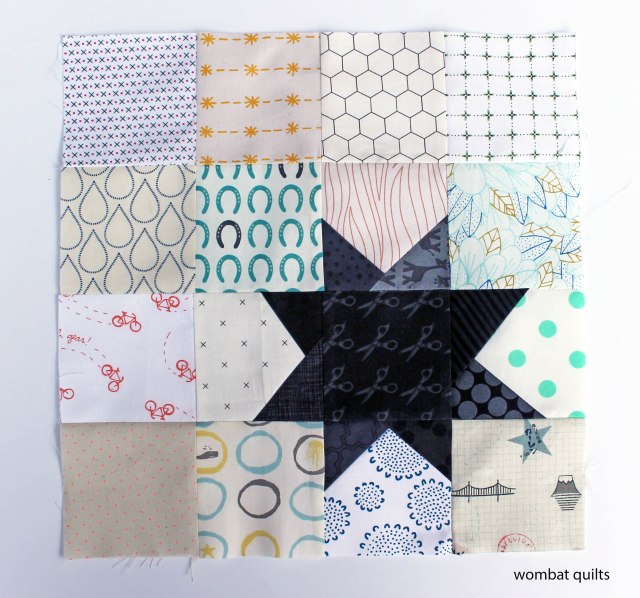
I have made a quilt using Tula Pink’s 100 Blocks book before.  I did not make all the blocks the first time and it was the same this time…

block 4

There are some blocks in the book that I look at and think life is too short….

block 13

But since the quilt along finished I have been making a block here and there….

block 11

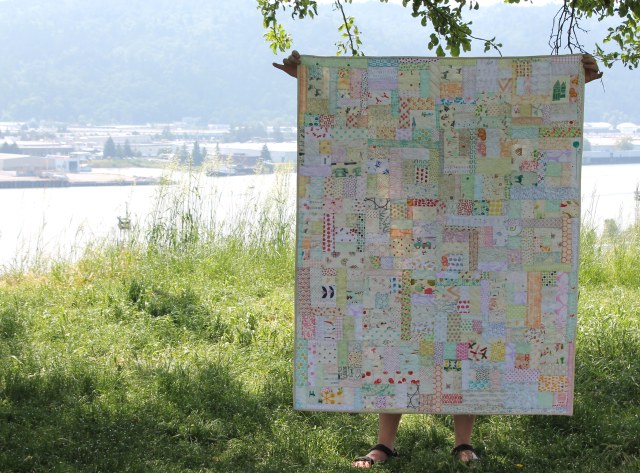
I am now up to 48 blocks which is enough for a quilt I think….

block 2

I am not sure what I will do with them… actually, if I am honest,  I am not sure where I have stashed them at the moment…

block 23

I put them somewhere safe and I can not find them…

block 3

Do not judge me… things got a little crazy a few months ago when our teenager moved back in with us…

block 26

and my stash and bits had to be hauled out of the spare bedroom…

block 22

I think this may be the one and only QAL I do… it will take an extra ordinary project to make me want to repeat this experience…

block 15

How do you feel about quilting along?  Have you done any?  What was your experience? Any tips?

It is time for another Bee Block….

Ah yes it is that time again… I am setting another block for my fellow Do Good Stitches gang… and this month snuck up on me so I have resorted to a variation of an old faithful….the wonky star…

dgs wonky star

For this 12 inch block I used:

  • Fifteen (15) low volume 3 1/2 inch squares
  • One (1) black/dark grey 3 1/2 inch square
  • Eight (8) black grey triangles – I used scraps but you can cut a 3 inch square in half to make the triangles.

Step one is to make the star points:

To make the star points you will need 4 of your low volume squares and your triangle pieces.

step 1


Take one of the squares and sew a triangle onto one corner, making sure the pattern sides of your fabric are together and when the triangle is flipped it covers the corner of your square.


step 2


Next trim the excess low volume fabric from the corner and press the triangle over into place.


step 3


Then add another triangle of fabric to the other side of the square…. sew it down … trim the excess low volume fabric and press over.


step 4


Your next step is to trim your block back down to 3 1/2 inches square.


step 4a


The back of your block should look like this…. now repeat the process until you have 4 star point sections.


block layout

Step Two:

Lay out your block as illustrated….

sewing block together


Step Three:

Sew the block together in rows… then sew the rows together to make a completed block.


What I love about this block is that has built in negative space which allows for you to stagger the stars layout when putting the quilt top together.  You can also make a couple of blocks that are just low volume squares (no star) to break up the layout of the quilt.

In the coming months I will have two different variations of this quilt to show you, as I also used this block recently at out Guild charity sew day.   For the sew day we used a rainbow of solids and a white star which gave us a really fun bright quilt.  If you want to see a work in progress shot of that quilt head over to my Instagram account.

Another low volume finish…

In my work room I have a box that I throw all my low volume scraps into as I am working.  This box fills up pretty quickly, not surprisingly with all the quilts I have my hands in/on and every time it gets to the point where it is over flowing I make a Scrap Vortex quilt…

low volume scrap vortex 2

This is my second one of these quilts I have made and I really do love how they turn out…. you can see my first version here… and with both these quilts I have struggled to get good photos.

quilt detail 3

they really are just an excuse for me to throw in as much fussy cutting goodness as I can… which makes for the best game of I spy…

quilt detail 4

plus this was a fun break for me from the complex butterfly blocks I have been making….

quilt detail 2

This finished quilt is already in the hands of the local PICU for some kid to snuggle under.

Quilt Details:

Block:  12 inch Scrap Vortex technique by Crazy Mom Quilts
Fabric:  Various low volume scraps
Finished quilt size:  48 x 60 inches

A special selection…

It has been quite a while since I have posted photos of some of the charity quilts that members of the Portland Modern Quilt Guild have made, so I hope you will indulge me as I share some of the recent projects…

trip around quilt

First up is a scrappy trip along top… the blocks and extra fabric was donated to the Guild by the wonderful Elsa and all I had to do sew the blocks together and make the back….

trip around quilt detail 3

We put this top on the long arm at one of our Charity Sew Days and a number of people had a blast quilting flowers all over it….

quilt back

And for the back of the quilt I pieced together the left over fabric and a few extra fat quarters and viola…

Bernstein bears quilt

Another donation to the Charity program was a couple of charm packs of fun Bernstein Bear fabric, which were easily turned into disappearing nine patch blocks…

Bernstein bears quilt detail

This fabric is so fun and bright not to much was need too make a fabulous kid friendly quilt…

orphan block quilt

And it would  not be a Charity quilt showcase without some orphan block quilts starting with this fun number.

orphan block quilt detail

I love all the quilting on this quilt….each block has a different pattern but all the pattern use straight lines.

orphan star quilt

And last but not least is this orphan block quilt that one of our wonderful members, Juline, put together.  I love Juline’s use of negative space with this quilt… she made a handful of similar blocks into a wonderful modern quilt.

I will try and get some photos of our group quilts up in the next couple of days as well, if the Portland weather permits.


A blue finish

This week I managed to get my sister in laws quilt finished, photographed and posted.  It took me way longer than I hoped, but I am glad it is finally on its way to sunnier climes.

Christines finished quilt

The quilt was too long to be photographed in my usual spot so I took it out to the local park and hung it on the fence around the baseball practice area.  It was a little to wet and muddy to get more creative but I liked the location change-up.

christines finished quilt 2
The blocks for the quilt were made using the “Trip Around” technique and tons and tons of blue solids.  If you are interested you can read more about the initial design process here.

quilt detail

For the quilting I was originally just going to do straight line stitching in on diagonally on the quilt in one direction.  It made the quilt feel like the water was flowing in one direction, which I loved.  I then had the brilliant idea to add ten lines of quilting diagonally opposite to the flow to represent the ten years that my sister-in-law has been married…the ten years where her path has intersected with someone else. Okay I was being really sentimental and mushy and I will stop now!

backing and binding

I backed the quilt with the perfect print from Lizzy House’s “Constellations” collection and hand bound it with a variety of dark solids.  I am hoping that Christine loves this quilt as much as I do…