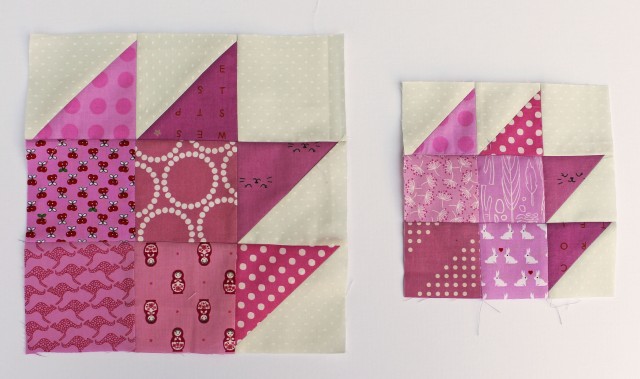
This month I am the setting the blocks for our Do Good Stitches Bee… and I find that it is easier for me to blog the block instructions that to try and do it all on Flickr…. Of all the social media platforms I use Flickr is really the one that constantly surprises me that it has not died yet. It is so clunky and not at all very user friendly for some things. Anyway rant over… here is the blocks.

I went with a simple Bear paw section… I have a ton of little scraps and this seemed like a great way to use some of my precious little bits… I have decided to do the block in two sizes – 6 inches and 9 inches…

And I worked out a way to make both sized blocks at the same time… so here goes….

Cutting Instructions:
Background fabric (we are using low volume or white on white):
5 (five) x 3 1/2 inch squares
1 (one) x 2 1/2 inch square
Colored fabric (we are using bright primary colors):
8 (eight) x 3 1/2 inch squares of various prints
4 (four) x 2 1/2 inch squares of various prints
Step one:
Choose four of the 3 1/2 inch squares and four of the 2 1/2 inch squares for the center part of the block . When I was choosing these fabrics I selected the more interesting fabrics for the center squares (ie. the ones with fussy cuts).
The remaining four 3 1/2 inch squares will make the half square triangles (HST).
Step two: Make the HSTs.

Mark a line down the center of the back side of your background fabric, going corner to corner.
Then mark another line 1/2 inch from that line. These two marks are your sew lines – you will be sewing directly down these lines.

Cut down the middle of your sew lines… you are actually cutting 1/4 inch from the center line. You now have your two HST components.
Press your HSTs (I usually press my seams open).
 Trim each of the HST components .
Your 3 1/2 inch HST will not need much trimming (it should be almost perfect).
There is a bit of wiggle room with your 2 1/2 inch HST so you will have a little bit to trim off.
Remember to use the center diagonal line of your ruler to make sure you are trimming straight.
Step Three: Sew it all together.

Sew your block sections together in rows.
With my blocks I have been ironing my seams open… but you can also nestle the seams. It is up to you.

Then sew your rows together to make your blocks… and trim as needed to the finished size.
Just for fun I have made a couple of tiny versions of this block…

This block finishes at 3 1/2 inches… all the bits are 1 1/2 inches which is a little crazy but also kind of fun. I have been having a blast finding little bits to fussy cut at this size.
I am having a blast with this project. I have actual work sewing to do and I do not want to do it… all I want to do is cut my scraps up into little bits and play.