Back with a block…

After a flurry of online activity, life once again got in the way of blogging but I am back again, this time with a block pattern for my Do Good Stitches circle.  You see in June I am the designated quilter which means I pick the colour scheme and block for my fellow DGS peeps to work with…

I never make this decision easily… I always ‘um and ah’ between a couple of block options… sometimes making test blocks to see what my idea looks like.   This month I settled on the colour scheme quickly…

CW_MoodBoardMonday_BluesGreens

and pulled these fabrics to match from my stash….

fabric pull

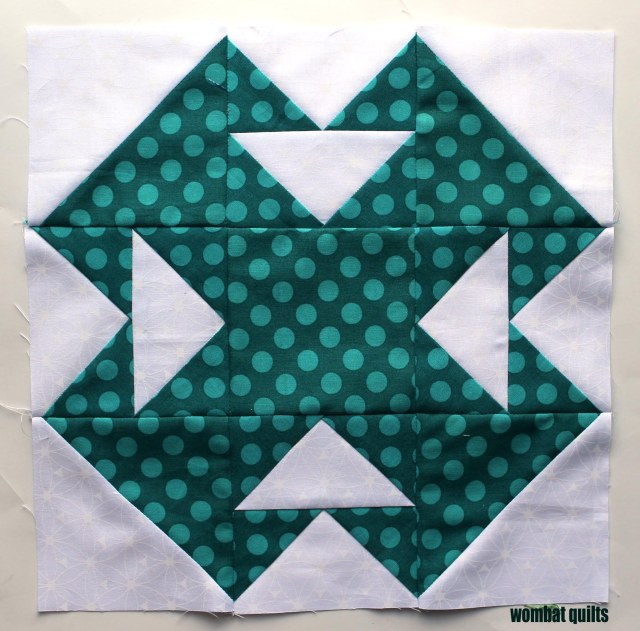
but struggled to pin down what sort of block I wanted to make.  I finally settled on a simple 12 inch block which Is called a Double T and dates back to 1882 I believe e…

finished T block

To make one block you will need to cut:

cutting instructions

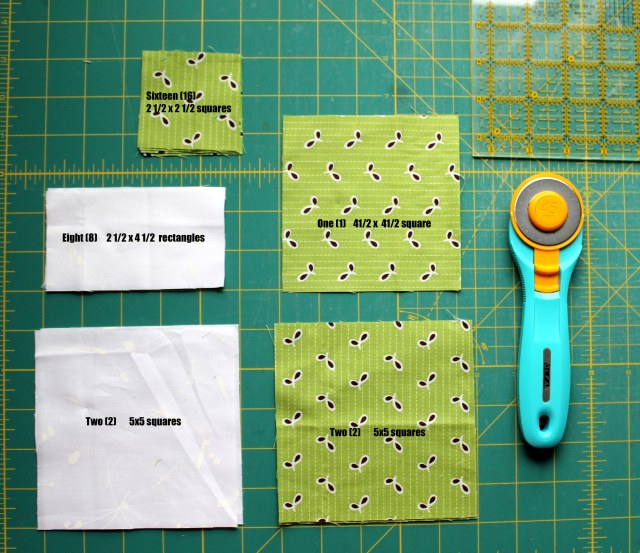
This 12 inch block uses two different types of block components – flying geese and half square triangles (HST).  So lets start with the HST…

For these components you will need the two white 5 inch squares and the two green 5 inch squares.

mark down center

Using a fabric marker (I use my trusty Frixon marker) mark a diagonal line down the center of both the white squares..

Place one white square and one green square pattern side together and then sew down both sides of the center line using a scant quarter inch…

sew down each side

Then cut down that center line using your rotary cutter…

cut down drawn line

You now have two half square triangle pieces….  iron the HSTs with the seams open.

trim block

Then trim your ironed HST to 4 1/2 inches square.  For each block you will need 4 half square triangle components.

Next component is the flying geese…and you can make these one of two ways – either using traditional piecing or paper piecing…  the cutting instructions above are for the traditional pieced version.  If you are paper piecing you can cut a little more generously – say about 1/4 inch more on all the geese pieces.

Lets start with the traditional version…. first mark up all of the 2 1/2 inch squares with the same diagonal line you used in the HSTs.

geese corners

Place the small green squares pattern side down on the corner of your white triangle pieces.  Sew down your diagonal line…

Trim the excess corner fabric off your rectangle and press the green corner up on your block, pressing your seams open…

geese corner 2

Place the second 2 1/2 inch square on the opposite side of your rectangle piece and again sew down the marked line, trim and press seams open.  You will need to make two of these geese blocks for each flying geese component…

flying geese unit

If you would like to use paper piecing to make these components you can download the pattern for these 4 1/2 inch flying geese here… Flying Geese components

paper piecing option

Once you have made your block components lay your block out like this….

block components

I then sew the components together in rows…. and press the seams to the side, making sure that the bulky side of the geese is laying flat.

block rows

I then sew the rows together and viola you have a block…. and in a month or so I should have a collection of blocks from my fellow Do Good Stitches peeps which will become a pretty quilt top.

An emotional finish…

One of the quilts that I recently finished up was one that had been languishing in the WIP pile not because I was bored with it but because I was not emotional ready to deal with finishing it.

The quilt was started in 2015 while I was recovering from surgery after an ectopic pregnancy.  For the last year or so I was not ready to deal with finishing the quilt up… then one day I looked at the quilt top and decided it was time.  I bundled it up and sent it to my friend Kazumi to finish up…

finished star cross quilt 2

The quilt top was made using a paper piecing pattern that I designed…and making the top was a slow and deliberate process for me as I healed.  If you are interested in reading more or using the pattern you can follow the links to my earlier posts.

star cross quilt detail 3

This quilt is our new couch quilt and my new comfort quilt.  I have not kept many of my quilts but this one will be treasured.  I look at it and see all the pain but also all the strength it took to keep going.

cross star quilt detail 2

I also see lots of little treasured bits of my stash, including some fabrics which were bought decades ago when I started quilting.

cross star quilt detail

I am really proud of this quilt… it is not my most creative masterpiece -my most creative quilt to date is my Michael Miller challenge quilt I think – but as I made this quilt piece by tiny piece I stitched myself back together.  I am proud of that.

quilt wrangler

And I could not have done any of it without the support of my wonderful quilt holder and partner in crime.  Thank you Mr Wombat.

Liberty Butterflies

It has been a while since I have done a Paper Piecing Monday post, as I have not been doing as much paper piecing lately…. but this week I started a fun little project…. Liberty Butterflies.

butterfly block 2

Everyday I am making one butterfly, just to so I am keeping my paper piecing skills sharp!

butterfly block 1

The pattern I am using for these darling 5 inch butterflies is a free one from Lillyella… and you can find the pattern for all three of Nicole’s butterflies here...

butterfly block detail

These blocks are a great way to use up some of my little scraps of Liberty… it does not take too much fabric to make a butterfly.

butterfly quilt block detail

I am not sure what I will do with these when I am done but I am sure I can come up with some way to use them all.  You will find the latest butterflies in my Instagram feed if you want to track the projects progress…. now I am off to make today’s butterfly…


Oh no more stars…

After an extended break from paper pieced stars I am now venturing back into familiar territory.  At QuiltCon I ran into an old friend who challenged me to make a special quilt… my response to that challenge will unfold over the coming months….starting with this block…

adventure block 1

This is an adaptation of one of the blocks I did for my pink Snowball quilt (which means you can use this pattern too if you want to make your own version of my fun modern baby quilt).

block pieces 1

You can see I used my tried and tested technique of marking the colour variations on the pattern.  If you want to make your own block, and do your own markings… you can download the free paper piecing pattern here….Adventure Star block 1

Another miniature Paper Piecing Monday

This week I was excited to get my latest delivery of Ava & Neve’s monthly Liberty Club.  Once a month I get a wonderful curated bundle of fat sixteenth’s cuts of Liberty Lawn to add to my slowly growing collection of Liberty.

If you are not familiar with Liberty Lawn it is a beautifully delicate cotton that has been made for centuries by Liberty of London.  What makes this fabric so special is how soft the handle is and how vibrant and varied the prints are.  I have been collecting little bits and pieces (fat eights mainly) for about two years and have a small but pretty collection… and I am loving adding to my stash every month with new prints through the subscription service.

Liberty fabric

So when the latest bundle of fabrics arrived I felt the need to make something immediately with all my little pieces…. so I took one of my old patterns and shrunk it down just a little and started making 2 inch Liberty hearts….

heart block

Lots and lots of two inch Liberty hearts.  What I love about this pattern is that it showcases the fabric so beautifully without taking too much fabric to make…. oh and it is really easy to piece too.

miniture liberty hearts

So if you are interested in making some really small hearts for a project you can find the free paper piecing pattern here….Mini hearts pattern